• Skip to primary navigation
  • Skip to main content
  • Skip to primary sidebar
The DIY Mommy
  • Decor
  • DIY
  • Clean + Organize
  • Printables
  • Recipes
  • Life
  • The Academy
  • Shop My Home
  • About
  • Contact
    • Facebook
    • Instagram
    • Pinterest
    • Twitter
    • YouTube
menu icon
go to homepage
search icon
Homepage link
  • Decor
  • DIY
  • Clean + Organize
  • Printables
  • Recipes
  • Life
  • The Academy
  • Shop My Home
  • About
  • Contact
    • Facebook
    • Instagram
    • Pinterest
    • Twitter
    • YouTube
  • ×

    Home » DIY Crafts » Knit, Crochet & Macrame

    Chunky Crochet Chair Pads Pattern

    Published: May 2, 2018 · Modified: May 30, 2023 by Christina Dennis · This post may contain affiliate links · This blog generates income via ads · 3 Comments

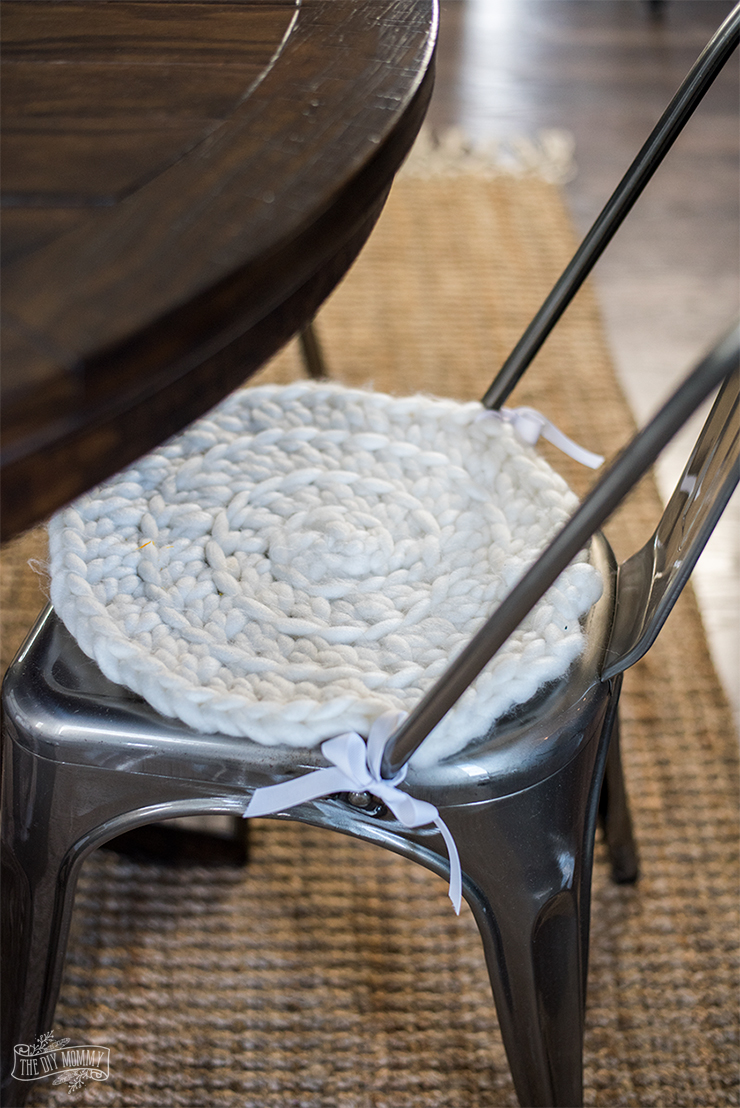
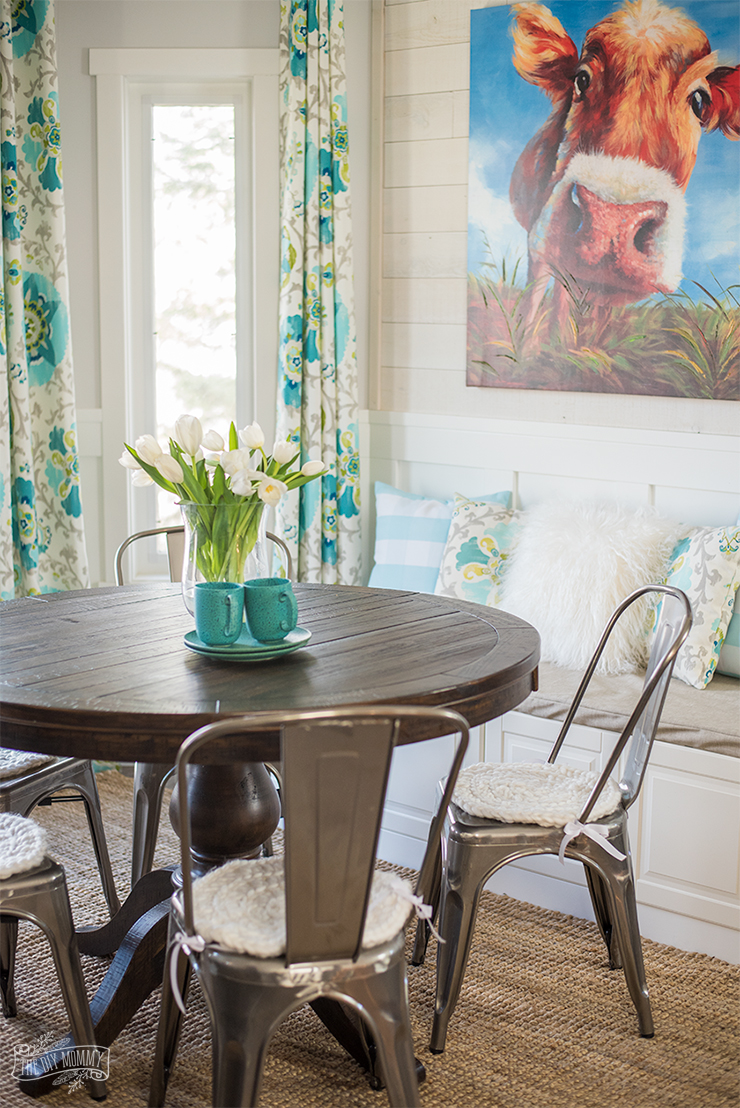
    These DIY chunky crochet chair pads are soft, squishy and a great addition to any farmhouse chair. I made them for our new breakfast nook, and I'm sharing the simple crochet pattern for these chunky crochet chair pads with you today.

    DIY chunky crochet chair pads - free pattern and video tutorial

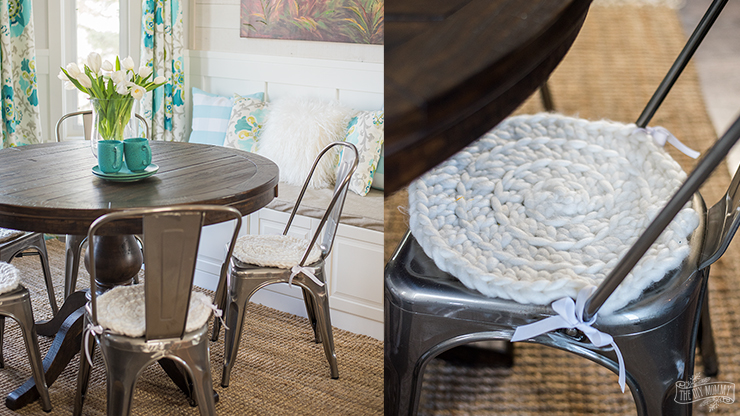
    For these chair pads, I used Top Knot Style yarn in Winter White and a large Q16 crochet hook. This is a vegan roving yarn that's very thick, so it makes this project really easy to whip up.

    DIY chunky crochet chair pads - free pattern and video tutorial

    You may have to adjust this pattern a little depending on the size of your chair and yarn, but this pattern should work for most chairs.

    DIY chunky crochet chair pads - free pattern and video tutorial

    Use the pattern below to make your own chunky crochet chair pad, or watch my video at the bottom of this post for a visual.

    Chunky Crochet Chair Pad Pattern

    • chain 6
    • sl st into first chain to create a loop
    • chain 2
    • 2 dc into the back stitch of the first chain in loop below
    • *2 dc into the back stitch of the next chain*, repeat until you've went all the way around the loop
    • sl st into first dc
    • chain 2
    • 2 dc into the back stitch of the first dc below
    • *2 dc into the back stitch of the next dc*, repeat until you've went all the way around the loop
    • sl st into first dc
    • chain 2
    • 2 dc into the back stitch of the first dc below
    • *dc into the back stitch of the next dc, 2 dc into the back stitch of the next dc*, repeat until you've went all the way around the loop
    • sl st into first dc
    • chain 2
    • dc into the back stitch of the first dc below
    • *dc into the back stitch of the next dc*, repeat until you've went all the way around the loop
    • sl st into first dc
    • cut yarn off leaving a tail, thread through loop and pull to tighten
    • weave in ends

    Disclosure: The yarn in this tutorial was given to me by Top Knot Style and I love it!

    More Inspiration

    • Cricut Must Haves for Beginners: Materials & Tools Guide
    • Modern coastal bedroom makeover with deep blue shiplap wall, vinyl plank flooring, IKEA furniture, and gold accents
      How to Make a Shiplap Wall - Step by Step Tutorial
    • 10 Old Door DIY Ideas - Creative Ways to Repurpose Doors!
    • How to Print and Cut Vinyl on a Cricut (Ultimate Guide!)

    Reader Interactions

    Comments

    1. susie

      October 19, 2019 at 2:29 pm

      Hiya,
      I'm going to try to make four of these for my new chairs. Any chance you could guess how much wool i might need? assuming i'm making them the same size as the video. Ebay seems to sell wool in grams so an estimate by weight would be most helpful.
      Thanks very much

      Reply
      • Sarah - The DIY Mommy

        October 23, 2019 at 2:20 pm

        Christina thinks she used about 1 ball of the yarn (which was 30m/250g) for each chair pad.

        Reply
    2. Evelyn Godin

      October 28, 2020 at 9:31 am

      What size crochet hook do you use?

      Reply

    What do you think? Cancel reply

    Your email address will not be published. Required fields are marked *

    This site uses Akismet to reduce spam. Learn how your comment data is processed.

    Primary Sidebar

    Welcome!

    Christina Dennis, The DIY Mommy

    I'm Christina and I'm sharing budget-friendly DIY & decor ideas to create a cozy home and life you love!

    Read more about me

    Latest Posts

    • Cricut Must Haves for Beginners: Materials & Tools Guide
    • RV Tips 101 - RVing Guide for Beginners
    • Build a Bench Seat for the Kitchen Table - DIY IKEA Hack

    What's my home decor style?

    Discover the home decor style that best fits your personality and lifestyle. This two-minute quiz is going to give you the direction you need to start the big, bold room makeovers that you've always wanted to try!

    Find out now!

    Footer

    ↑ back to top

    About

    • About The DIY Mommy
    • Privacy Policy
    • Disclosure Policy
    • Terms of Service

    Newsletter

    • Sign Up! for emails and updates

    Contact

    • Contact

    As an Amazon Associate I earn from qualifying purchases.

    Copyright © 2009 - 2023 The DIY Mommy. "The DIY Mommy" is a registered trademark.