Cricut Must Haves for Beginners: Materials & Tools Guide
This post may contain affiliate links · This blog generates income via ads
If you’re a beginner looking to create professional and stunning projects with your new Cricut machine, you’ve come to the right place. In this blog post, I’ll discuss the essential Cricut must haves for beginners that every Cricut newbie should have in their arsenal. Armed with the right materials, tools and accessories, you’ll be well on your way to creating beautiful and unique Cricut projects that you can be proud of.
Disclosure: This post is sponsored by Cricut. All opinions are my own.
I’ve been making DIY projects with my Cricut machines since 2016, and it’s still one of my top favourite tools to craft with. My favourite projects to make with my Cricut are personalized gifts, unique home decor and organization labels, but the options are truly endless with this cutting machine. (New to Cricut? Check out my blog post on what a Cricut is and what you can make with it!)
One of the top questions I get asked when my friends purchase a Cricut is: what materials & tools should I buy with my Cricut so I can get started making projects right away? In this blog post, I aim to answer this question and create a comprehensive guide for any beginner looking for the best materials & tools to purchase with their machine. I’m also including a tutorial on how to make a personalized tumbler at the end of this post. It’s the perfect beginner’s project. Let’s get started!
Cricut Materials Every Beginner Needs
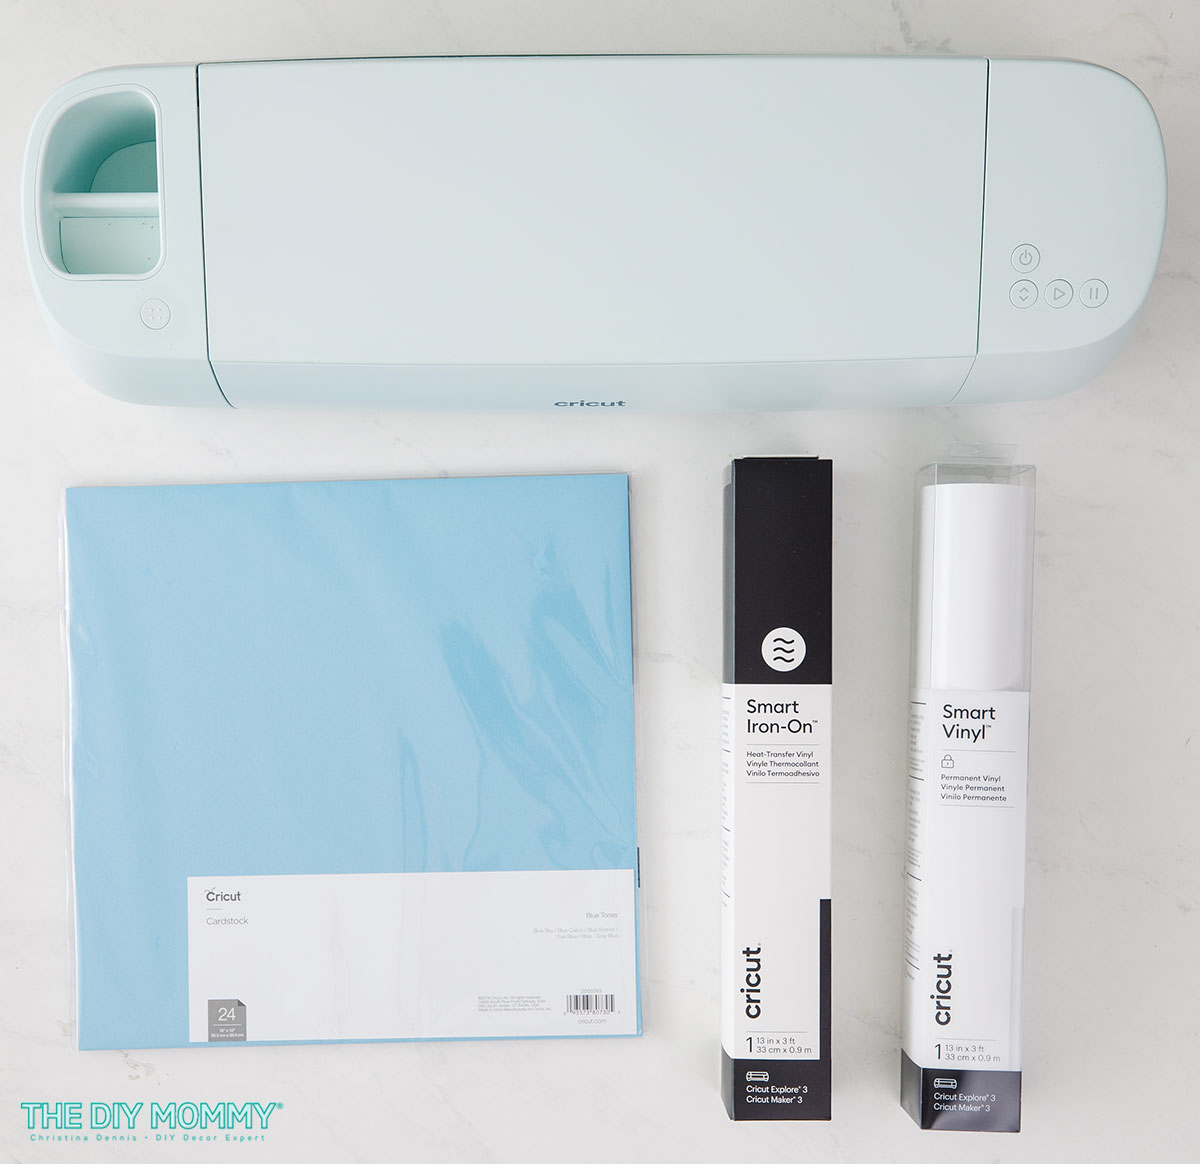
Vinyl
Adhesive vinyl is a must-have material for Cricut users and the first one that I would recommend purchasing. It comes in a variety of colors, finishes, and styles, making it perfect for personalizing items like mugs, cell phone cases, and home decor. When shopping for adhesive vinyl, I recommend sticking with the Cricut brand as it’s specifically designed to work perfectly with your Cricut machine. I’ve tried other brands, and I’ve had the most success with Cricut’s own vinyl with how it weeds (removing excess vinyl around my design) and applies.
- Smart Vinyl is what I’ve been using the most lately as it’s compatible with the Maker 3 and Explore Machines and these are what I use the most. (It’s also compatible with the Cricut Joy in the narrower size.) This material doesn’t require a Machine Mat to use, and weeding it is a dream. It comes in permanent and removable options and it’s perfect for continuous or extra-long cuts up to 12 feet long.
- Premium Vinyl is the best choice for use with a Cricut Maker or Cricut Explore Air 2. It also comes in either a permanent or removable option depending on the project you want to make. It requires a Machine Mat to cut.
Want to know which Cricut machine is right for you – the Explore series, the Maker or the Joy? Click right here to read my blog post all about the different machines!
Iron-On HTV (Heat Transfer Vinyl)
If you want to customize clothing, bags, or fabric items, heat transfer vinyl (also known as iron-on or HTV) is the way to go. Make sure to follow Cricut’s instructions for cutting, weeding, and applying HTV to ensure a lasting and professional finish. I recommend using a Cricut EasyPress to apply your Iron-On to your item for the longest lasting finish.
- Smart Iron-On is like Smart Vinyl – it doesn’t require a machine mat for cutting. I LOVE this material as it’s a dream to week, and the Cricut Maker 3 or Explore 3 cuts it SO quickly. It also comes in rolls up to 12 feet long for extra-long designs.
- Everyday Iron-On is another good choice. You’ll need a Machine Mat to cut it, and it comes in a large variety of colours. Cricut often has good deals on bulk variety pack iron-on like this one in multiple colours.
Cardstock
Cardstock is a versatile material that’s great for creating paper crafts like greeting cards, scrapbook pages, and home decor pieces. Choose a high-quality cardstock (usually 65lb or higher) that’s compatible with your Cricut machine. Experiment with different colors, textures, and finishes to add variety to your projects.
Cricut’s Cardstock Samplers are a great place to start. I love the texture of this cardstock, and at 80lbs it’s nice and thick for a variety of projects like scrapbooking and card making.
Essential Tools for Your Cricut Toolkit
A Desktop Computer & Cricut Design Space
In order to use your machine you will need a computer and Cricut’s software – Design Space. While you can download the Design Space app and use it on your phone or tablet, I recommend having a desktop or laptop computer with Design Space access as it will offer you a more robust experience with the program. I use both my computer and my phone to make my Cricut designs via Design Space.
Blades
Your Cricut machine comes with a premium fine point blade, but you may also want to invest in a deep point blade (compatible with Cricut Maker & Explore machines) for cutting thicker materials like chipboard and heavy cardstock.
Another blade/tool I love to use is the Rotary Blade. This is only compatible with the Maker, though, but it’s fantastic for cutting fabric and crepe paper.
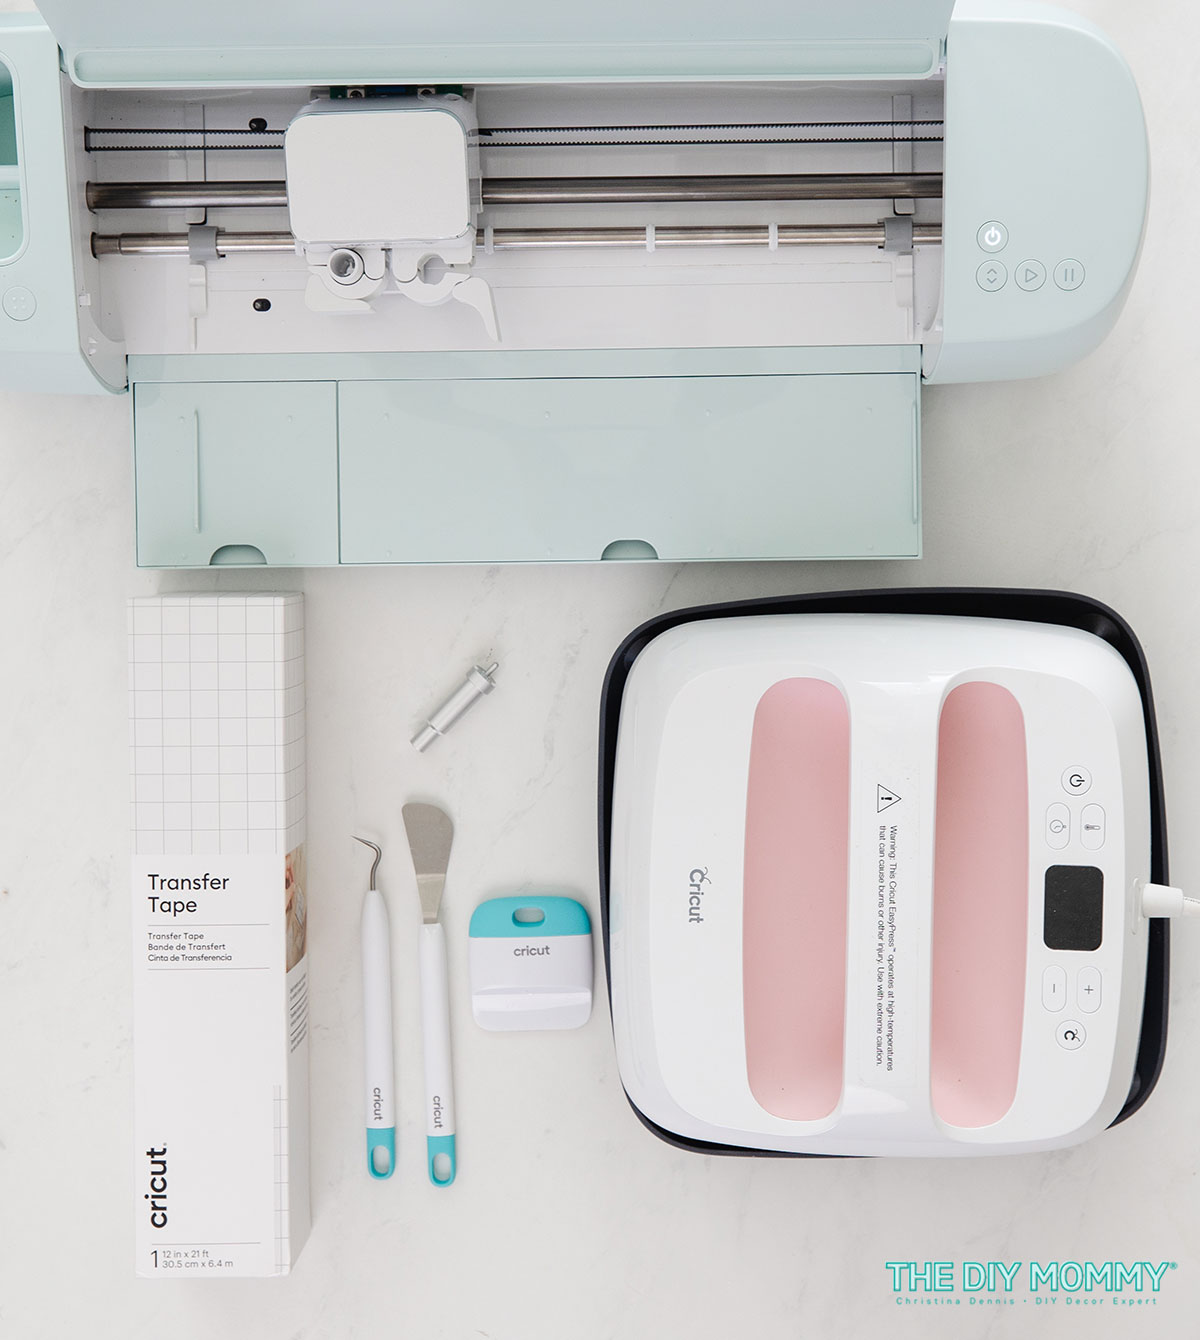
Basic Tool Set for Weeding & Lifting
Weeding tools help you remove excess material from your cuts, making it easier to transfer designs onto your project surface. A basic weeding tool kit should include a hook, tweezers, scissors, and a scraper. A spatula is another essential perfect for lifting delicate cut-outs off your cutting mat without damaging them. I like Cricut’s Basic Tool Set because it comes with all of the essential tools you may need to weed and transfer your designs. There’s also the Essential Tool Set that comes with even more tools like the scoring stylus and trimmer.
You may want to add a scoring stylus to your tool kit if you plan to do cardstock projects like greeting cards and paper flowers. It creates beautiful score lines for folding.
Transfer Tape
Transfer tape is necessary for moving adhesive vinyl designs from their backing to your project surface. Cricut’s grid-lined transfer tape makes for easy alignment, and it comes in a regular grip and a strong grip. Regular Transfer Tape will work with most vinyls, while the StrongGrip variety is essential for thicker vinyls like glitter vinyls.
Cricut EasyPress
While I’ve certainly used a regular household iron to transfer iron-on designs to tees & bags in the past, a Cricut EasyPress is an essential tool for making a more professional & long-lasting project. Not only can you adjust the temperature of the EasyPress, but you can also set a built-in timer so you know exactly how long to press your design for the best result. I find my 9×9 EasyPress works well for most of my projects like t-shirts, tote bags and labels.
Optional Cricut Tools, Materials & Accessories for an Enhanced Experience
In addition to the above Cricut must haves for beginners, here are some optional products that can help make the most of your Cricut crafting experience.
- Cricut Access Subscription: While there are some free fonts and images in Cricut Design Space and you can upload your own, I highly recommend a Cricut Access Subscription. This is especially useful if you use your Cricut often and want access to over 300,000 images and thousands of ready-to-make projects.
- Brayer: A brayer is a small roller that helps you press materials onto your cutting mat for a smoother cut and better adhesion.
- XL Scraper: An XL scraper comes in handy for larger projects, making it easier to apply transfer tape and smooth out bubbles.
- LightGrip or StrongGrip Mats: While your Cricut machine comes with a StandardGrip mat, you might find LightGrip or StrongGrip Cricut mats useful for working with thinner or thicker materials, respectively. You won’t need to worry about using any mats at all if you’ve purchased the Cricut Explore 3 or Maker 3 and want to use Smart Materials exclusively.
- Trimmer: A portable trimmer will help you create perfectly straight cuts on your vinyl and paper materials. The Cricut Roll Holder also has a built-in trimmer, and this is a nice add-on to the machine if you’re working with longer rolls of Smart Materials.
- Infusible Ink: Infusible Ink is a fun material to play with if you want an ultra professional look to your projects. The ink looks like it melts right into the fabric (or mug using the Cricut Mug Press!) creating a smooth, professional look.
Storage, Organization, and Finding the Best Deals
Keeping your materials and tools organized is crucial for a successful Cricut experience. Invest in a storage system that works for you, whether it’s a rolling cart, a pegboard, or a dedicated crafting space. I personally love a rolling cart for materials I’m using right now. I put the rest of the materials in drawers in my studio.
Look for deals on materials and tools right on the Cricut site. If you sign up for their newsletter, they’ll send you all of the latest sales (or keep checking their sale section here). I also find that their bundles are a great value if you want to purchase a Cricut machine, tool set and basic materials together.
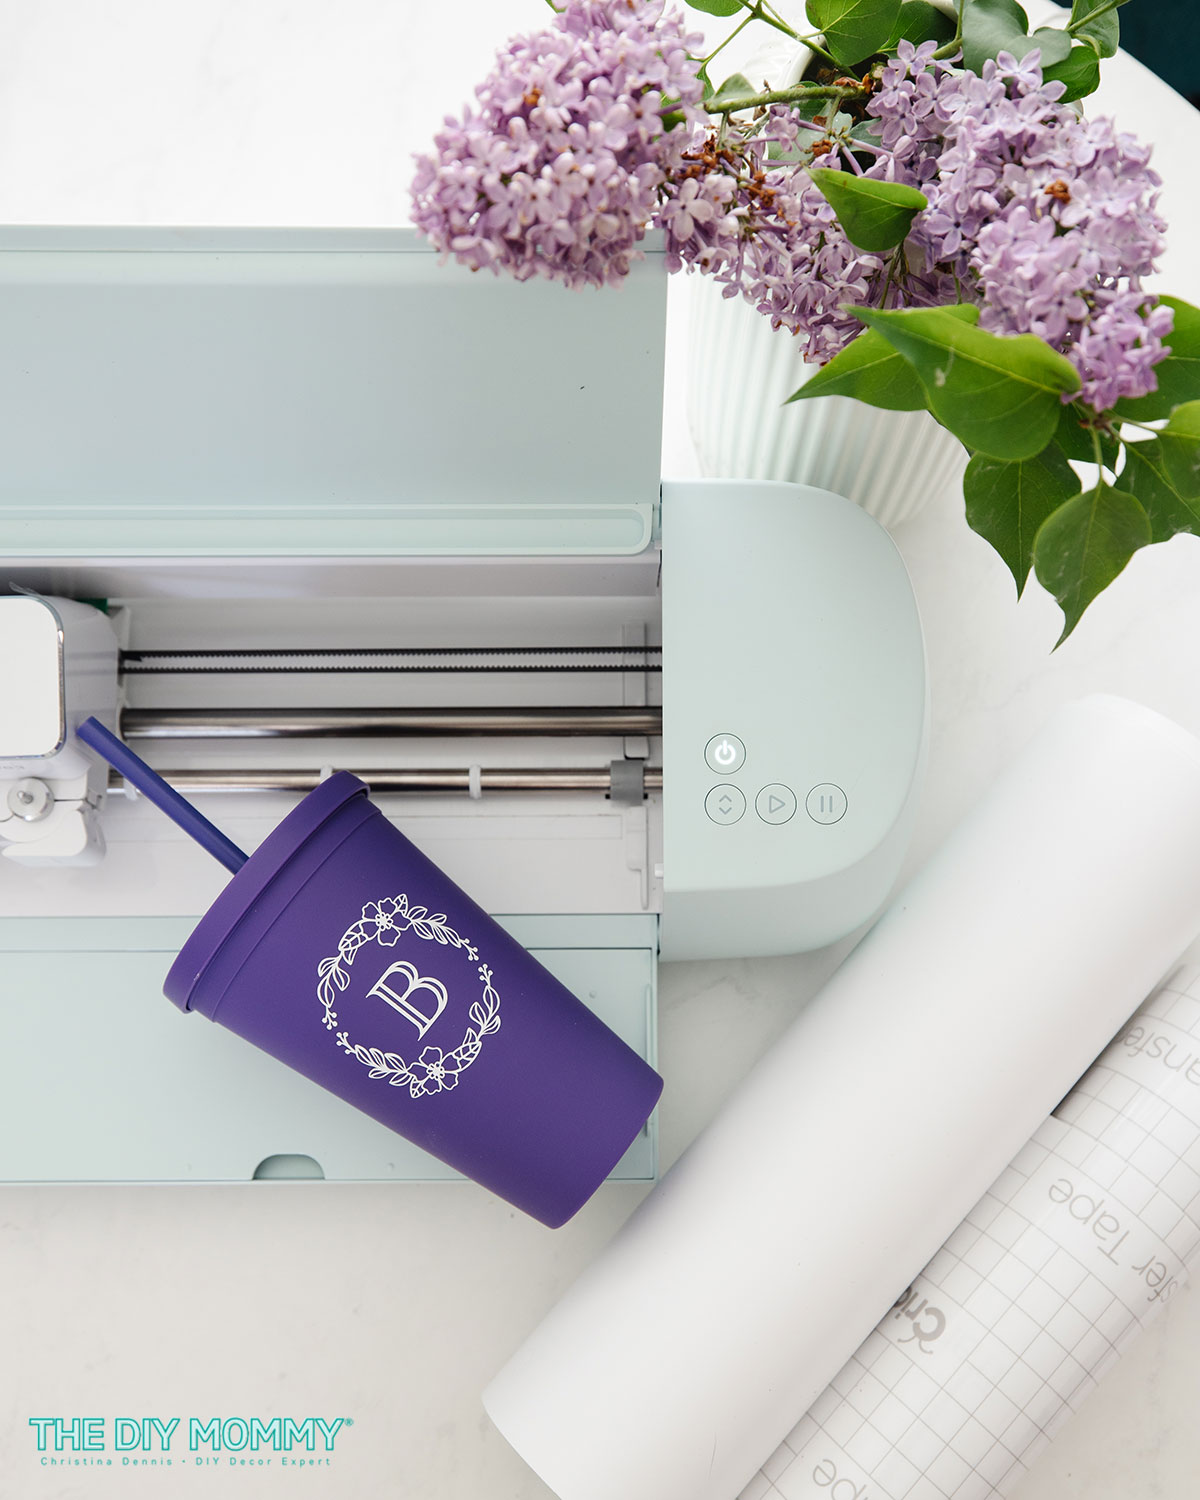
Sample First Project: A Personalized Tumbler
Now that you have your machine and know the Cricut must haves for beginners, let’s make your first project! One of my favourite beginner projects to make with a Cricut is a personalized drink tumbler. Tumblers are trendy, useful, and an easy small-scale project to start with. You can also use these exact same directions to make organization labels for containers, which is another beginner-friendly, useful project. For this DIY personalized tumbler, we’ll use Cricut Design Space’s built-in Monogram Maker tool for an extra easy project.
Supplies:
- Cricut machine (I’ll use a Cricut Explore 3 for this tutorial)
- Permanent Smart Vinyl in White
- Transfer Tape
- Alcohol Wipes
- Tumbler blank
Instructions
Create your design in Design Space
You can customize my pre-made Cricut Design Space Project by clicking here, or make your own from scratch by following the instructions below.
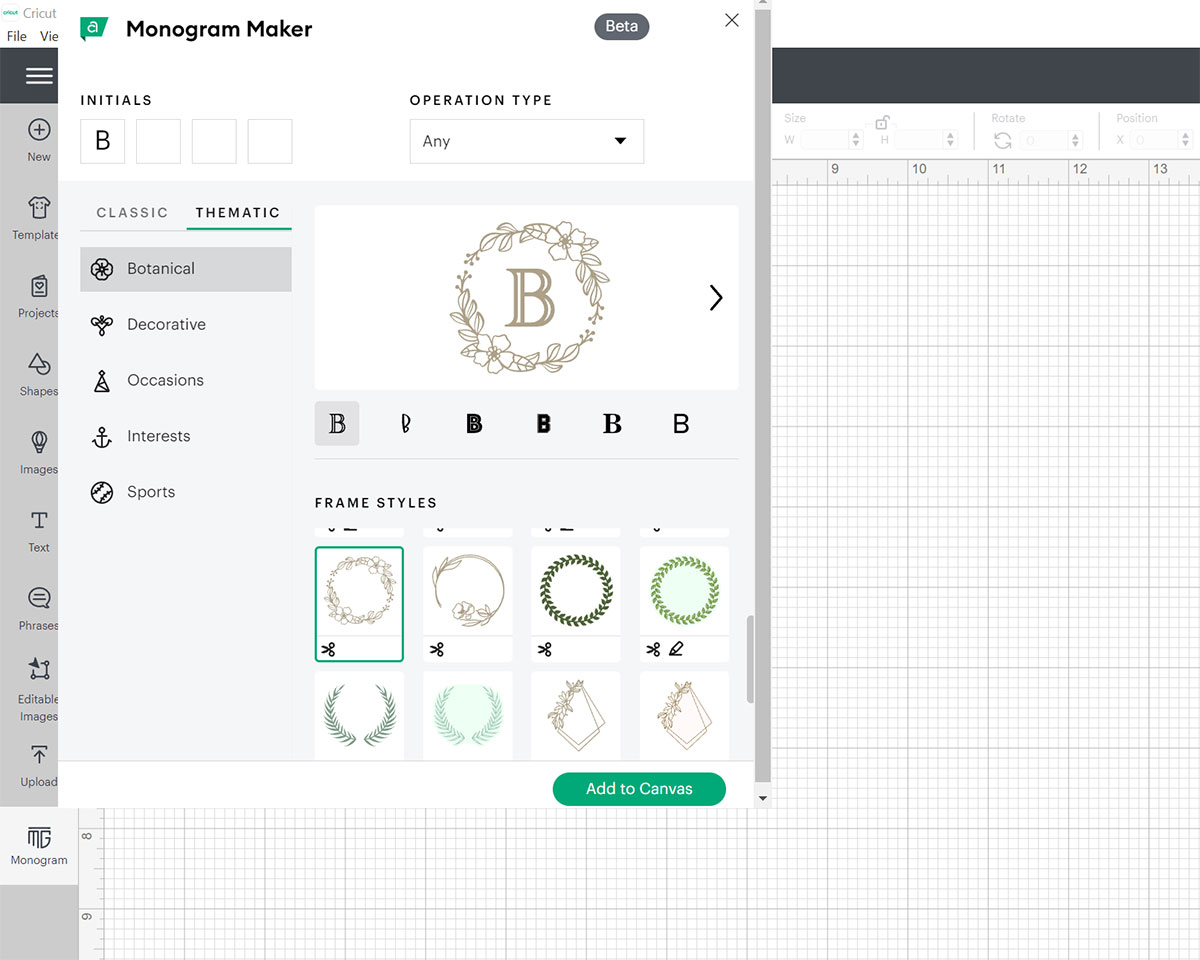
Begin by creating a New Project in Cricut Design Space. Click on Monogram on the menu on the left side. Enter the initials you want to use, choose the font, and choose the frame style. Click Add to Canvas.
Tip: For a beginner-friendly project, I recommend choosing a frame style and font style with thicker details so that your project is easier to weed and transfer.
You can now adjust the size of your custom monogram design by clicking on the monogram image and clicking and dragging the corners of the image. You can also enter a custom size for the image by clicking in the Size boxes on the top menu. I made my monogram image 2.5 inches wide for my tumbler.
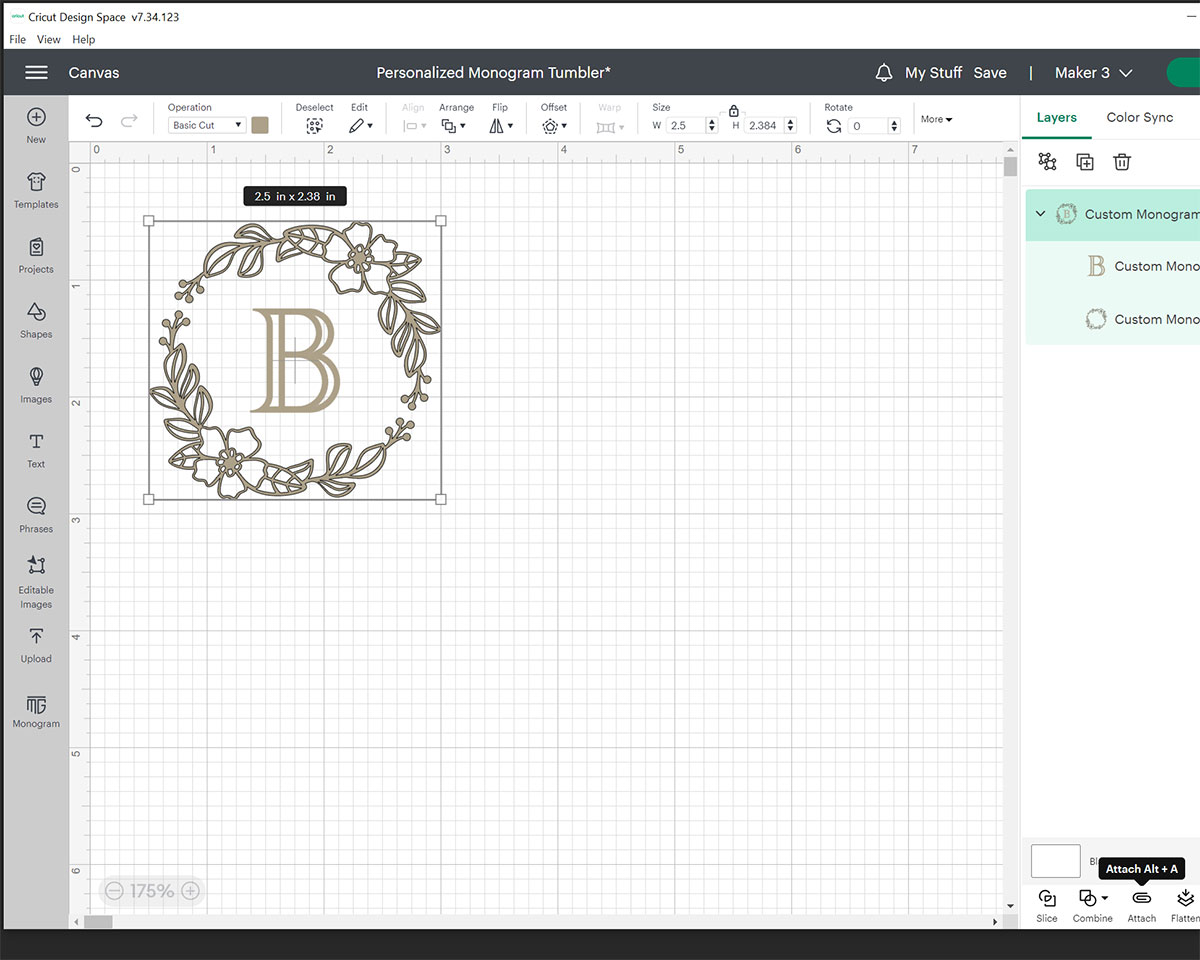
If you want your letter & surrounding design to be the same colour of vinyl like I do, select both and then click the Attach button on the bottom right. This will attach the two elements together so they cut out on your vinyl as one piece.
Now, click Make It in the top right hand corner and Design Space will walk you through how to get your machine ready to cut out the design.
Cut with your Cricut Machine
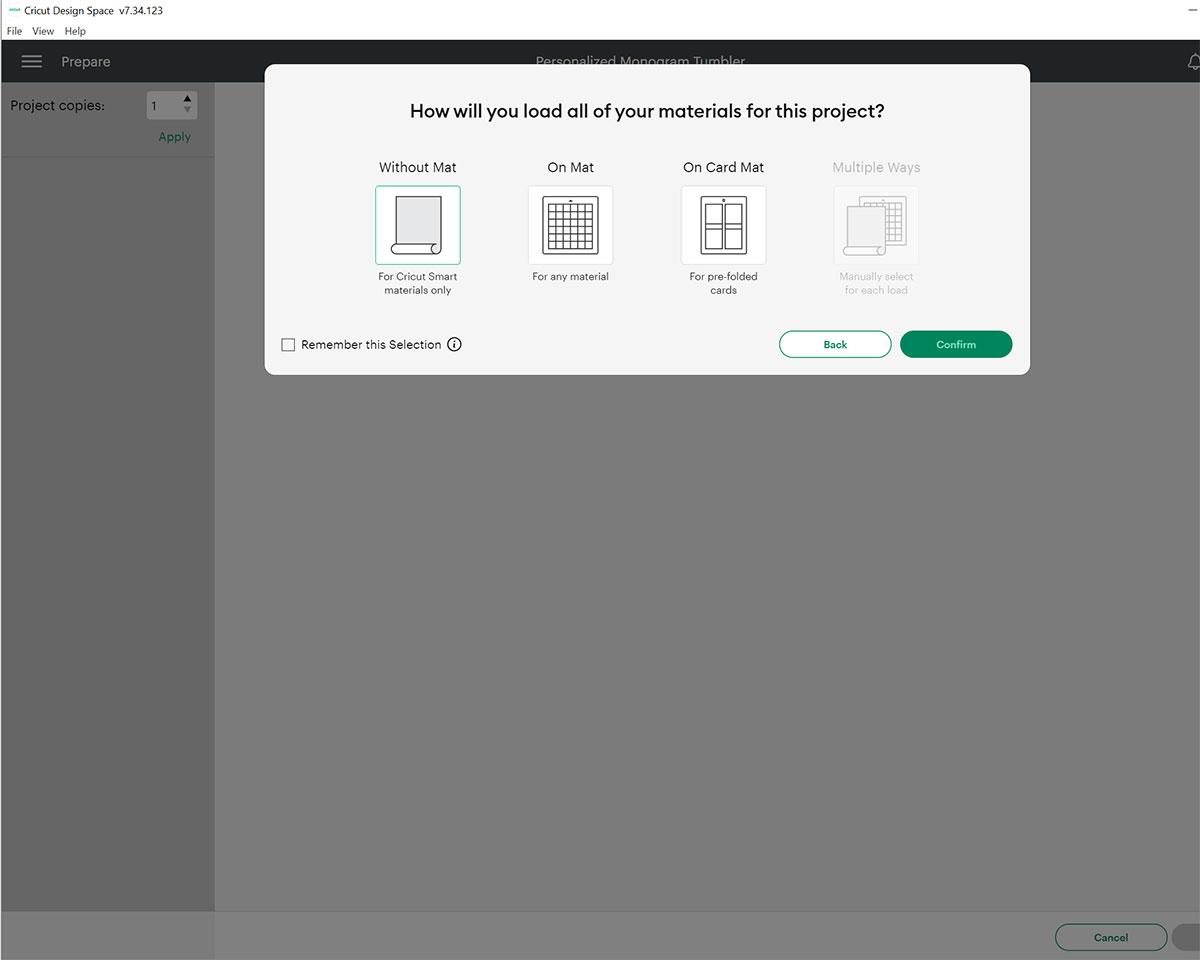
If you’re using Smart Vinyl like I am, you can now click on Without Mat & Confirm. On the next screen you can review your artwork and the size of material you will need.
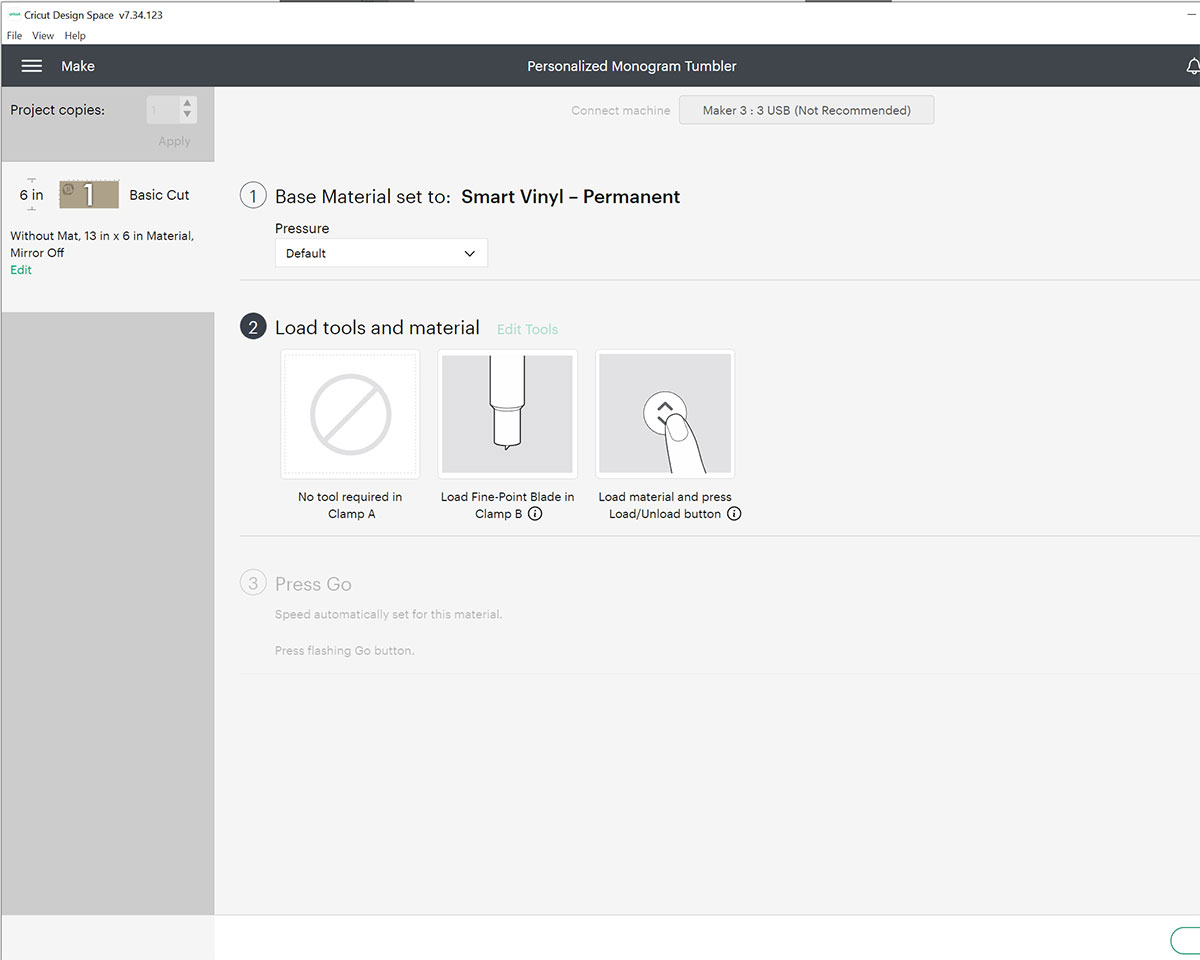
Click Continue and choose your Cricut machine from the following Connect menu. Next, choose Smart Vinyl – Permanent from the Set Base Material menu, and load your Smart Vinyl into your machine.
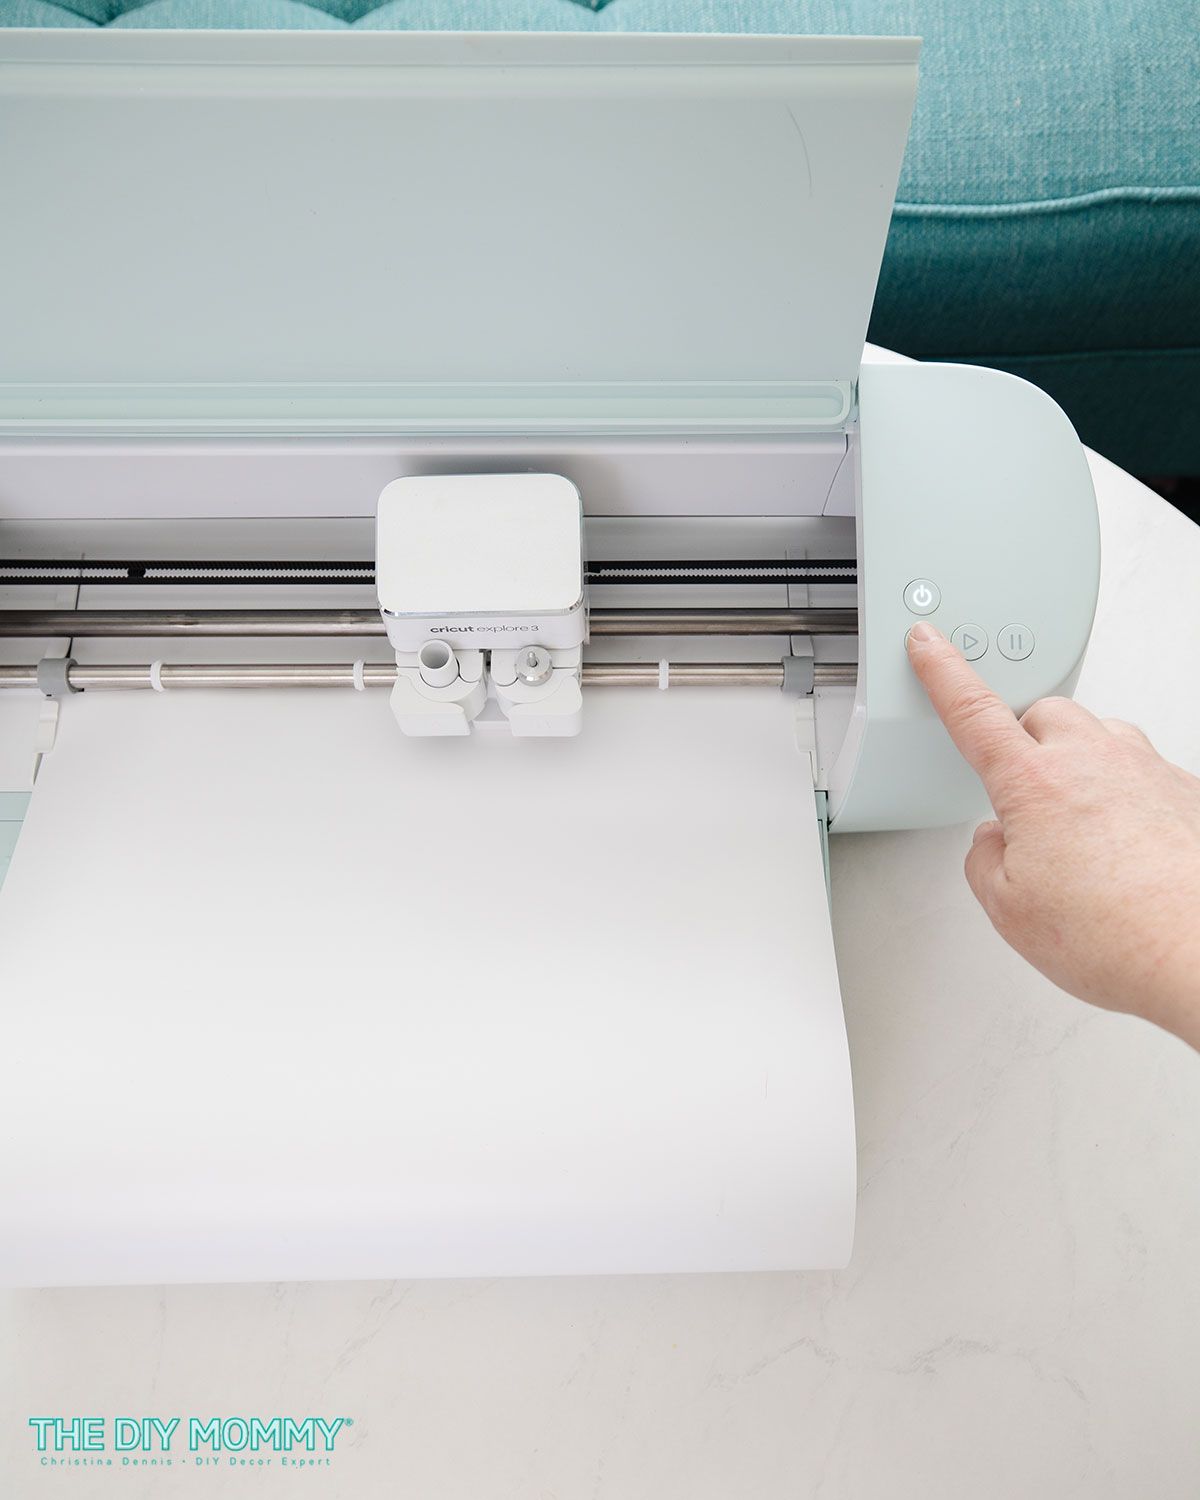
Hold the material up to the first roller of your machine (the good side up), and tap the Load button on the machine. Ensure you have the Fine Point blade in the clamp of your machine, and then press the Start button on the machine. The Cricut will start to cut, and it’s so fun to watch the process!
Assemble the final product
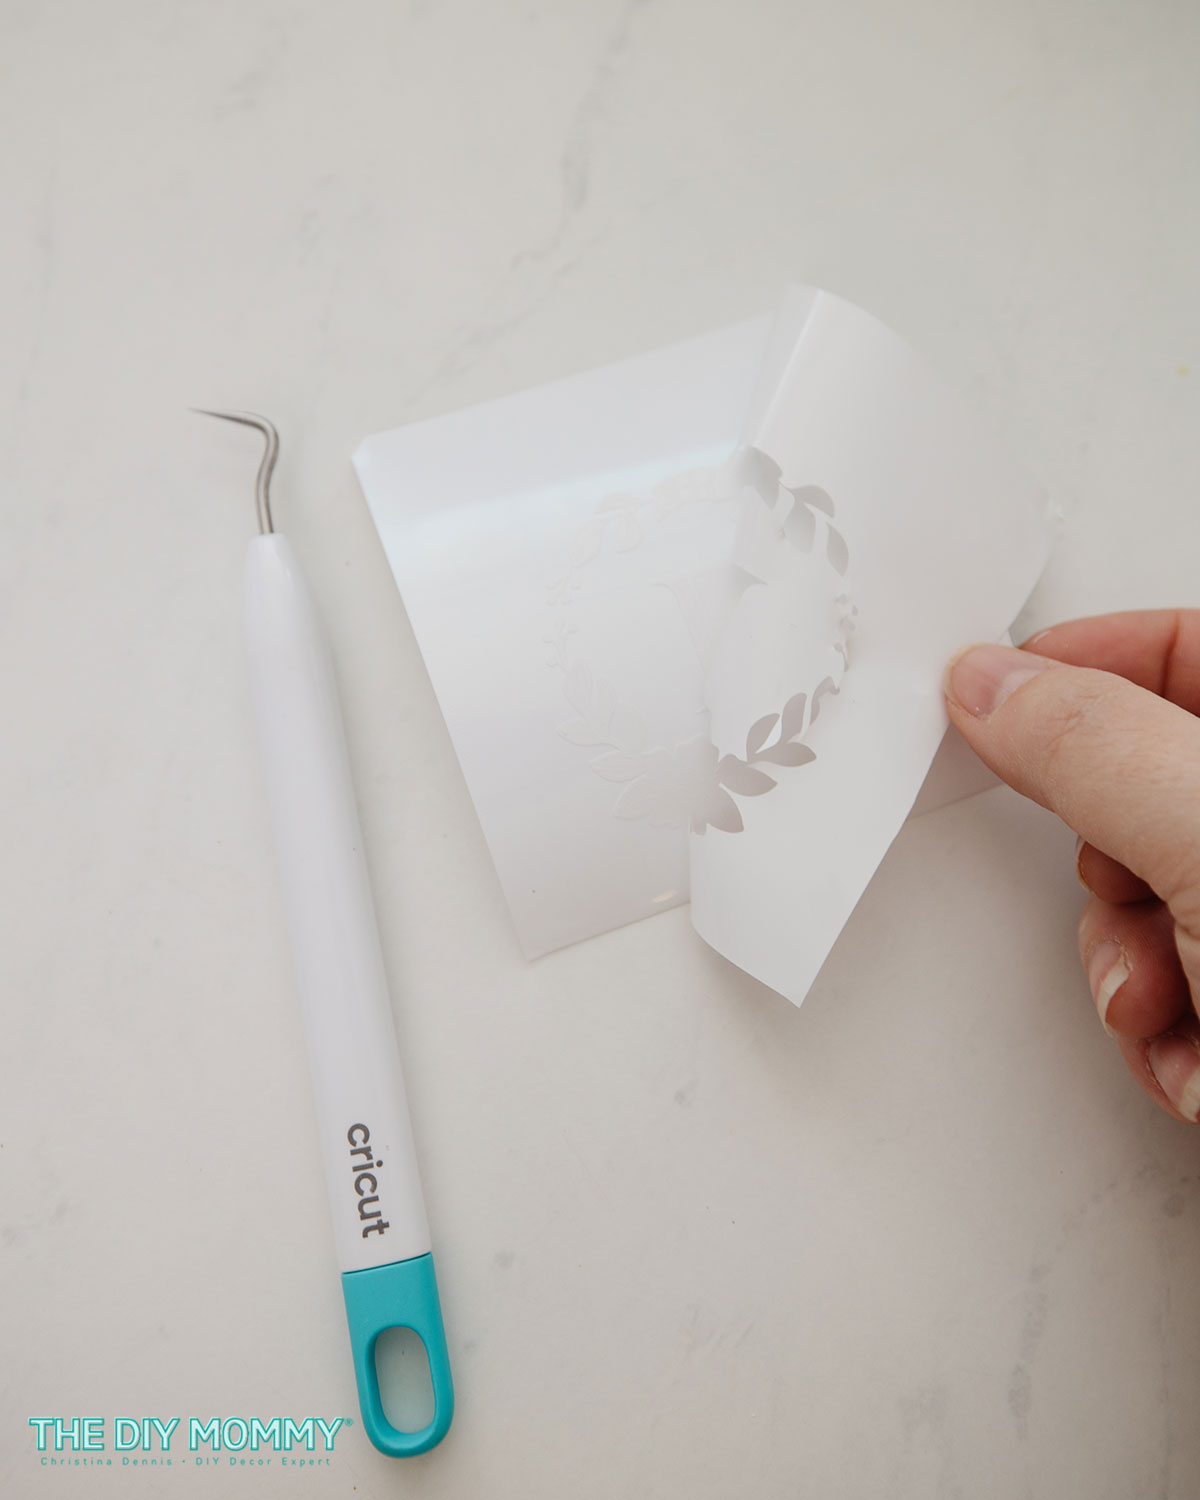
Once your design has finished cutting on the vinyl, press the Load button again and the vinyl will unload from your Cricut machine. You can trim away any excess vinyl with scissors or a trimmer, and then weed away the vinyl that’s not part of your design with your fingers and weeding tools.
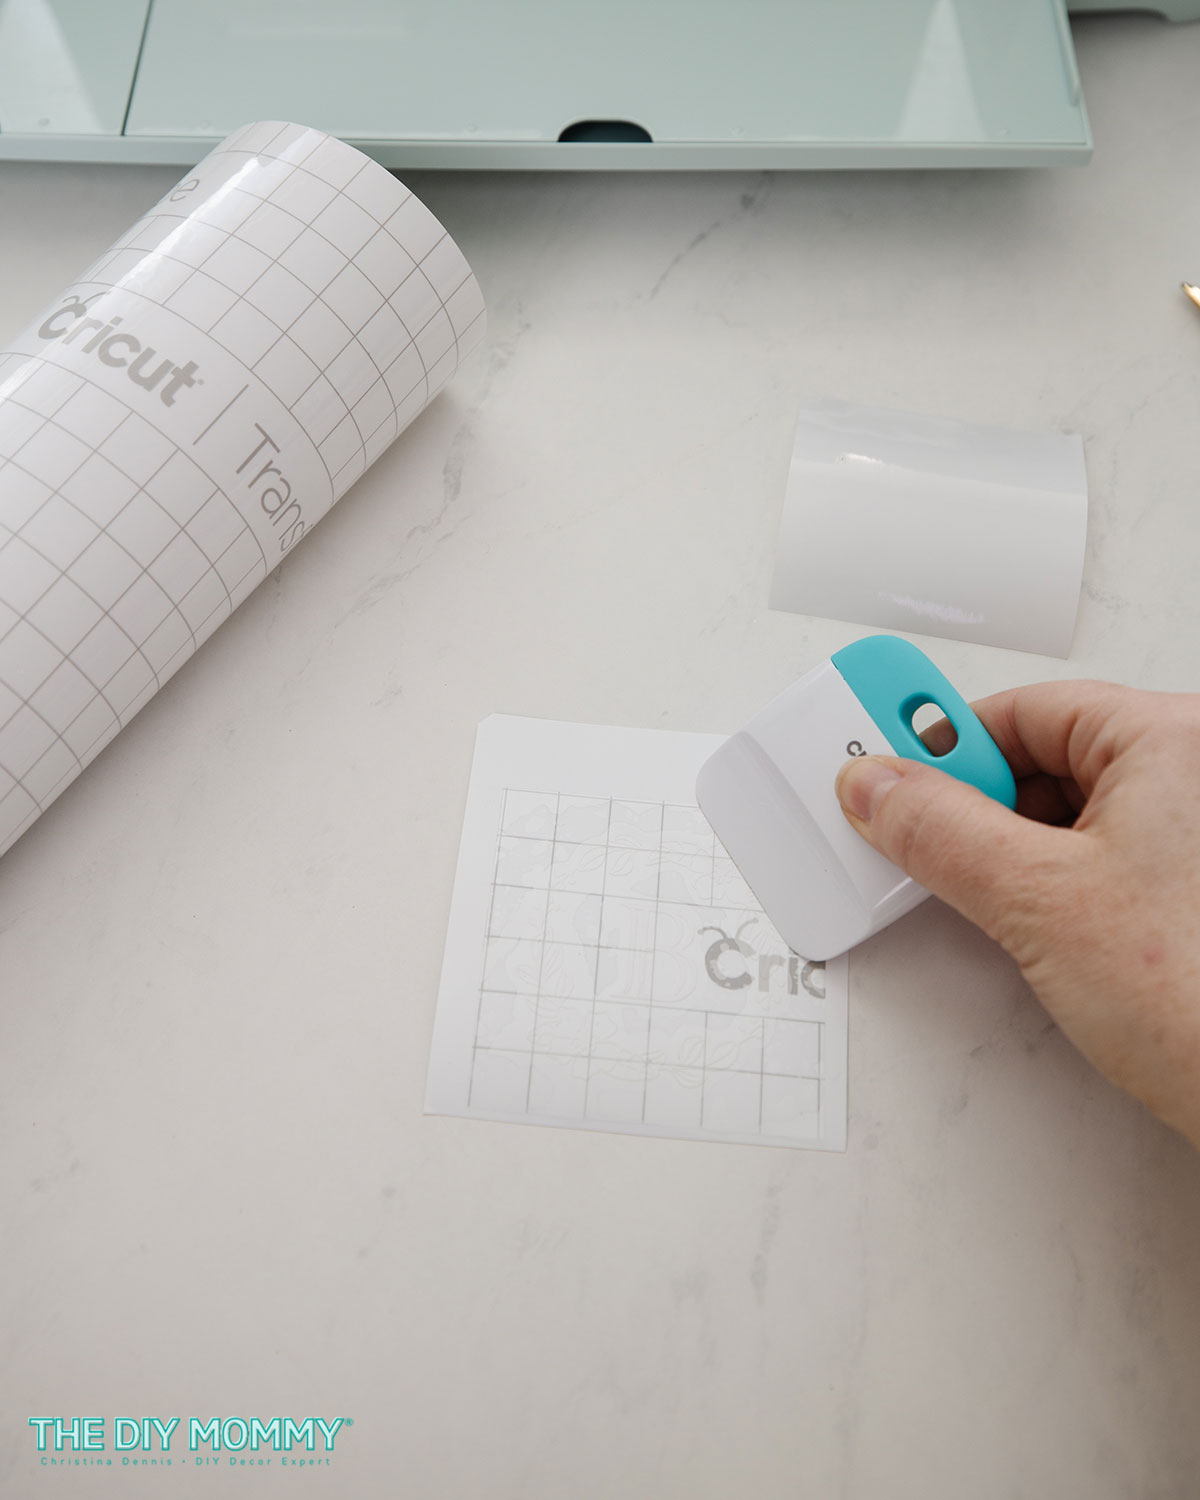
Now that the excess vinyl is gone, cut a piece of Transfer Tape that’s at least the same size as your design, remove it from its backing, and apply it on top of your vinyl design smoothing it out with your hand or a scraper tool. I recommend scraping/smoothing the back of the design as well.
Tip: For easiest Transfer Tape application, I find it best to curve the Tape up slightly and apply it to the vinyl design from the center outward.
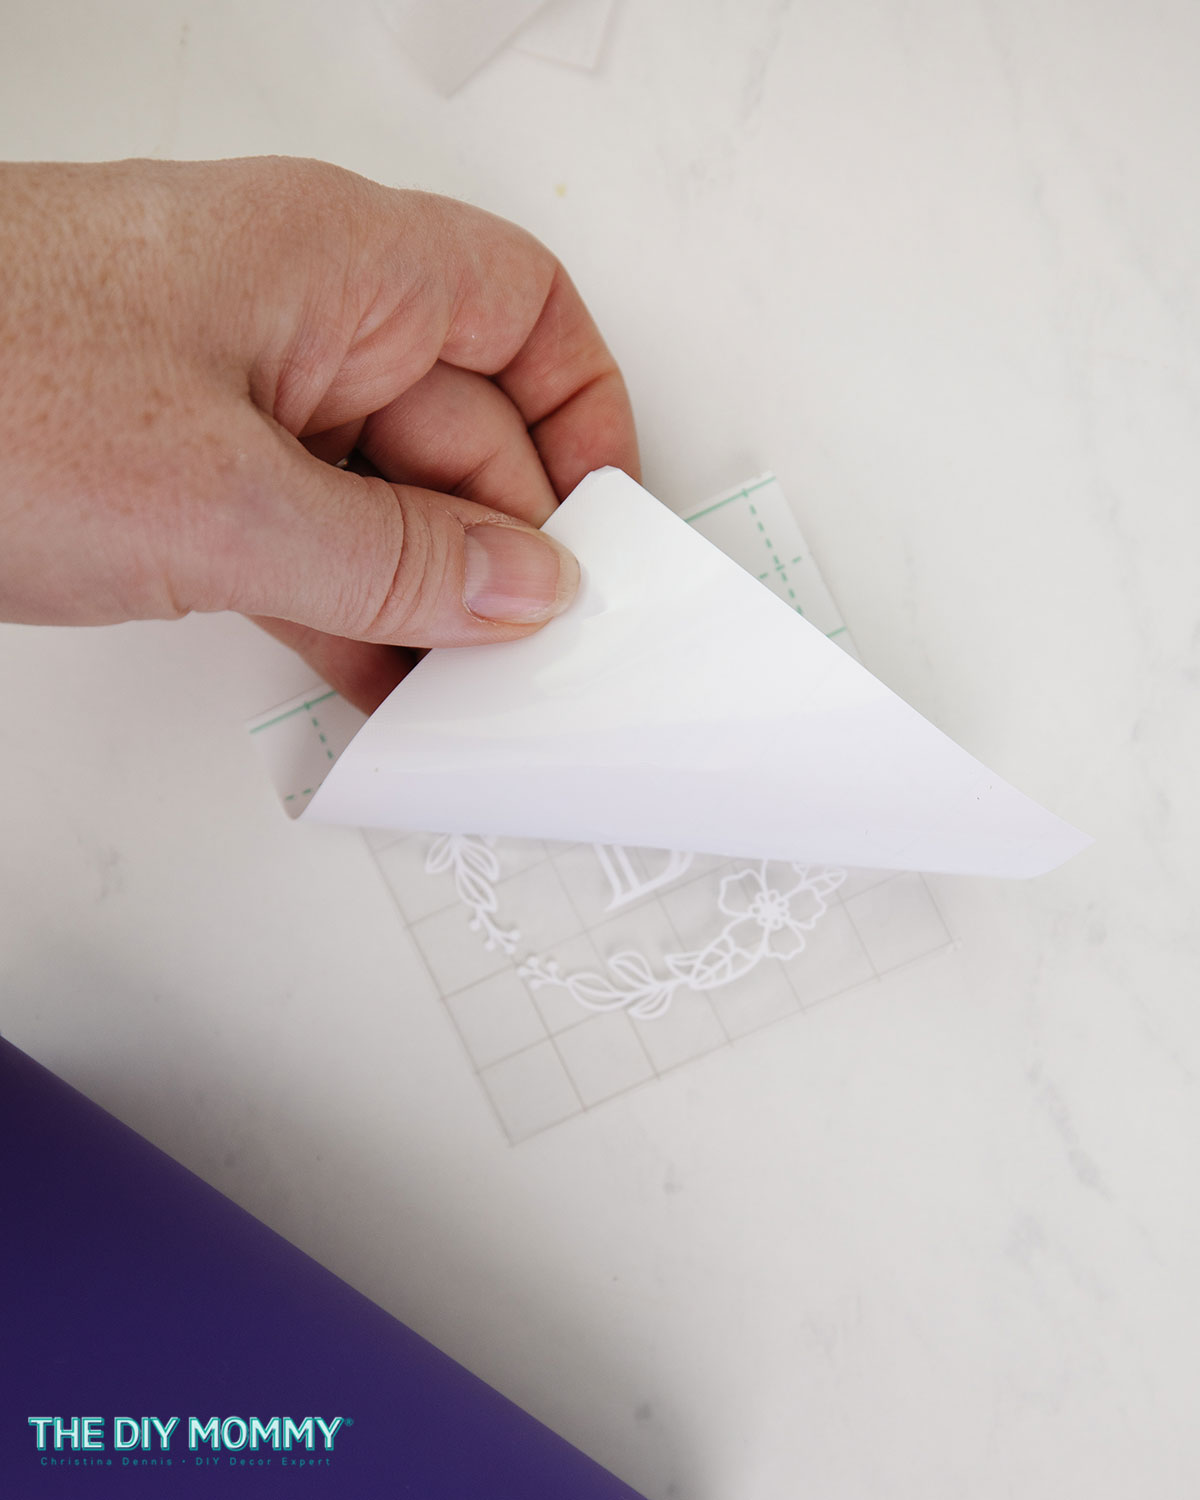
Next, flip the design over to its backside, and carefully remove the backing away from the design + Transfer Tape.
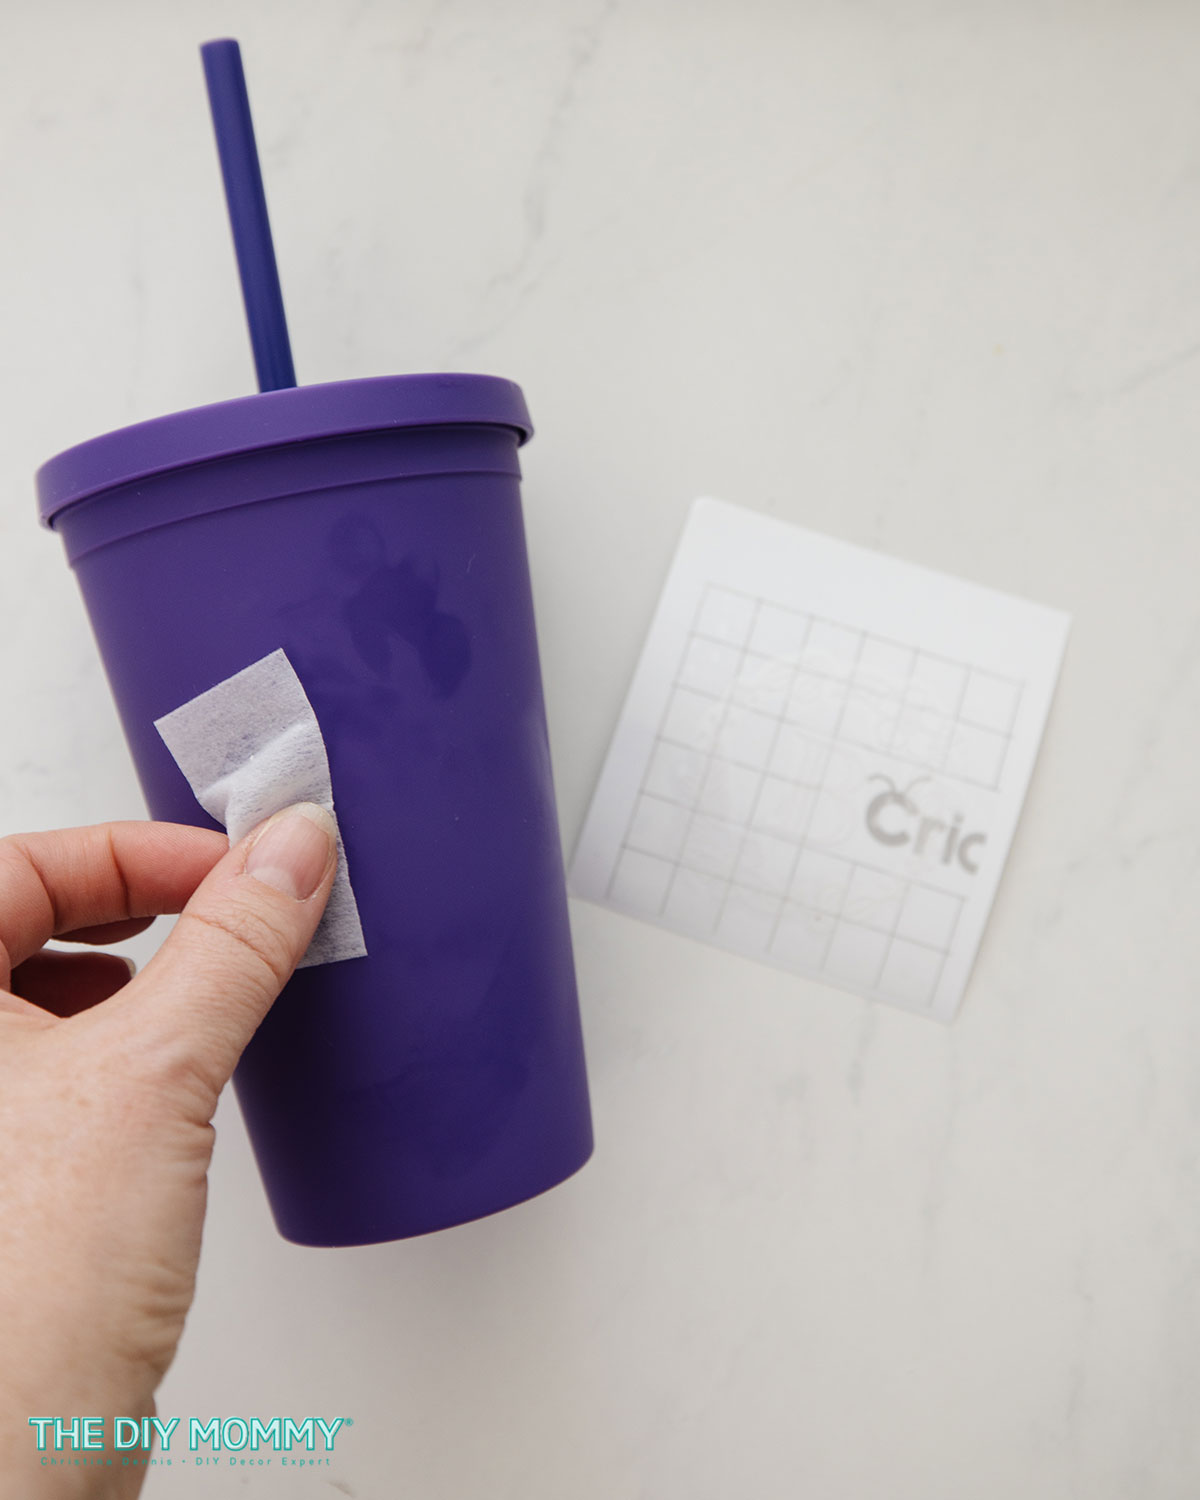
Prepare your tumbler by wiping it clean with an alcohol pad.
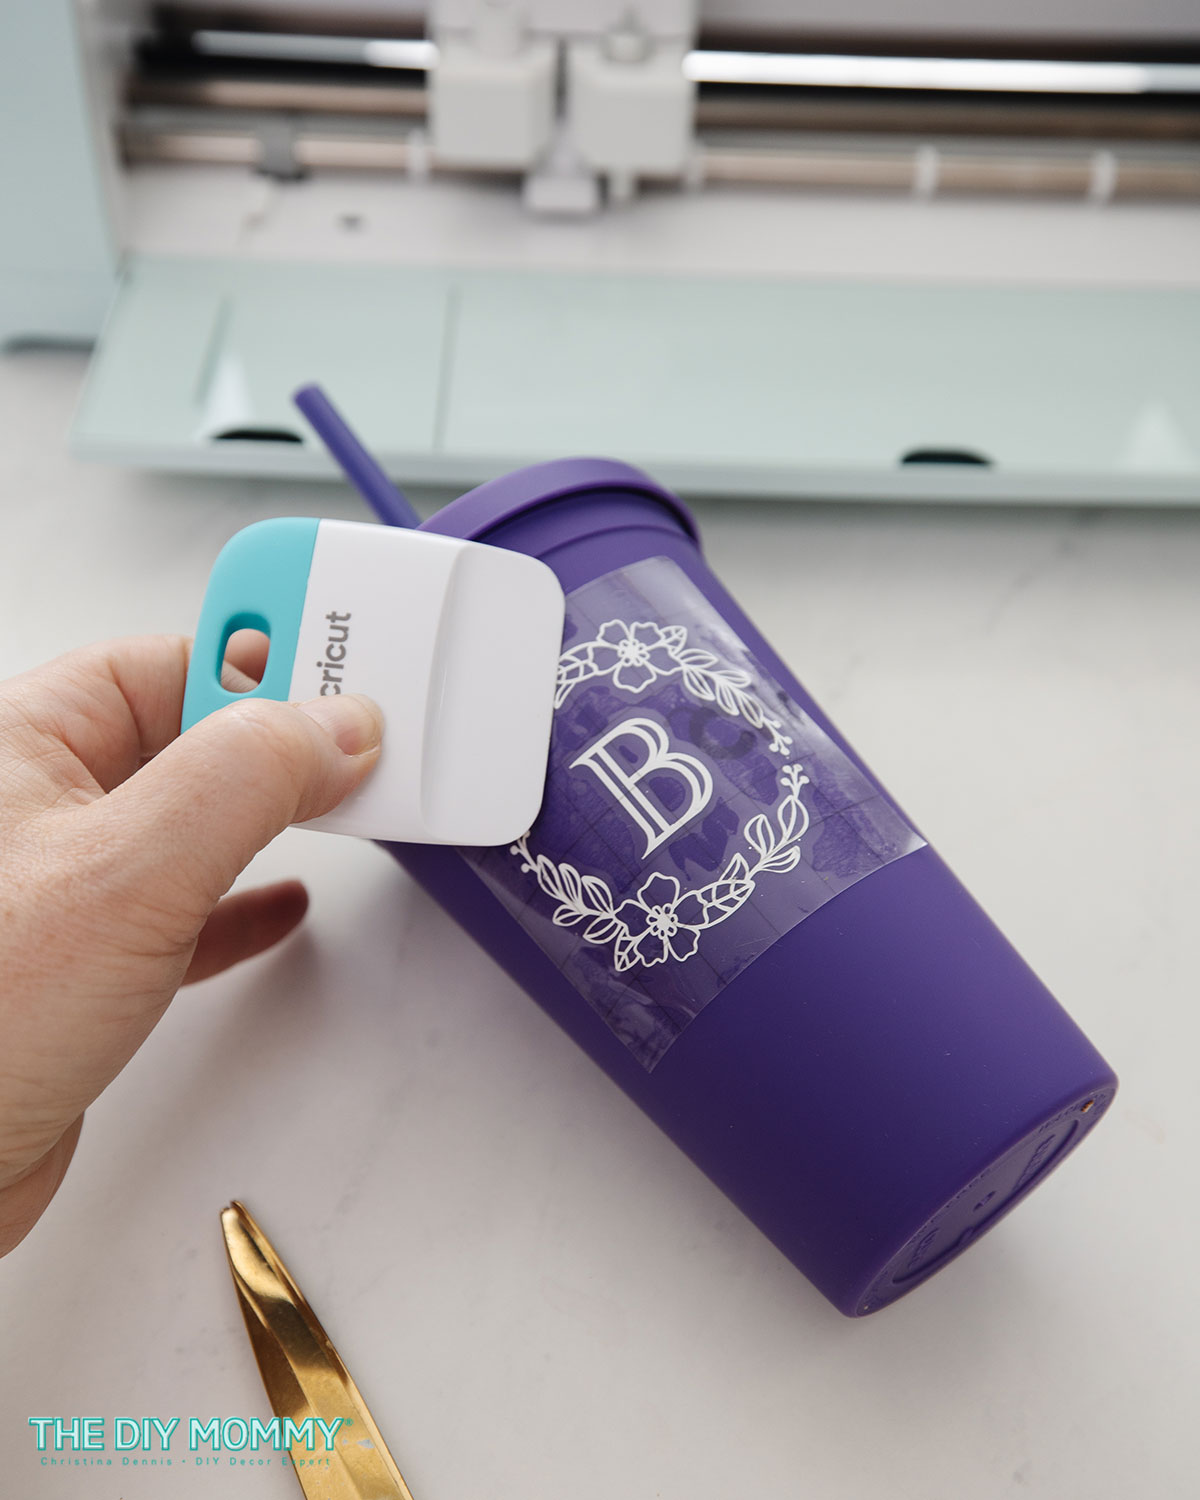
When it’s dry, carefully position the vinyl design on top and adhere it well to the tumbler with your hand and a scraper tool.
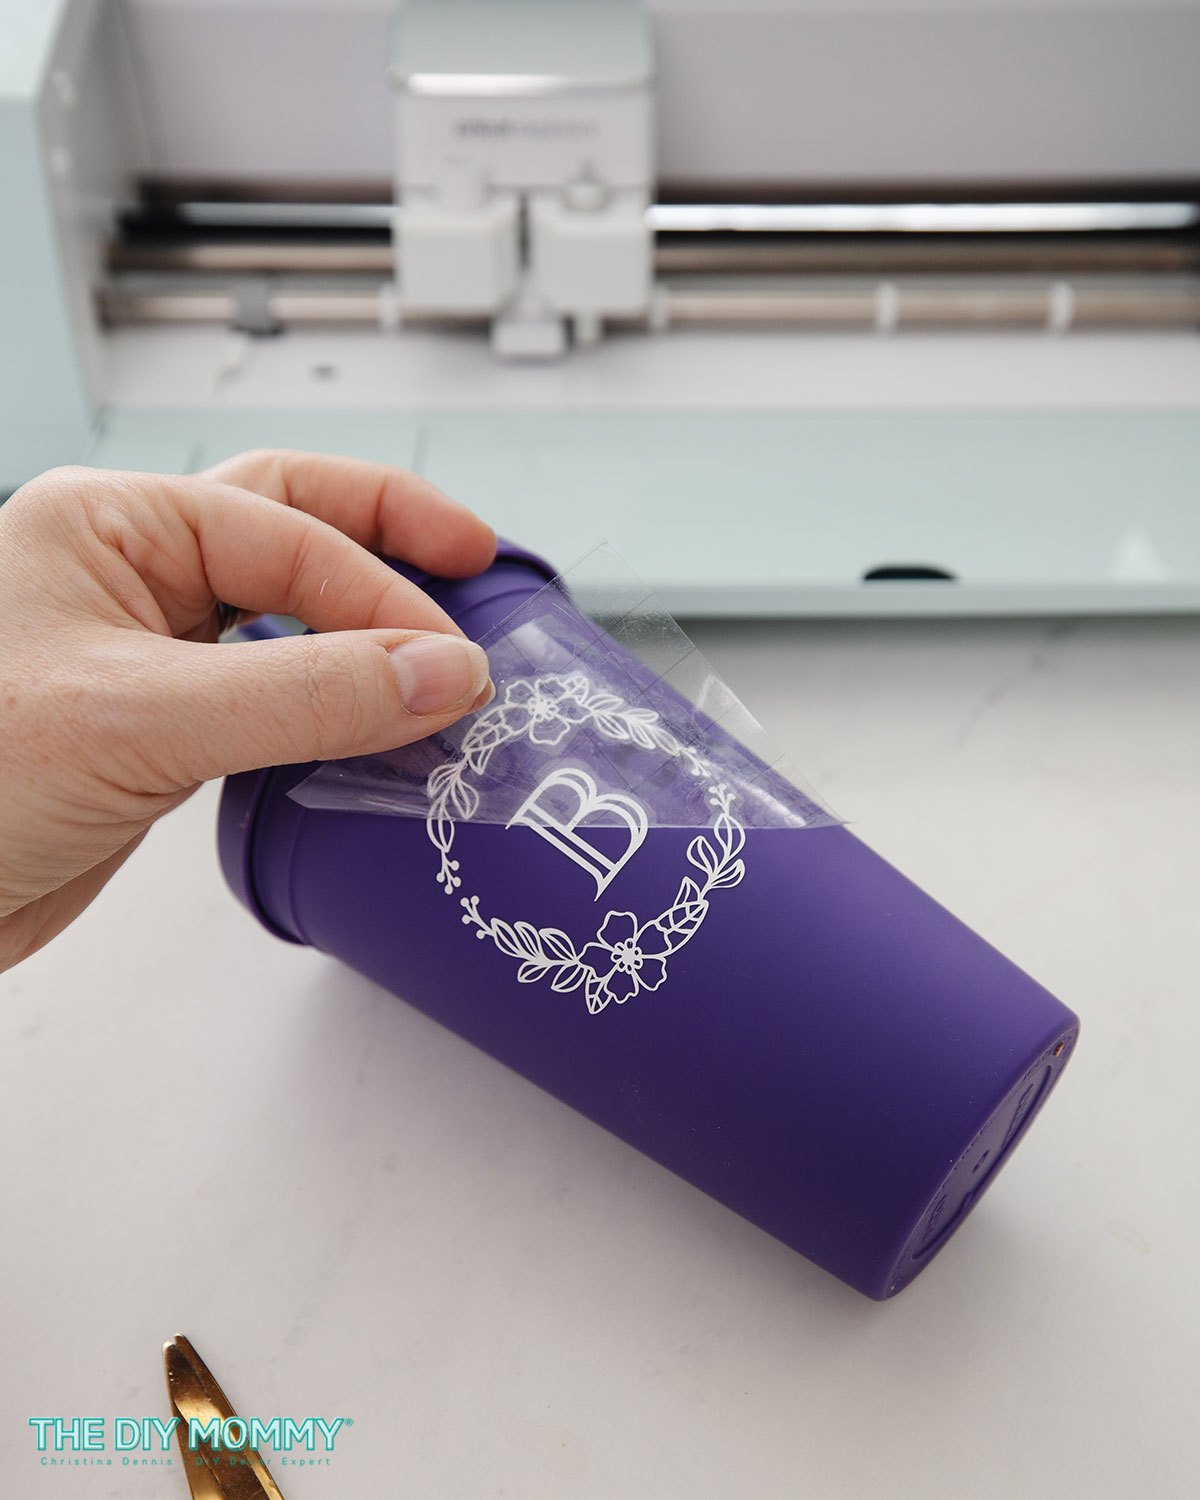
Finally, carefully remove the transfer tape from the design by rolling and pulling it back.
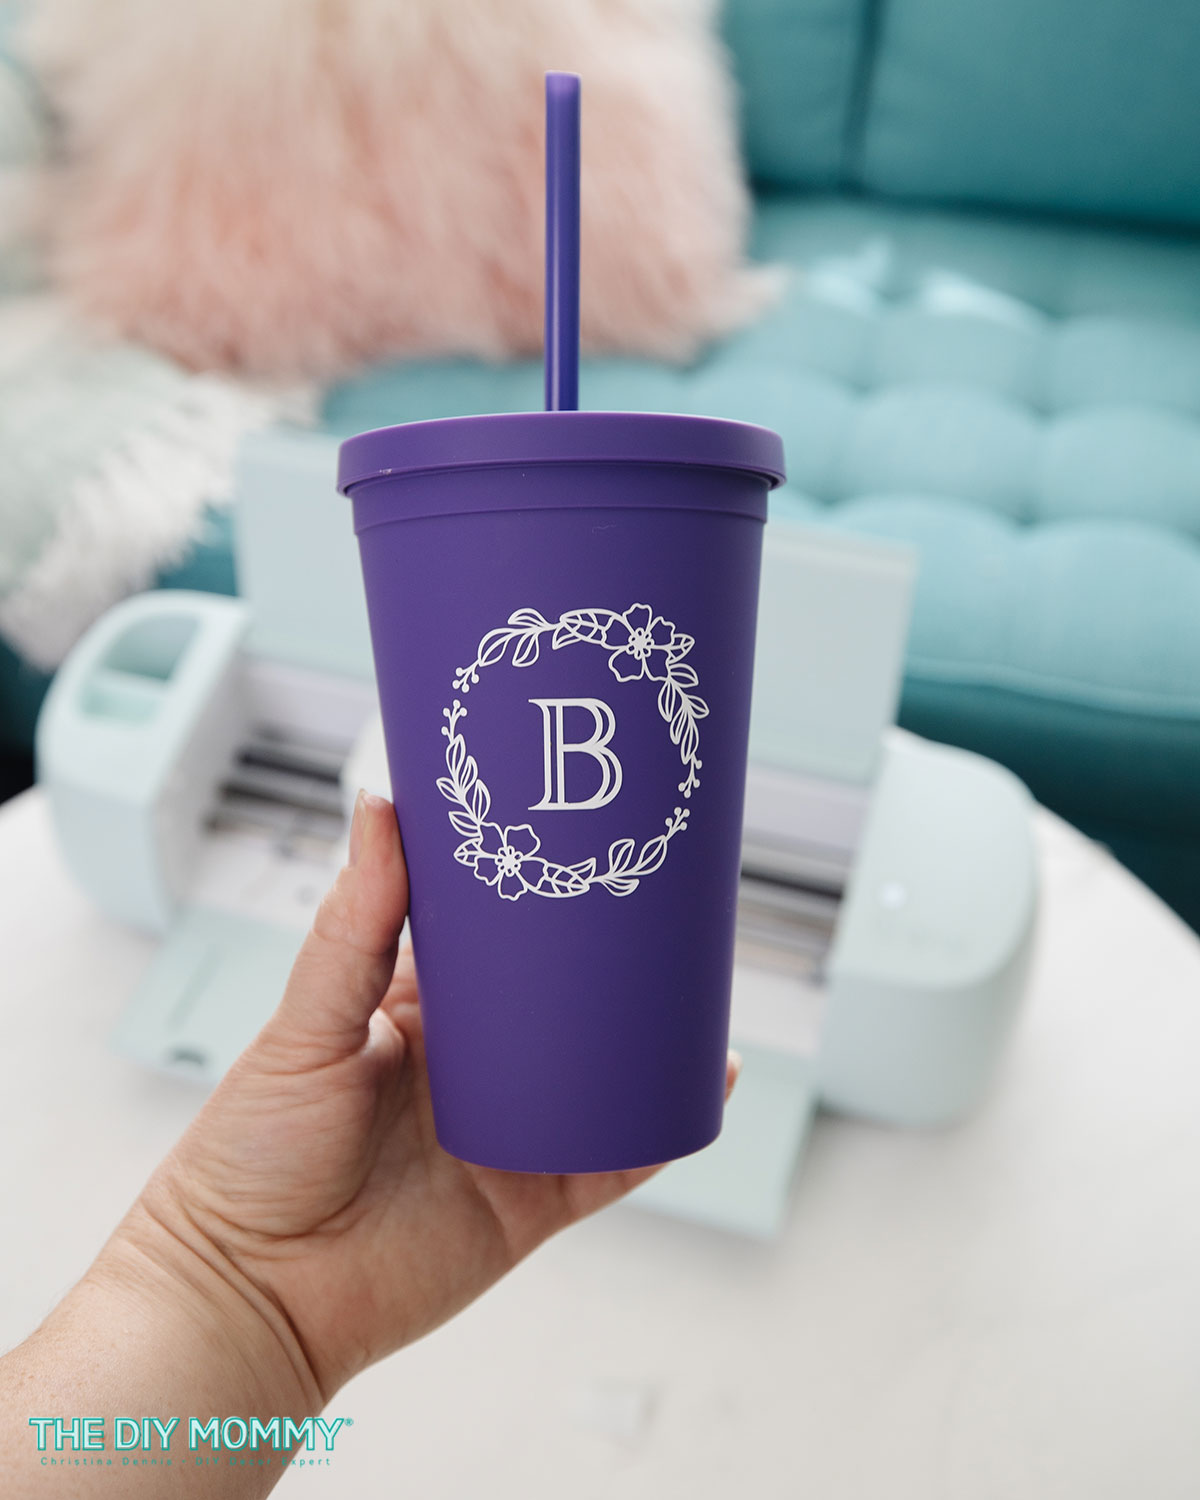
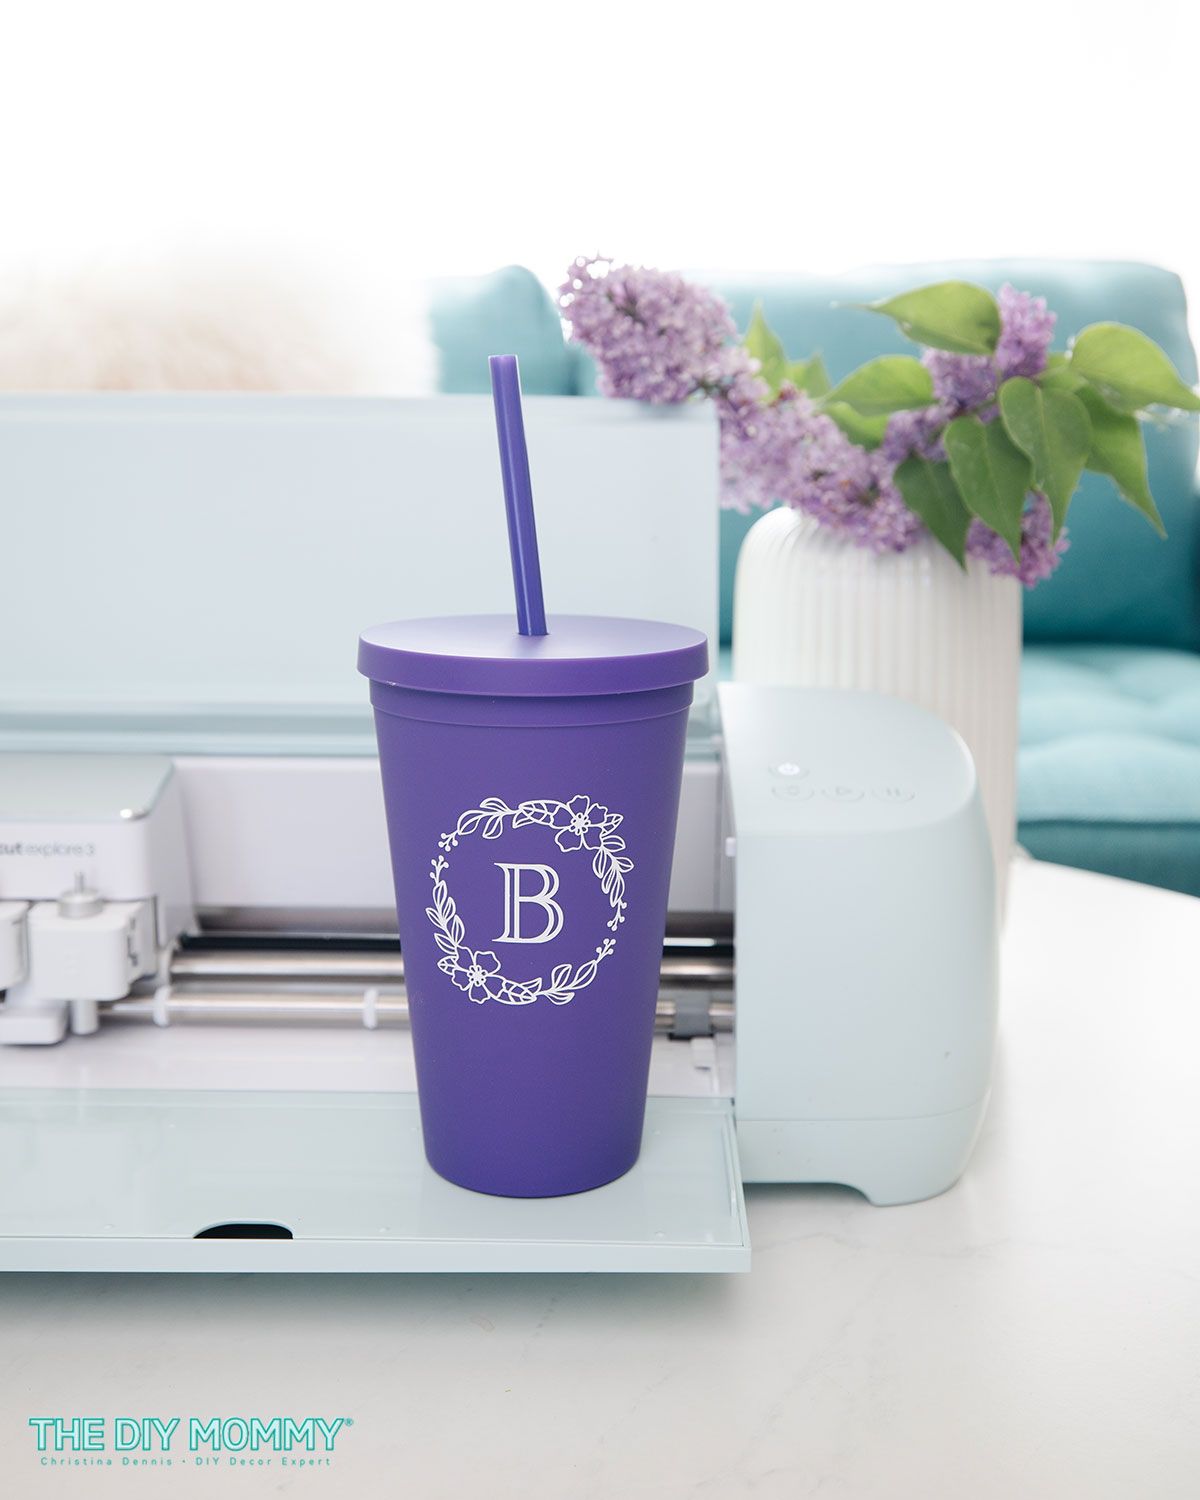
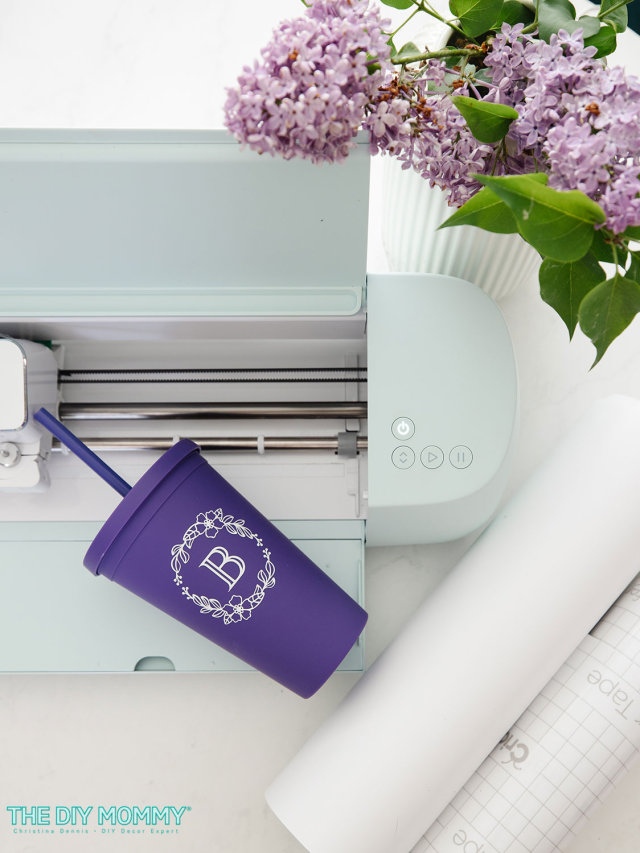
You’re all done & ready to enjoy your custom tumbler! This makes a beautiful gift, or these would also be a wonderful product to sell at a craft market or in an online shop. If applied correctly, I find that finished tumblers like this are usually top rack dishwasher friendly.
Next Steps
Now, do you want to experiment with different colours of vinyl and with layering vinyl? Try this DIY floral monogram tumbler next!
Or, do you want to dry working with Iron-On HTV next? Check out these cute personalized socks you can make as a gift.
I hope you found this Cricut Must Haves for Beginners list & sample starter project helpful! For more Cricut project ideas, you can click here. I love to see what you’re making, so don’t forget to share your DIYs on social media and tag me, @thediymommy.