• Skip to primary navigation
  • Skip to main content
  • Skip to primary sidebar
The DIY Mommy
  • Home Decor
  • DIY Crafts
  • Organize
  • Printables
  • Recipes
  • Life
  • Shop My Home
  • Lake House
  • About
  • Contact
    • Facebook
    • Instagram
    • Pinterest
    • Twitter
    • YouTube
menu icon
go to homepage
search icon
Homepage link
  • Home Decor
  • DIY Crafts
  • Clean & Organize
  • Recipes
  • Free Printables
  • Life
  • Our Little Lake House
  • Shop Our Home
  • About
  • Contact
    • Facebook
    • Instagram
    • Pinterest
    • Twitter
    • YouTube
  • ×

    Home » DIY Crafts » Upcycling Ideas

    Make a Fabric Covered Bulletin Board #12MonthsofDIY

    Published: Feb 24, 2016 · Modified: Apr 26, 2020 by Christina Dennis · This post may contain affiliate links · This blog generates income via ads · 10 Comments

    Bulletin boards are such a handy thing to have around the home - especially in a home office! I had a boring old bulletin board in my craft room office that was begging for a makeover. With the help of some gorgeous fabric from OnlineFabricStore.net, some paint and some brass upholstery tacks, I easily turned it into a beautiful fabric-covered bulletin board that looks like a lovely piece of art on my wall! Here's how to make your own fabric covered bulletin board. Make sure you scroll down to the end of this post to see 11 more fantastic crafts to make with fabric from my Canadian blogging friends.

    How to make a covered bulletin board with paint, fabric and brass upholstery tacks.

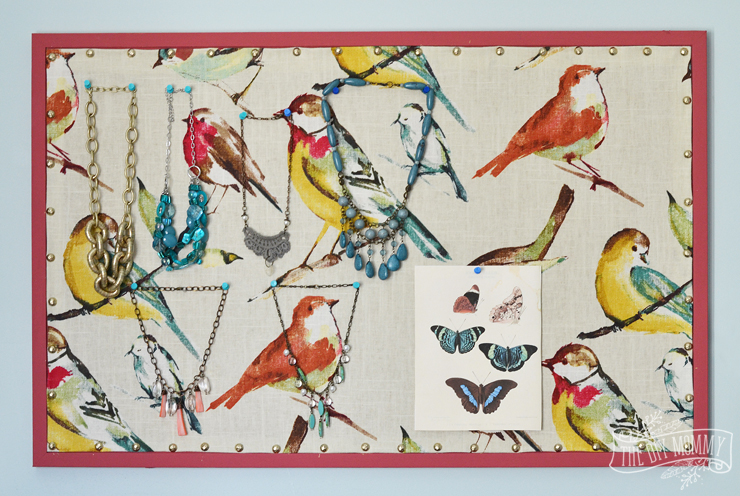
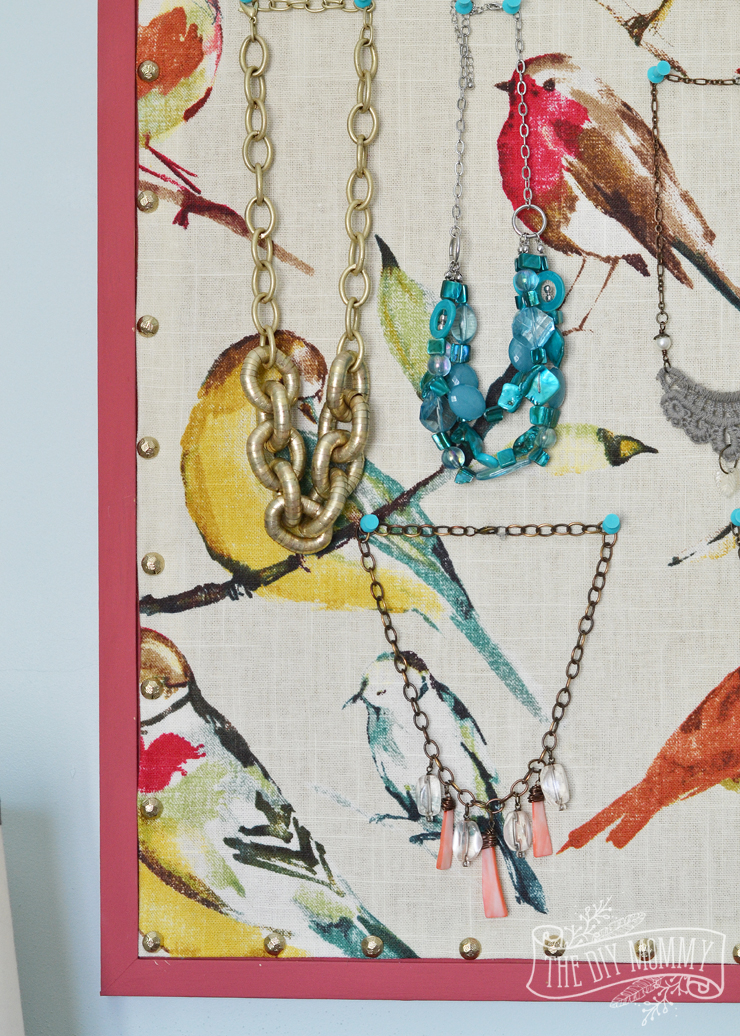
    This bulletin board will be in my craft room office as a place to hang up inspiring photos or important documents, but I also love it as it's displayed here - a place to store my favourite necklaces and art work!

    How to make a covered bulletin board with paint, fabric and brass upholstery tacks.

    Supplies:

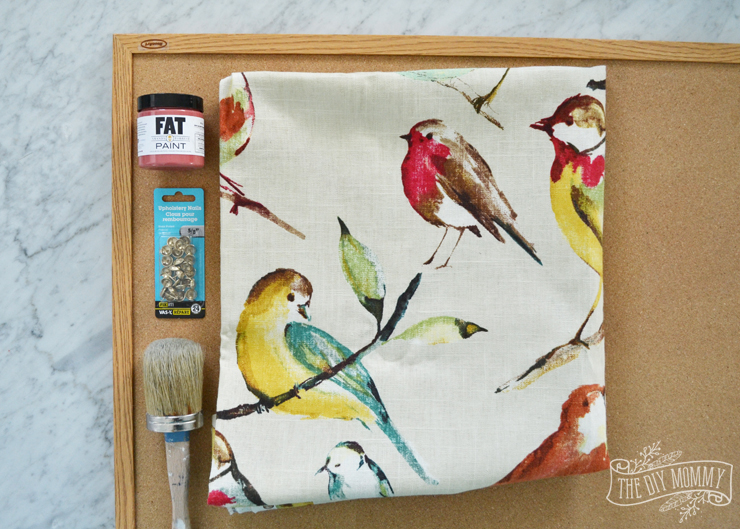
    • 1 yard of fabric (I used Richloom Birdwatcher in Meadow fabric from OnlineFabricStore.net)
    • a sample sized jar of paint (I used FAT Paint in Blushing Bombshell)
    • an old bulletin board with a wooden frame
    • brass upholstery tacks / nails
    • rotary cutter or scissors
    • hard ruler
    • iron

    How to make a covered bulletin board with paint, fabric and brass upholstery tacks.

    Instructions:

    How to make a covered bulletin board with paint, fabric and brass upholstery tacks.

    Paint the wooden frame with a couple coats of paint. Don't worry if the paint gets on the cork board as this will be covered up later with fabric.
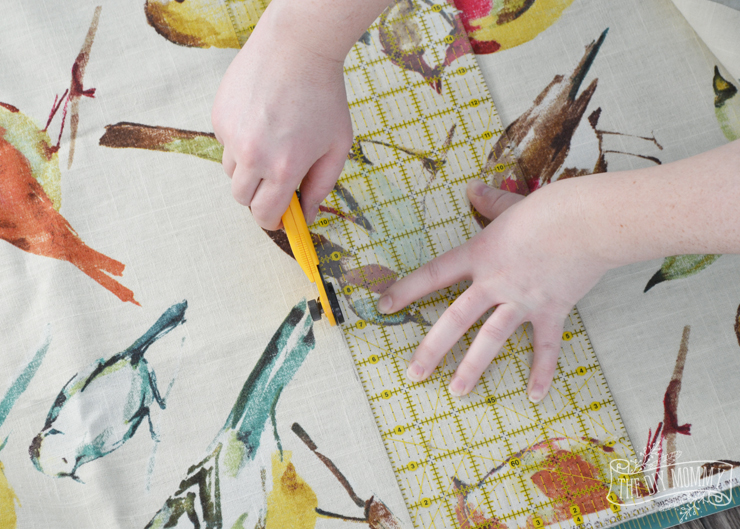
    How to make a covered bulletin board with paint, fabric and brass upholstery tacks.

    Cut a piece of fabric that's 2 inches wider and 2 inches longer than the cork board part of your bulletin board.

    How to make a covered bulletin board with paint, fabric and brass upholstery tacks.

    Fold all of the fabric edges over 1 inch to the back side of the fabric and press.

    How to make a covered bulletin board with paint, fabric and brass upholstery tacks.

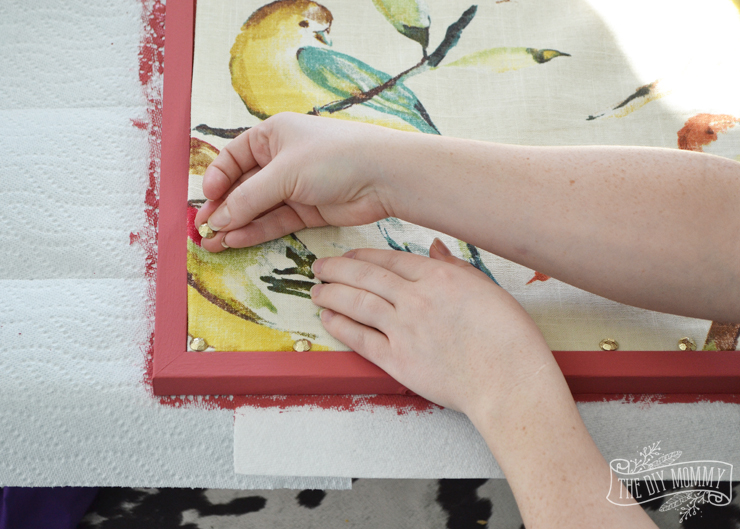
    Place the fabric onto the bulletin board right-side-up. Push one upholstery tack through the fabric and the bulletin board on one corner, aligning the fabric to the inside of the frame. Then, pull the fabric gently and secure the opposite corner with a tack. If there's excess fabric, fold it and tuck it further underneath. Repeat this process with all four corners of the fabric. Next, tack the centers of the fabric to the bulletin board.

    How to make a covered bulletin board with paint, fabric and brass upholstery tacks.

    Then fill in the rest of the fabric's edges with tacks. You can use a ruler to make sure the tacks are an equal distance apart, or just eyeball it like I did.
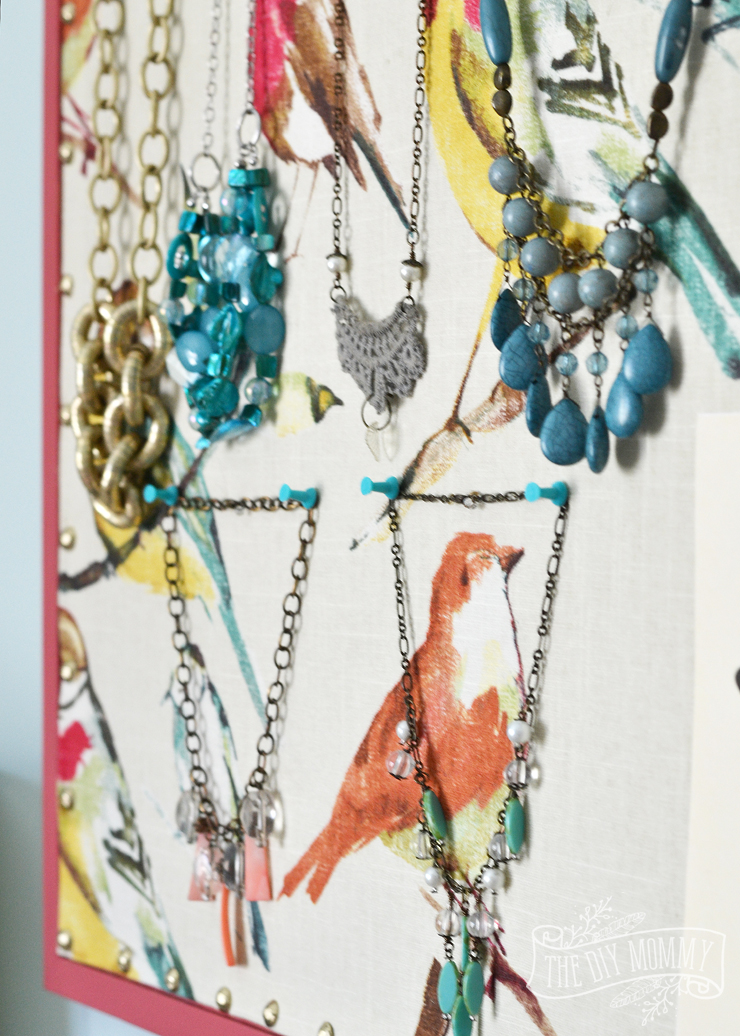
    How to make a covered bulletin board with paint, fabric and brass upholstery tacks.

    That's it! Your beautiful new bulletin board is ready to hang and enjoy. I love how this fabric looks like it's a watercolour painting. It looks like a happy piece of art on my wall.
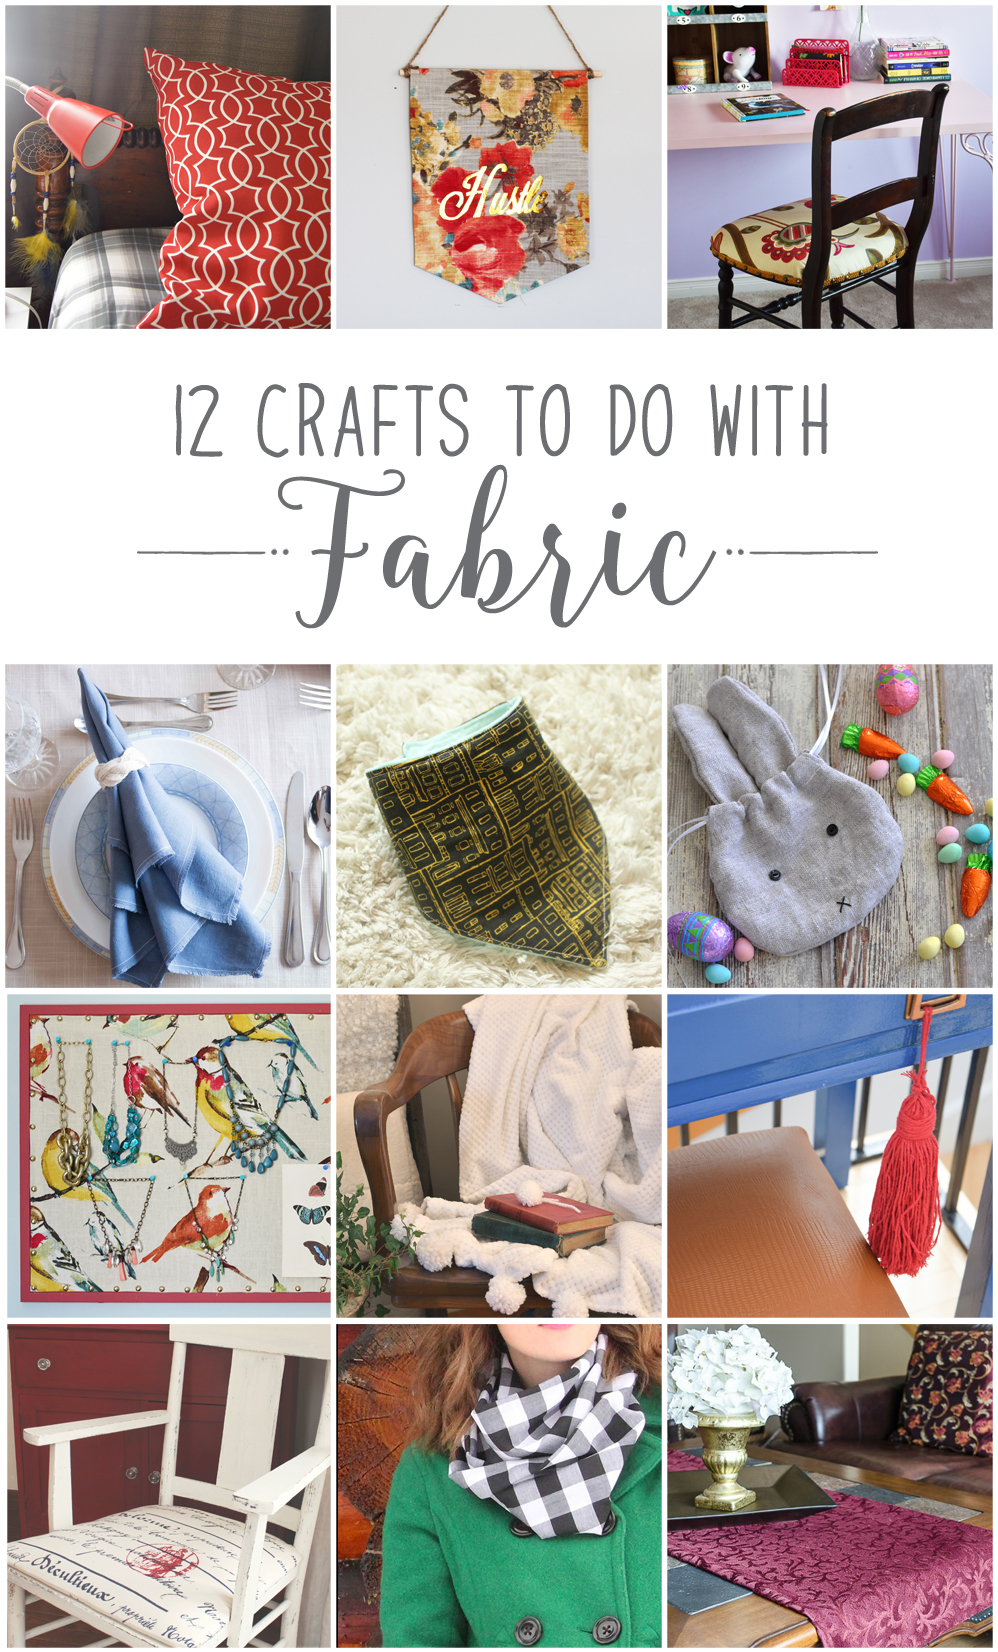
    12 Creative Crafts to Make with Fabric! #12MonthsofDIY

    Now it's time to see the rest of the DIY fabric project ideas from my Canadian blogging friends.

    From the top left, they are:

    A Reading Pillow from Bette Creek

    Fabric Banner from Brooklyn Berry Designs

    Reupholstered Bedroom Chair from Woman in Real Life

    DIY Linen Napkins and Nautical Napkin Rings from Sustain My Craft Habit

    DIY Baby Bandana Bib from Mommyzoid

    Bunny Treat Bag from Life Is A Party

    Fabric Covered Bulletin Board from The DIY Mommy

    DIY Chenille Blanket with Pom-Poms from Vin'yet Etc.

    Alligator Vinyl Pouf from PMQ For Two

    Upcycled Commode Chair from New House New Home

    DIY Infinity Scarf from Fresh Crush

    Coffee Table Runner Easy Sewing Tutorial from Time with Thea

    Are you on INSTAGRAM? Make sure to follow me there to see how YOU can be involved in our #12MonthsofDIY series this year! I'd love to see what you create!

    Disclaimer: This post is sponsored by OnlineFabricStore.net. As always, all of the opinions here are my own. I only recommend companies that I use and love myself.

    More Inspiration

    • DIY Dollar Tree Heart Shaped Wreath
    • How to Set Up a Cricut for the First Time (Step by Step!)
    • Inexpensive Gift Wrapping Ideas that look stunning!
    • Free Printable Christmas Coupon Book for Kids

    Reader Interactions

    Comments

    1. Ariel

      February 24, 2016 at 6:25 pm

      What a lovely pattern! I love the details on the birds. Great idea for a project too! Much nicer than just plain old cork.

      Reply
    2. Jen @ Fresh Crush

      February 24, 2016 at 7:48 pm

      Fantastic pattern! Love it, and love this idea! Why not make a bulletin board pretty?!

      Reply
    3. Heather Mills

      February 25, 2016 at 6:07 pm

      This is such a cute idea!

      Reply
    4. Thea

      February 25, 2016 at 8:09 pm

      Love the idea, love the fabric and love how it turned out. Very clever way to 'freshen up' an older bulletin board.

      Reply
    5. Laurie @ Vin'yet Etc.

      February 26, 2016 at 3:15 am

      This looks so fresh and reminds me of Spring! It's a great use of your material and what a wonderful way to add style to a boring bulletin board.

      Reply
    6. Dannyelle @ www.lifeisaparty.ca

      February 27, 2016 at 7:31 am

      What a great project, turned out great. Love the fabric, and the pillow you made too -so pretty!

      Reply

    Trackbacks

    1. A READING PILLOW - Bette's House says:
      February 24, 2016 at 7:41 am

      […] Fabric Covered Bulletin Board from The DIY Mommy […]

      Reply
    2. How to make an Infinity Scarf - Fresh Crush says:
      February 24, 2016 at 8:38 am

      […] Fabric Covered Bulletin Board from The DIY Mommy […]

      Reply
    3. Alligator Vinyl Poof • A PMQ for two (and three pets) says:
      February 25, 2016 at 9:14 am

      […] Fabric Covered Bulletin Board from The DIY Mommy […]

      Reply
    4. Bunny Treat Bag - Life is a Party says:
      March 29, 2018 at 7:51 pm

      […] Fabric Covered Bulletin Board from The DIY Mommy […]

      Reply

    What do you think? Cancel reply

    Your email address will not be published. Required fields are marked *

    This site uses Akismet to reduce spam. Learn how your comment data is processed.

    Primary Sidebar

    Welcome!

    Christina Dennis, The DIY Mommy

    I'm Christina and I'm sharing budget-friendly DIY & decor ideas to create a cozy home and life you love!

    Read more about me

    Latest Posts

    • Introducing my NEW Canva Mood Board Templates & Mini Course!
    • We built a small bathroom wet room from scratch!
    • Creative And Unique DIY Wall Art Ideas

    What's my home decor style?

    Discover the home decor style that best fits your personality and lifestyle. This two-minute quiz is going to give you the direction you need to start the big, bold room makeovers that you've always wanted to try!

    Find out now!

    Archives

    Footer

    ↑ back to top

    About

    • About The DIY Mommy
    • Privacy Policy
    • Disclosure Policy
    • Terms of Service

    Newsletter

    • Sign Up! for emails and updates

    Contact

    • Contact

    As an Amazon Associate I earn from qualifying purchases.

    Copyright © 2009 - 2023 The DIY Mommy. "The DIY Mommy" is a registered trademark.