• Skip to primary navigation
  • Skip to main content
  • Skip to primary sidebar
The DIY Mommy
  • Decor
    • All Home Decor
    • Room Makeovers
    • DIY Camper Renovations
    • Simple Decorating Tips
    • IKEA Hacks & Decor
  • Crafts
    • All Crafts
    • DIY Gifts
    • Cricut Crafts
    • Dollar Store Crafts
    • Upcycling Ideas
    • Knitting & Crochet
    • Sewing
    • Macrame
    • Woodworking
  • Recipes
    • All Recipes
    • Baking
    • Breakfast
    • Lunch
    • Dinner
    • Snacks
    • Drinks
    • Dessert
  • Clean & Organize
  • Life
    • All Life
    • DIY Business & Blogging
    • Travel on a Budget
    • DIY Kids Activities
    • Fashion
    • Health & Beauty
    • Shopping
    • Randoms
  • Printables
  • Shop My Home
    • Our Home
    • Our Camper
    • Our Little Lake house
  • Lake House
  • Podcast
  • About
    • About The DIY Mommy
    • Terms of Service
    • Privacy & Cookie Policy
    • Disclosure Policy
    • Sign up for my Newsletter & Get Free Stuff!
    • Link Parties
  • Contact
    • Facebook
    • Instagram
    • Pinterest
    • Twitter
    • YouTube
menu icon
go to homepage
search icon
Homepage link
  • Home Decor
    • Room Makeovers
    • DIY Camper Renovations
  • Crafts
    • DIY Gifts
    • Cricut Crafts
    • Upcycling Ideas
    • Dollar Store Crafts
    • DIY Sewing
  • Clean & Organize
  • Recipes
  • Free Printables
  • Life
  • Our Little Lake House
  • Shop Our Home
  • Podcast
  • About
  • Contact
    • Facebook
    • Instagram
    • Pinterest
    • Twitter
    • YouTube
  • ×

    Make DIY Photo Backdrops with Fabric or Paper

    Published: Jul 17, 2012 · Modified: Aug 15, 2012 by Christina Dennis · This post may contain affiliate links · This blog generates income via ads · 6 Comments

    by Christina Dennis

    DIY Photo Backdrops by The DIY Mommy

    I love taking photos of my two girls! They're just so darn cute and I want to capture every stage of their little lives with images that I can treasure forever. While I like to take photos with natural backgrounds (like the beautiful outdoors), I also like to experiment with creating interesting backdrops with easy and inexpensive materials that I have in my crafty arsenal. My favourite materials to use as backdrops are simple fabrics and white banner paper - both of which also work really well ask backdrops for product photography if you're a DIY mommy that sells her creations!

    DIY Photo Backrops by The DIY Mommy

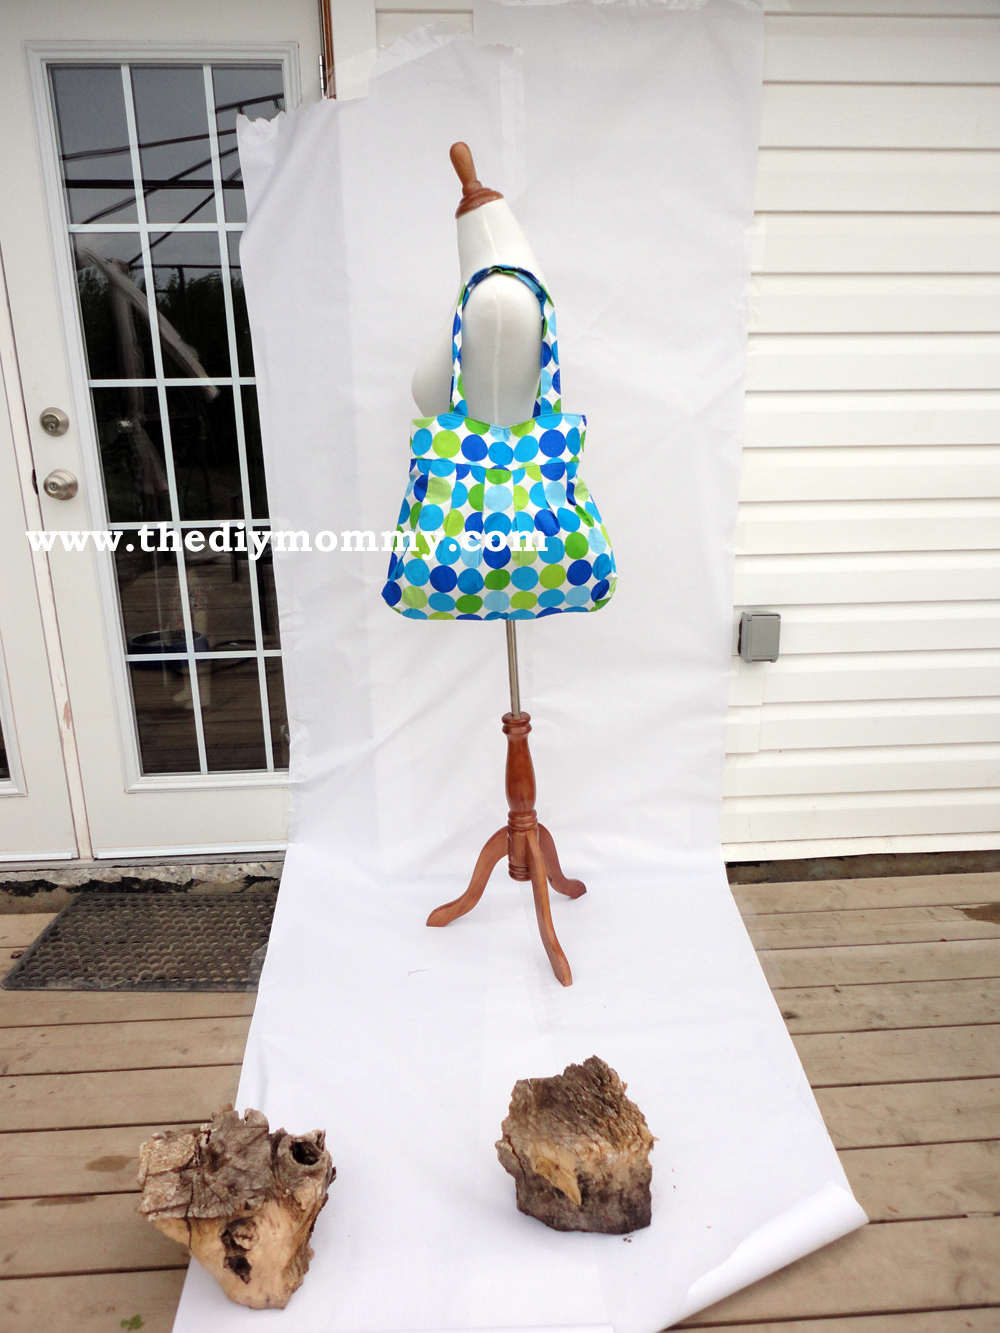
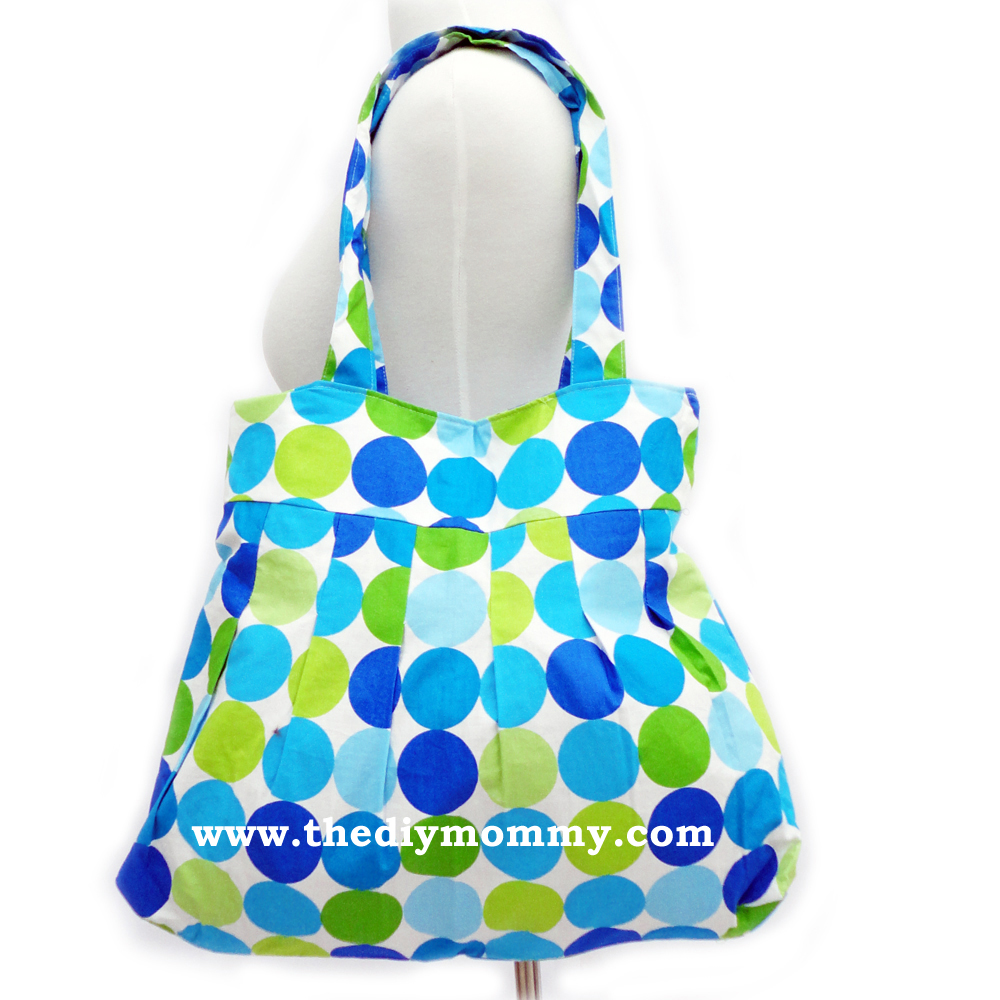
    For a simple white backdrop for photos, I use banner paper. It comes in very long rolls and you can buy it at most stationery or office supply stores. My favourite setting to take photos in is outside at the middle of the day when it's cloudy (it's daylight, but the sun can't cause shadows). I roll out a long piece of banner paper, and tape it up to the side of my house with packing tape as high as I need it to be. Then, I let it roll gently onto the ground at least 5 feet and secure the bottom with whatever heavy things I can find. In this case, stumps! I then set my subject (here, it's a bag for my Golly Gee! Baby line) on the paper, about 6" from the side of the house and I shoot away. I always take many, many pictures so that I have lots to choose from when I'm editing them.

    DIY Photo Backrops by The DIY Mommy

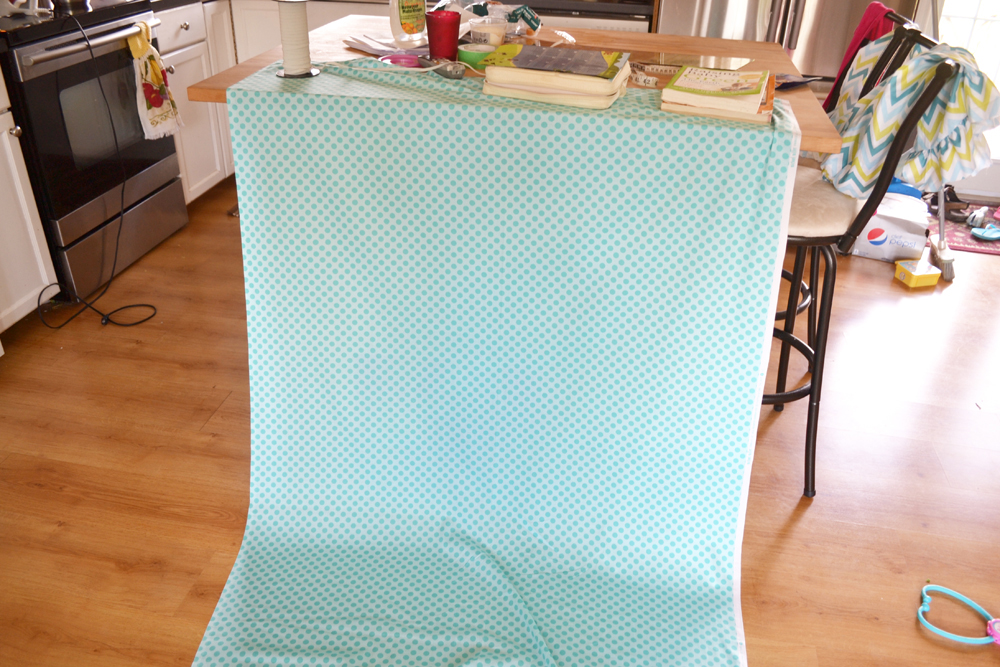
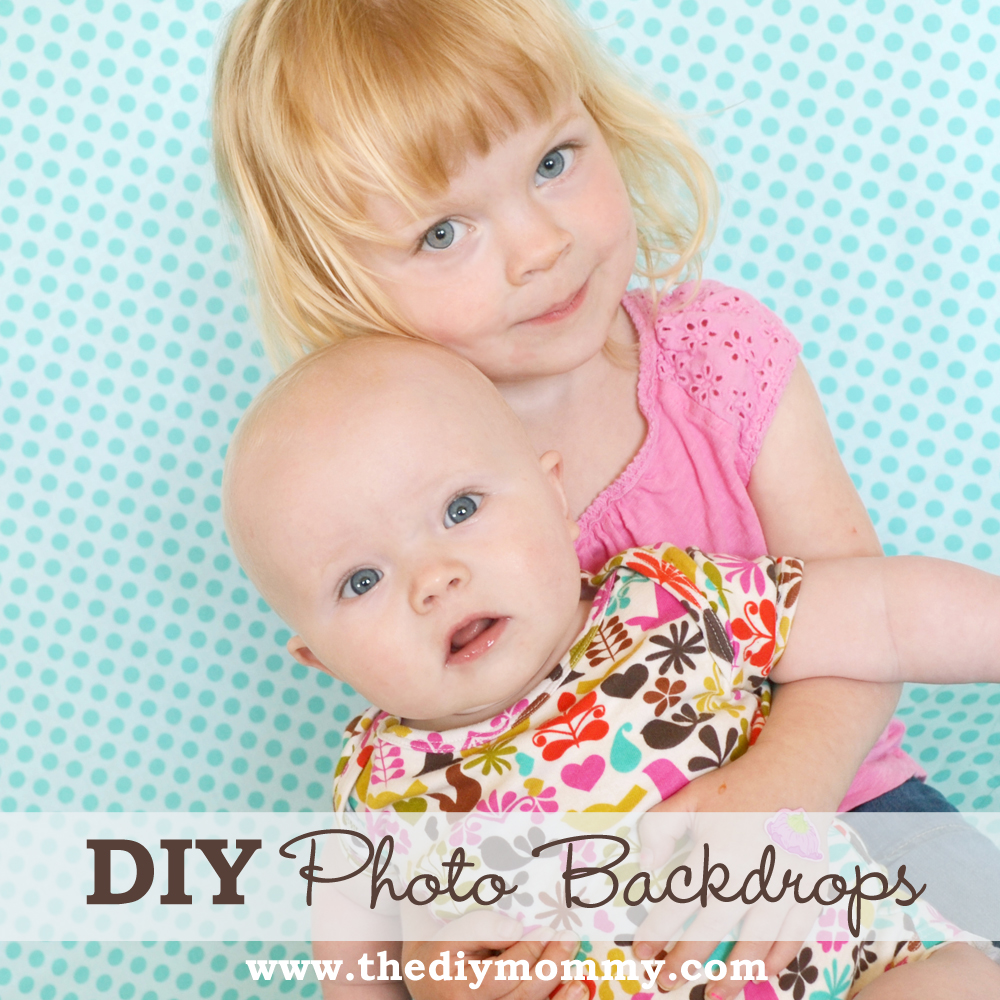
    If I'm looking for a photo backdrop with a little more pizazz, I use some brightly coloured fabric! Here, I've used a bolt of quilter's cotton in a lovely aqua shade with small polka dots. The dots are cute, but they're not busy enough to distract from my subjects which are my dear girls for this picture!

    And, as the photo above shows you all, here's my secret to crafting with two children in the house: RARELY CLEAN YOUR HOME. *wink*

    Here, I've placed the end of the fabric on top of my (messy) kitchen island (iron out the fabric first if it's wrinkly or has a crease down the middle) and secured it with heavy objects. Let the fabric drape down to the floor, and continue it a few feet on the floor in front of your island, counter, table, desk or whatever high object works! Place your subjects a few inches from the back of the fabric and snap away!

    DIY Photo Backrops by The DIY Mommy

    In both cases, I open up my favourite shots in Photoshop and edit them a little. First, I'll crop the image so that I take out any secret things I don't want in it (like tree stumps or messy kitchens). If there's only one other edit I do, it's open up the "curves" window and lighten the image (as shown above). Sometimes I'll adjust the colour balance and other things, but my Photoshopping skills are minimal so I usually keep it pretty simple.

    Here's the finished product using a fabric backdrop and my darling girls (I took at least 50 shots, cropped the photo and lightened it):

    DIY Photo Backdrops by The DIY Mommy

    And here is one using banner paper outside with one of my products (I cropped the photo, lightened the background, and then ended up erasing the background completely using the eraser tool):

    DIY Photo Backdrops by The DIY Mommy

    While they're no substitute for professional photos, DIY photos of children and DIY products are so much fun to experiment with! Try playing with paper and fabric next time you take some photos and see what you can come up with that's interesting and unique.

    Christina Dennis is the creator and designer behind Golly Gee Baby, a collection of unique and colourful baby clothing and accessories that are ethically manufactured.

    « Sew a One Yard Chevron Dress
    Sew Designer Drapes the Easy Way »

    Reader Interactions

    Comments

    1. Nicholas John

      July 24, 2012 at 4:04 pm

      Well what can I say these are nice I like what you are doing.

      Reply
    2. Linette

      October 03, 2014 at 6:10 pm

      It's an awesome paragraph for all the online
      people; they will get advantage from it I am sure.

      Reply
    3. xuyen viet

      August 04, 2017 at 10:14 pm

      two babies look lovely

      Reply

    Trackbacks

    1. Affordable Tips for Taking a Phenomenal Family Photo | PFS says:
      August 24, 2012 at 6:47 am

      [...] butcher paper, shower curtains, fabric remnants, and even wrapping paper can be used for colorful DIY backdrops when photographing children and [...]

      Reply
    2. 55 Awesome DIY Photography Backdrops - PhotographyPla.net says:
      December 18, 2013 at 5:46 am

      […] Fabric or Paper Backdrop […]

      Reply
    3. 10 Simple Springtime Photo Backgrounds says:
      March 28, 2017 at 11:41 am

      […] It doesn’t get much easier than this. You can actually get some cute wrapping paper at the Dollar Tree. All you have to do is tape it to the wall and snap! This is one of my favorite DIY springtime photo backgrounds. The DIY Mommy shows you how she does it HERE. […]

      Reply

    What do you think? Cancel reply

    Your email address will not be published. Required fields are marked *

    This site uses Akismet to reduce spam. Learn how your comment data is processed.

    Primary Sidebar

    Welcome!

    Christina Dennis, The DIY Mommy

    I'm Christina and I'm sharing budget-friendly DIY & decor ideas to create a cozy home and life you love!

    Read more about me

    Latest Posts

    • Gutting the tiny cabin (and what we found!)
    • Peonies 101: How to Grow Them, Store Them & Get Ants Off Them!
    • Modern Rustic Basement Makeover with Hidden Storage Ideas

    What's my home decor style?

    Discover the home decor style that best fits your personality and lifestyle. This two-minute quiz is going to give you the direction you need to start the big, bold room makeovers that you've always wanted to try!

    Find out now!

    Archives

    Latest YouTube Video

    [youtube]https://youtu.be/MjDoqQFoj9g[/youtube]

    Footer

    ↑ back to top

    About

    • Privacy Policy
    • Disclosure Policy
    • Terms of Service

    Newsletter

    • Sign Up! for emails and updates

    Contact

    • Contact

    As an Amazon Associate I earn from qualifying purchases.

    Copyright © 2009 - 2022 The DIY Mommy. "The DIY Mommy" is a registered trademark.