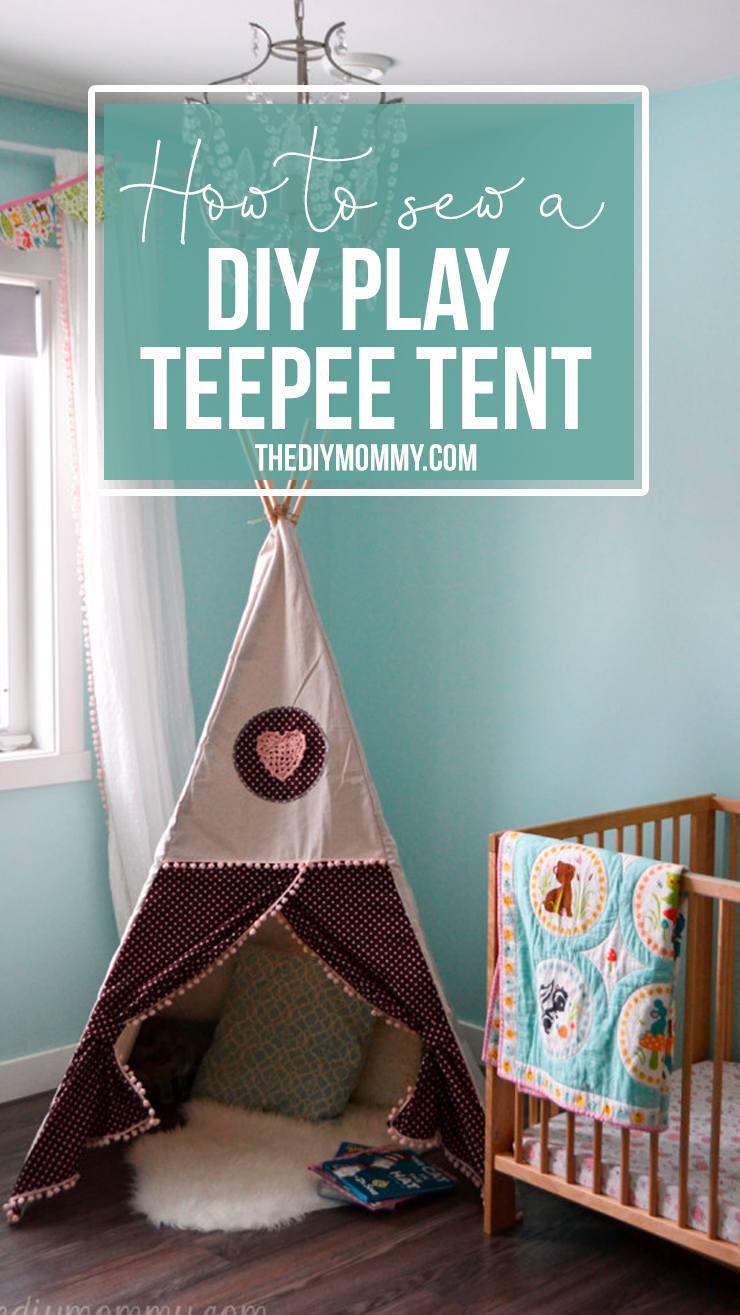
Sew a DIY Play Tent
This post may contain affiliate links · This blog generates income via ads
My Little A loves to read already and she’s only just turned two years old! Her reading, mind you, is staring at picture books lovingly but I’m thrilled that she’s showing such a love for books at this age. I’m trying to finish her little room before Baby Three comes, and I thought making a cute tent in her room for her to retreat with some books to would be fun. I’ve seen so many creative DIY play teepees and tents online, and I thought I’d create my own for my little girl. I did, and I’m so excited with how it turned out! She absolutely loves it, and it’s such an adorable addition to her room decor.
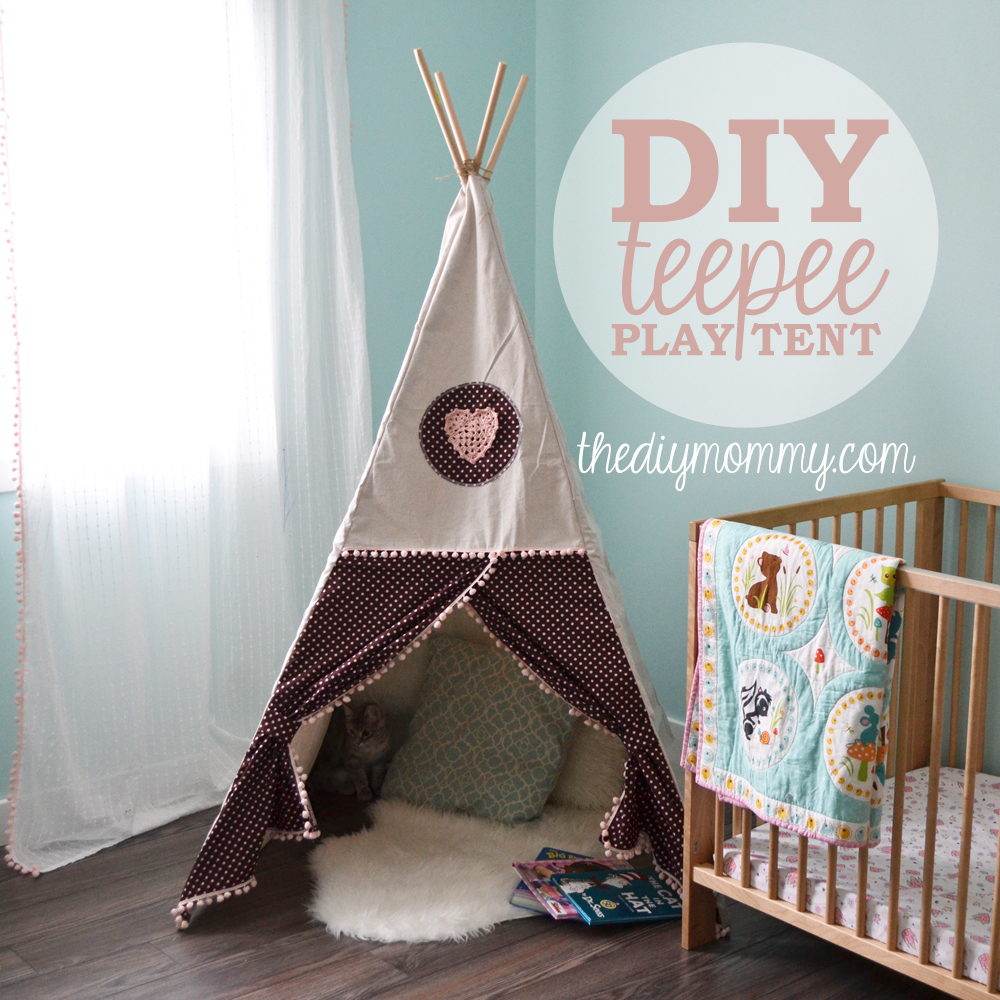
This is a toddler-sized teepee (about 36″ x 36″ and 5′ tall), so if you follow my instructions you should come out with something with about the same dimensions! If you want to make a larger teepee, buy longer dowels and calculate your own measurements for the fabric (I’ll explain how I found mine out).
This tutorial does require sewing, but it’ simply a lot of straight lines with a regular ol’ sewing machine and/or serger. If you don’t like to or cannot sew, I recommend checking out this no-sew teepee tutorial. The fabric is wrapped around the frame rather than sewed together.
I chose to make this tent with 4 dowels (for simplicity and budget sake), but I’ve also seen them made with 5 or more. If you’d like to use more, you’ll also have to calculate your own measurements for the narrowed side panels. I really like our simple, four-sided tent, however!
Here’s how to make your own:
Materials:
- 4 lightweight wooden dowels that measure 6′ tall and 3/4″ in diameter or less *For those that have asked, I found my dowels at Home Depot in the moulding section. They are 3/4″ full rounds made from Hemlock that were 12′ long that I cut down to size.*
- a painter’s cotton canvas drop cloth (I used a 9′ x 12′ drop cloth and have plenty left over for other projects)
- 1 1/2 yards of printed cotton fabric (for the curtain doors, tie backs and embellishments)
- 4 yards of decorative trim (optional) (I used pom-pom trim leftover from this project)
Directions:
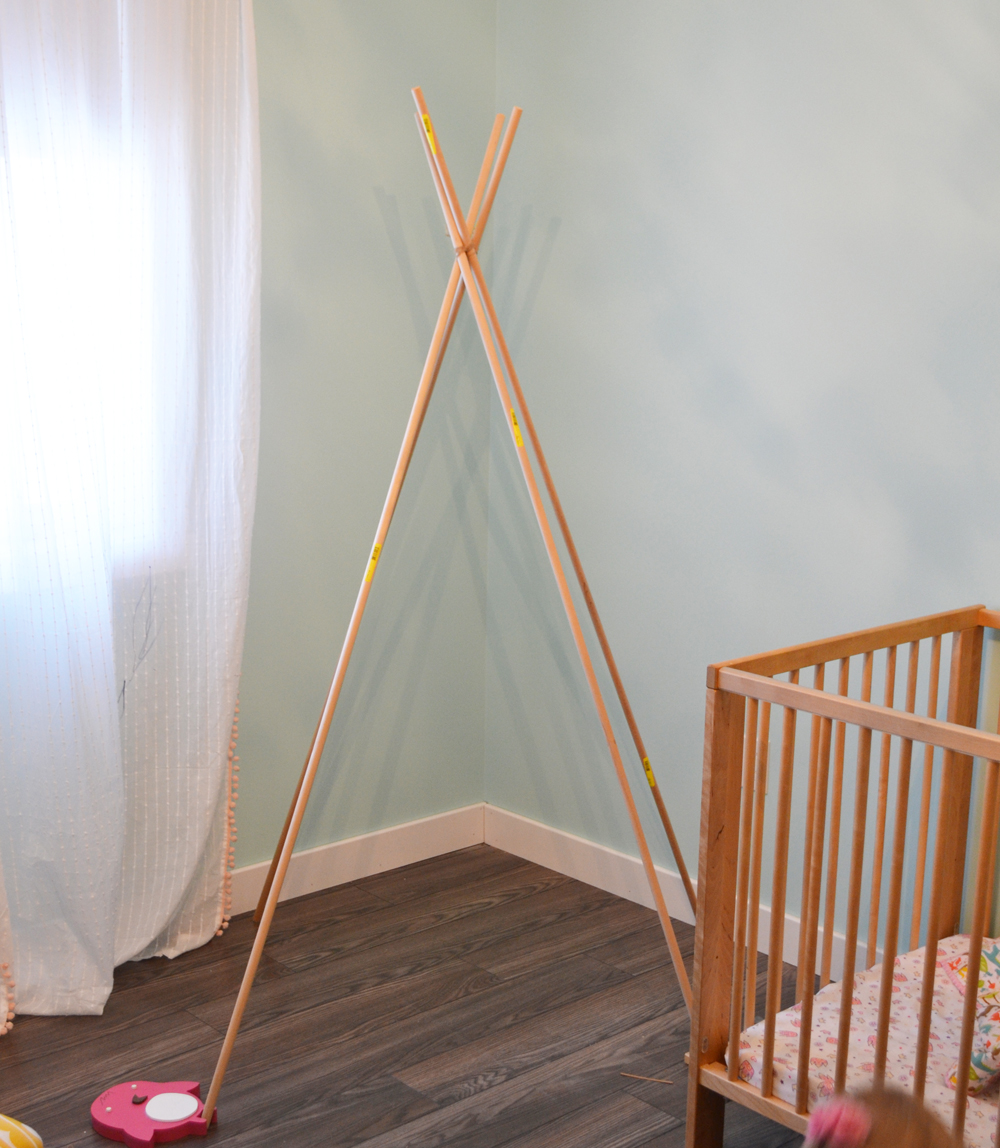
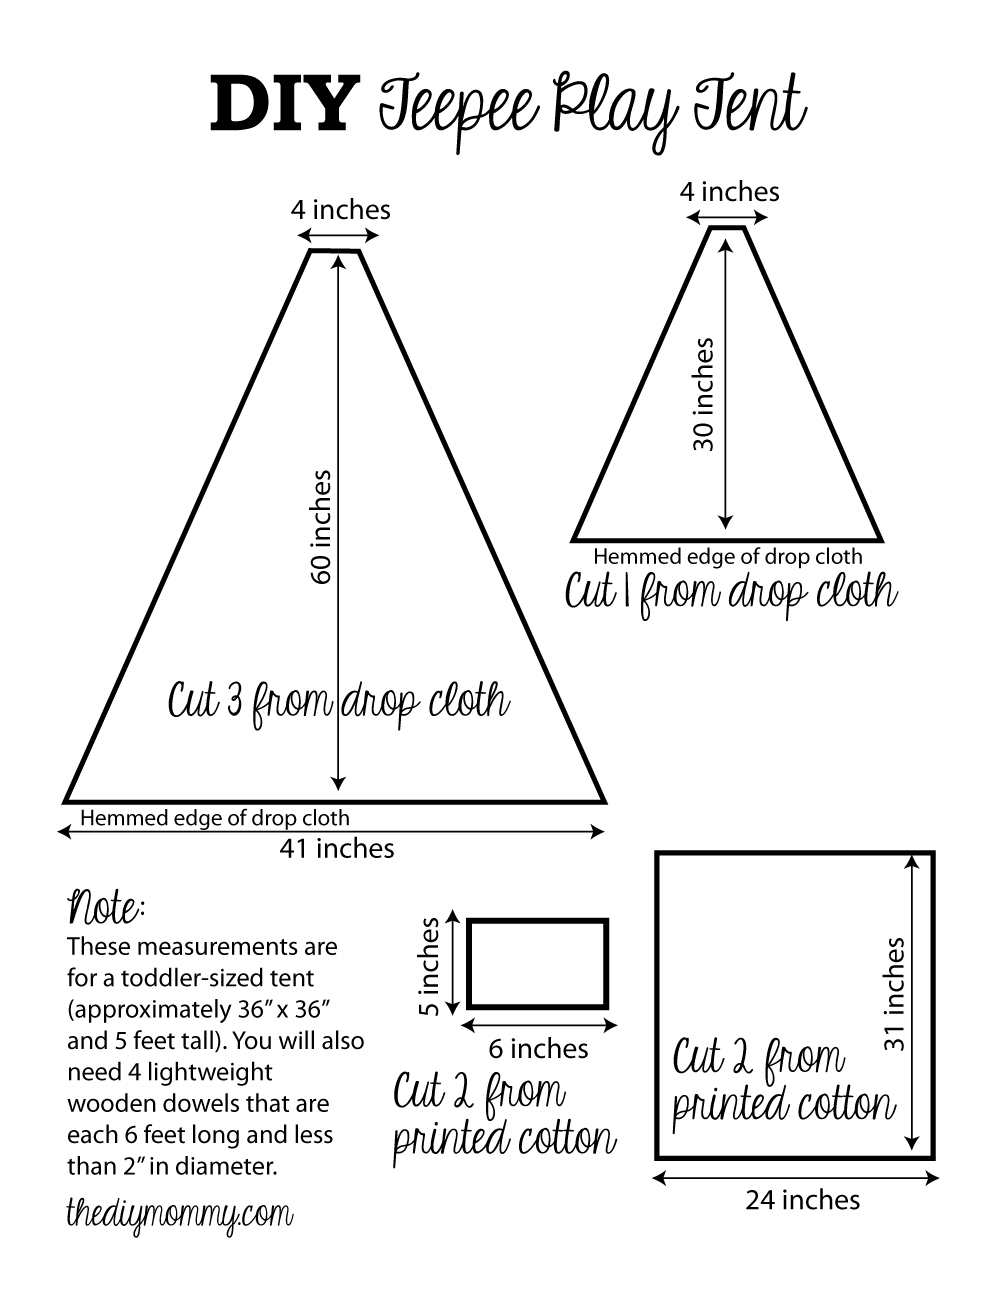
If you’re making a tent that’s the same size as mine, follow the cutting guide below. If not, set up your 4 longer dowels by tying them together at the top (about 9-12″ from the top), spreading out the bases evenly to the height you want, and measuring the width and height of the triangles you’ll need.
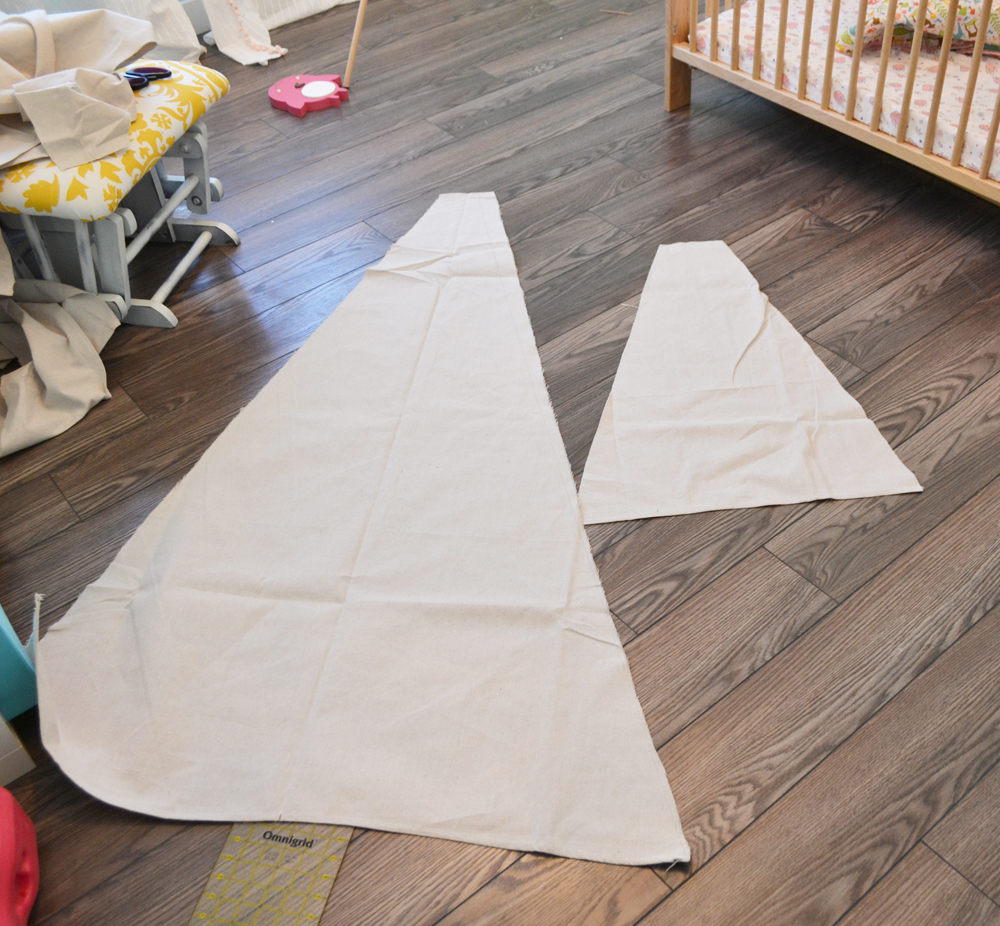
For a toddler teepee like mine, cut out three triangles from the drop cloth, one smaller triangle for the front panel from the drop cloth, and the two large and two small rectangles from the printed cotton fabric. Use the guide below for your measurements and make sure that the bottom of each piece is on a hemmed edge of the drop cloth. This saves you having to hem yourself!
The cutting is my least favourite part because of the bulk of the fabric and size of the pieces, so I cleared out a large space on the floor in Little A’s room to do it! I used a measuring tape, a hard edged ruler and a pencil to measure my pieces and ensure I had straight lines.
Once the pieces are all cut out, it’s time to get started on the front panel with the curtain doors.
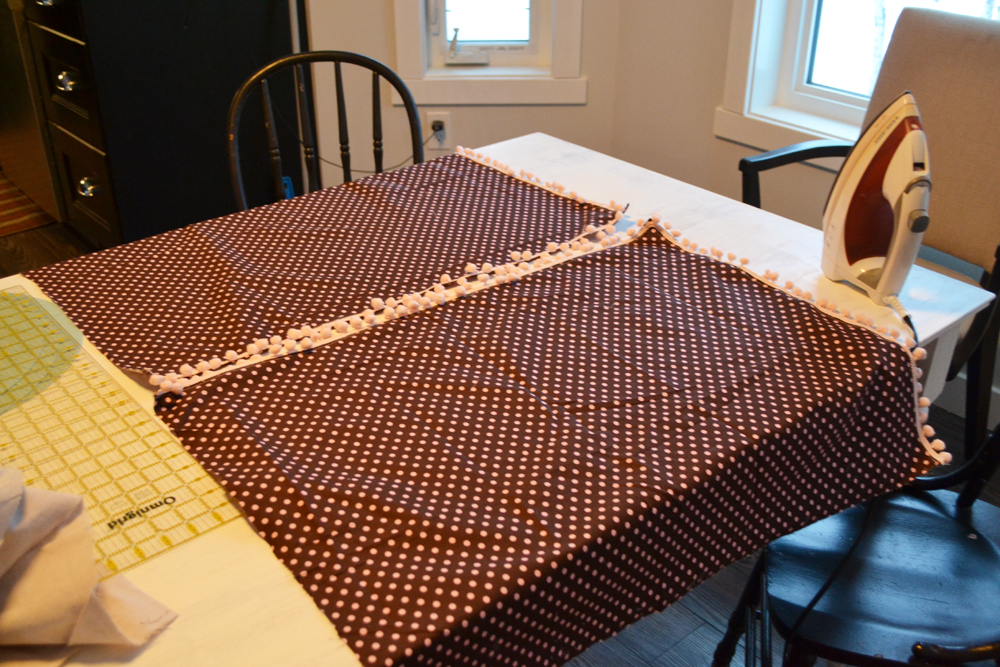
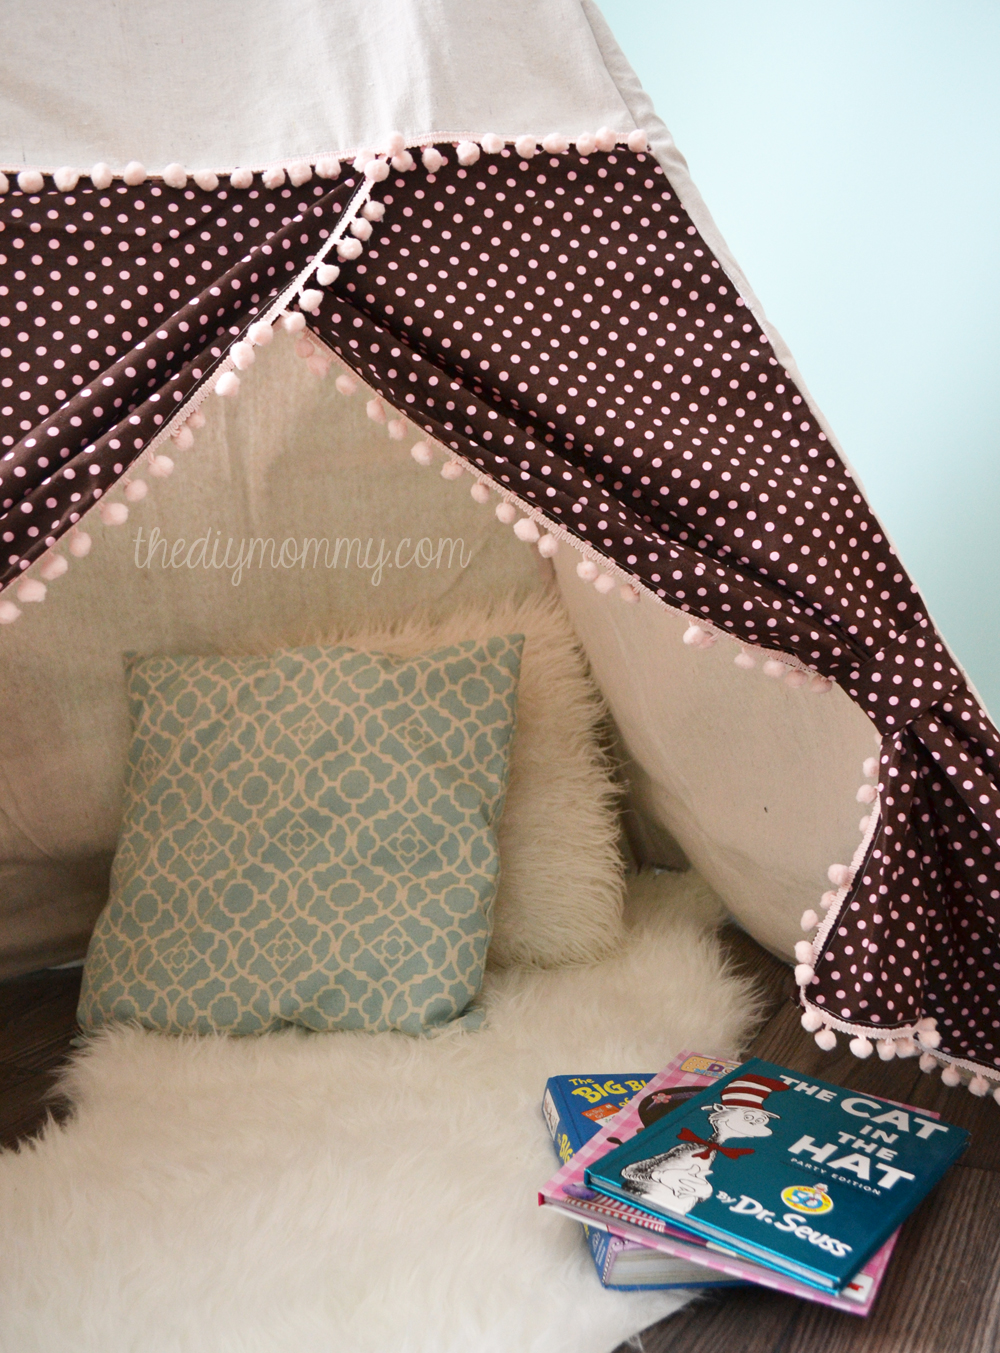
Hem the bottom and the two inside edges of the large rectangular curtain pieces (fold over 1/4″, then another 1/4″ and stitch). You can then embellish the inside and bottom edges with trim if you wish.
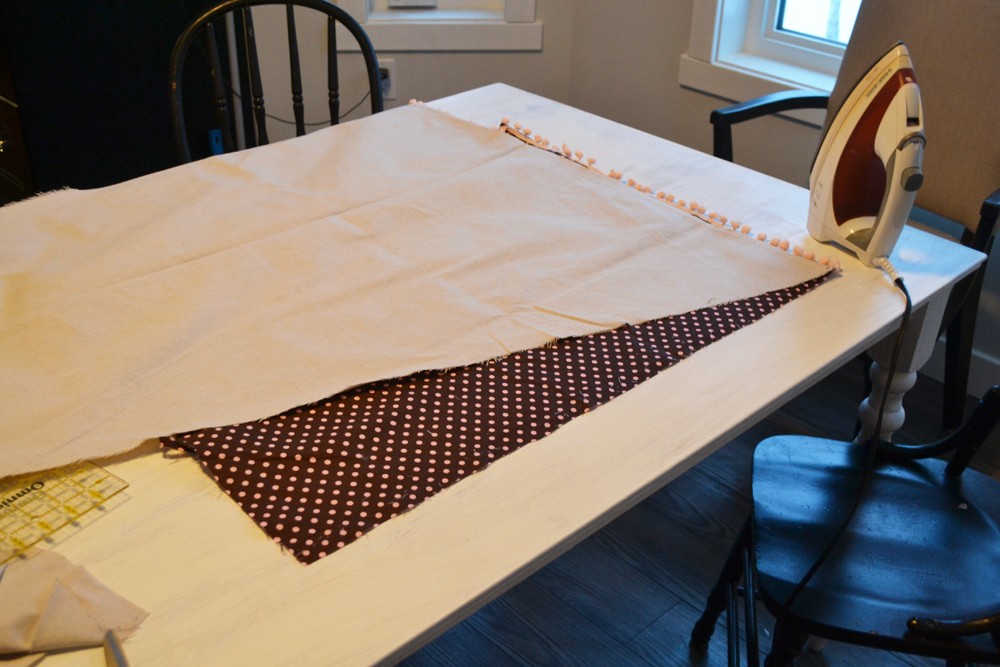
Lay the bottom diagonal edge of one of the drop cloth triangles over one of the curtains and cut the side of the curtain diagonally to match the side angle of the drop cloth triangle. Repeat with the other curtain piece.
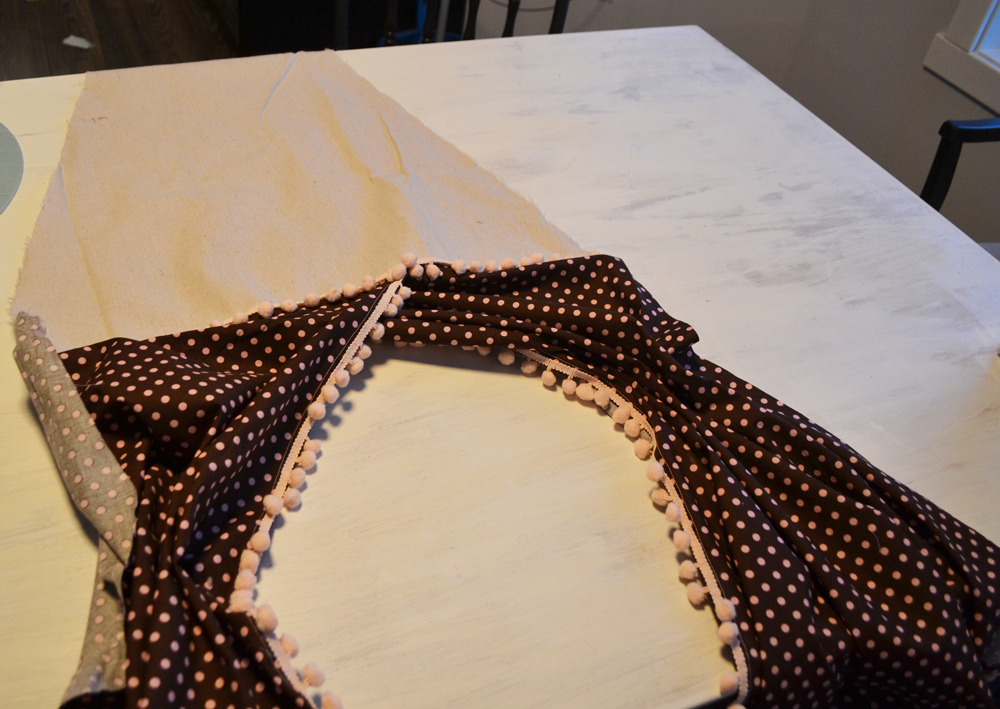
Next, find your small drop cloth triangle and pin your two curtain pieces to it so that their top edge is about 1/2″ above and behind the small drop cloth triangle. Adjust the curtains to overlap and match the sides of the drop cloth triangle. Pin and then stitch together.
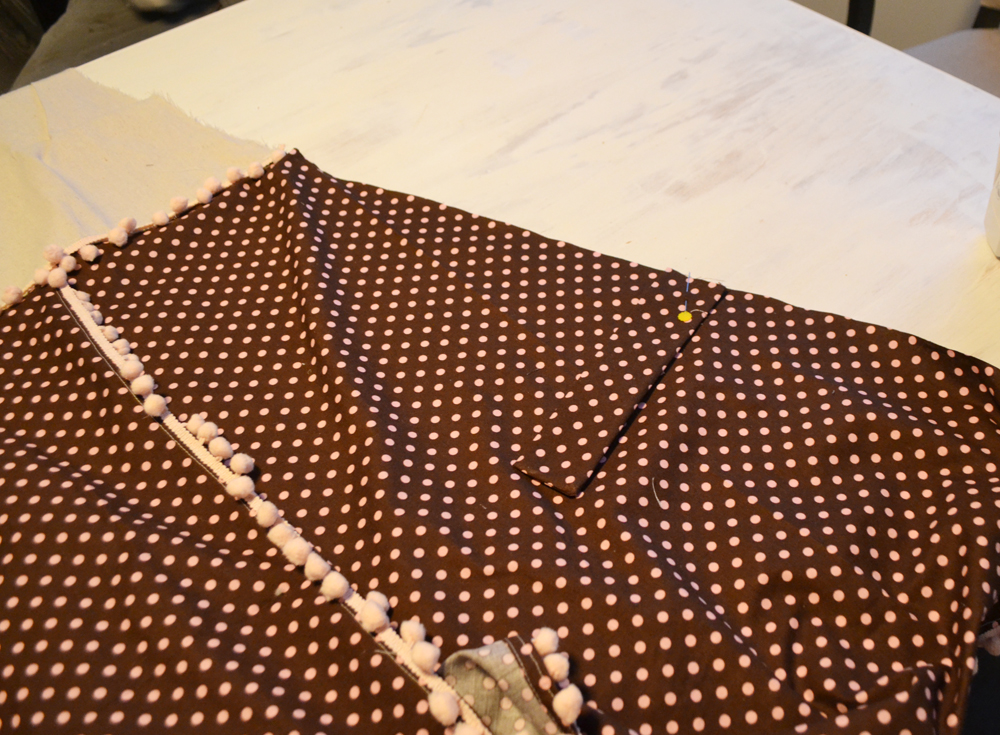
Fold each of the two tieback rectangular pieces in half horizontally (right sides together), and sew down one short side and the long side. Turn them right-side-out and press to form a strap piece. Pin one tie back to the raw edge of one side of the curtain. I pinned mine so it was about half way down the curtain piece. Repeat with the second tie back and curtain.
Sew a small piece of velcro (hook side) onto each tie back, and another small piece (loop side) onto the wrong side of the curtain that’s about 2″ from the seam and in the same spot vertically as the tie back.
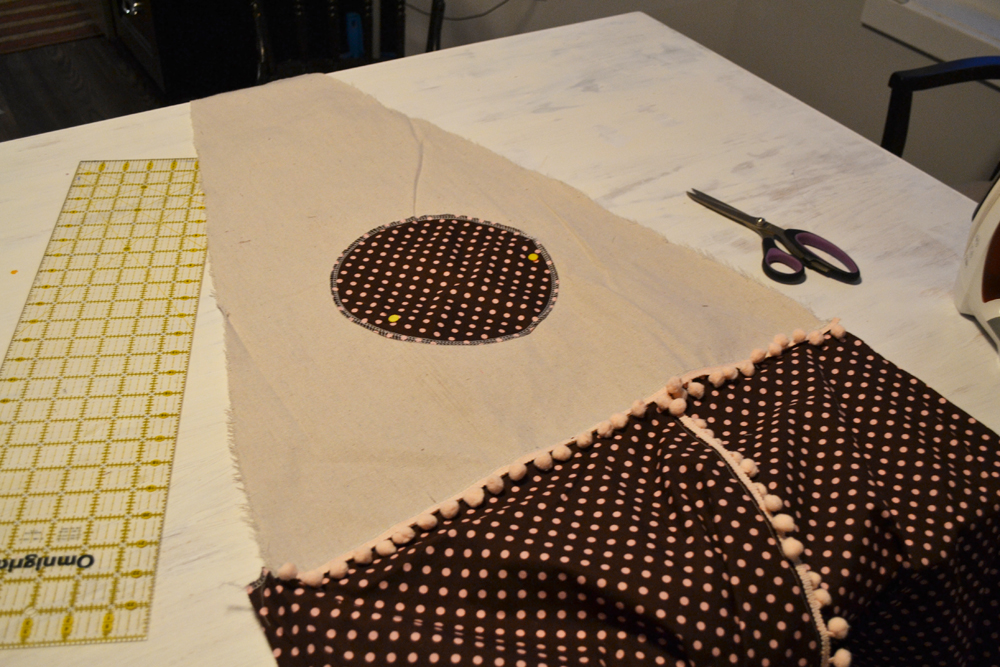
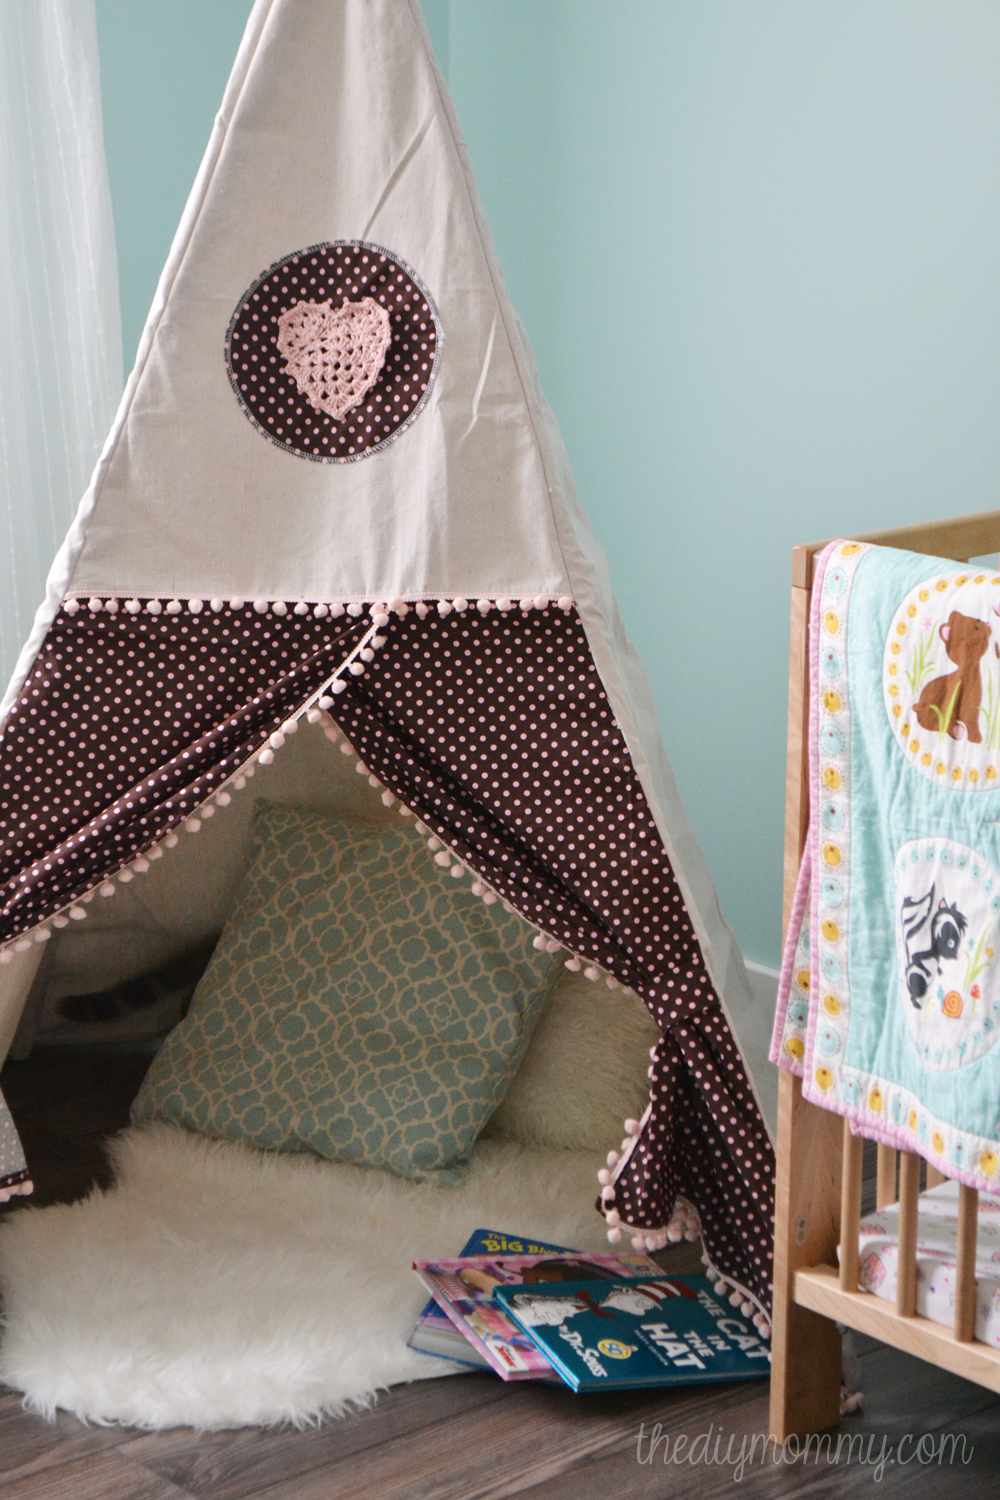
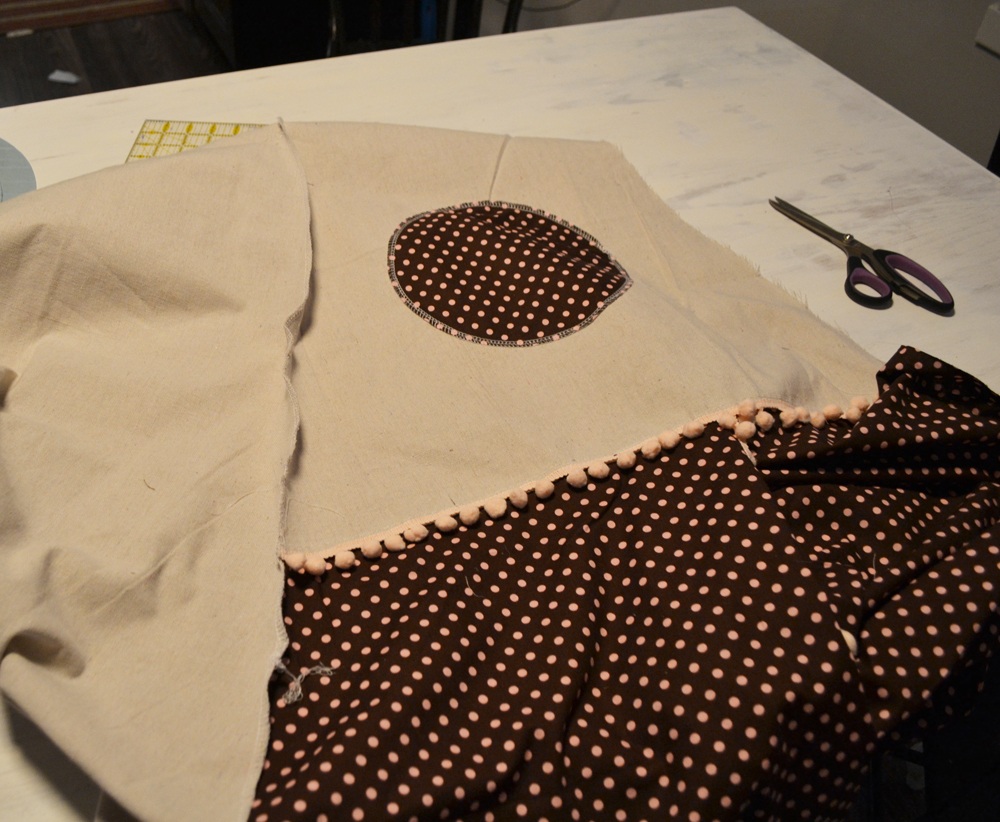
You can embellish the top half of the front with an applique if you like. I chose to cut a circle out of my printed cotton (using a dinner plate as my pattern), and then I later crocheted a sweet pink heart and hand stitched it to the center. I’ve also seen some adorable tents and teepees with children’s monograms on them! You could also sew a bunting banner and stitch it to the top of the front.
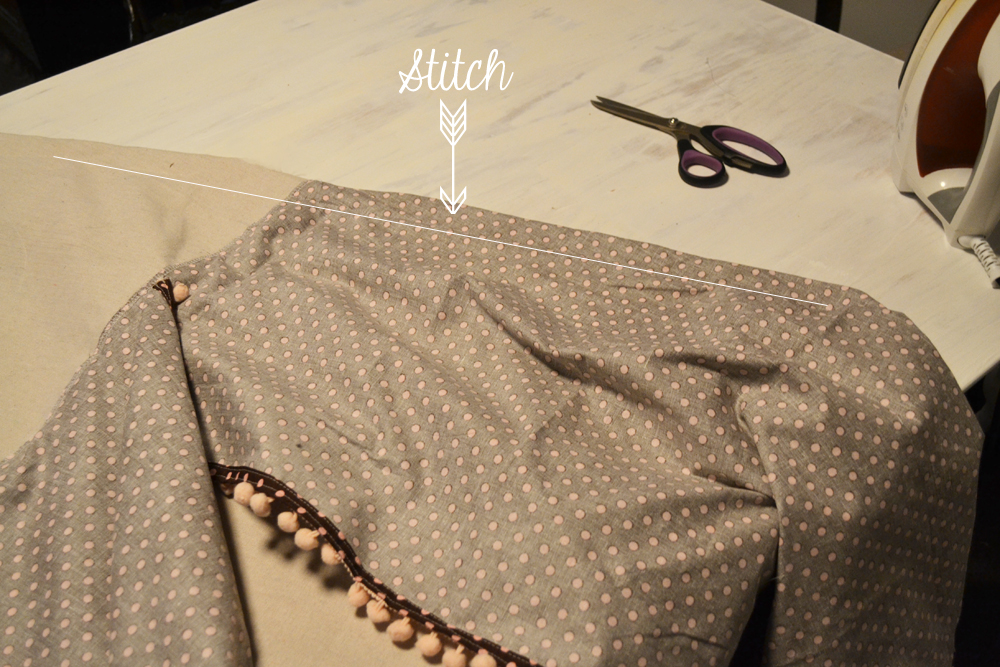
Now, you’ll simply be sewing all of the triangular panels together to make the pyramid shaped tent. Each seam will be a casing for the dowels.
Sew each panel together at the sides of the triangles, lining up the tops and bottoms (and pinning if you wish) on the RIGHT SIDE of the fabrics using a 1/2 seam allowance. You will have 4 panels sewn together and four seams. I found the drop cloth frayed a TON, so make sure you catch both sides of the drop cloth well when you sew them together.
At this point, you can serge, zig-zag or hem the very top of the teepee. I chose to leave mine with raw edges and so far it’s holding up!
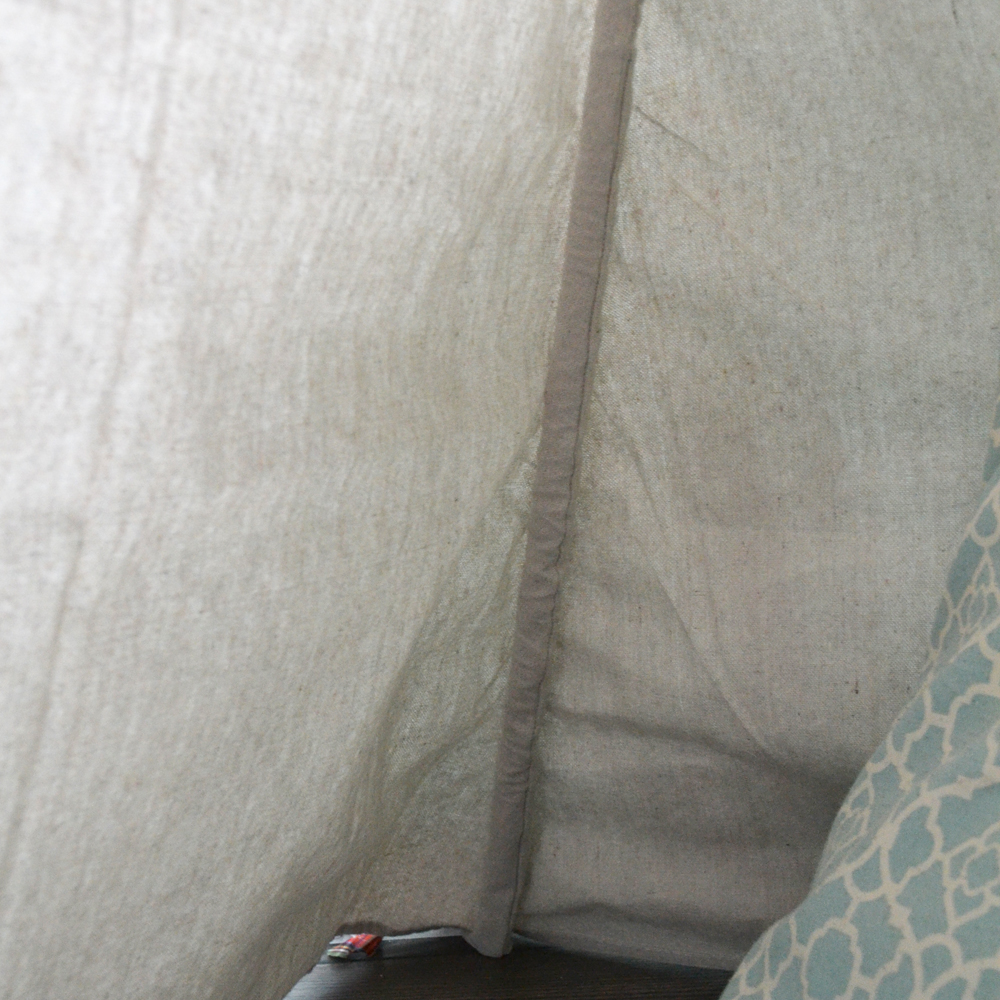
Then, turn the tent inside out and fold each corner right-sides together. Stitch a line that’s about 1 1/2″ from the seamed edge to create a casing for your dowels. Repeat from the top to the bottom of each of the 4 seams.
The inside of the tent and the casing will look nice and neat, like this:
Now, all you have to do is insert the dowels and tie the tops! Insert each dowel, one at a time, through each of the four casings. I found it easiest to go from the bottom of the teepee to the top. Once they’re all inserted, stand the teepee on it’s bottom, arrange the dowels at the top, and tie them with a piece of twine or rope. There will be about 9-12″ of dowel sticking out of the top of the teepee.
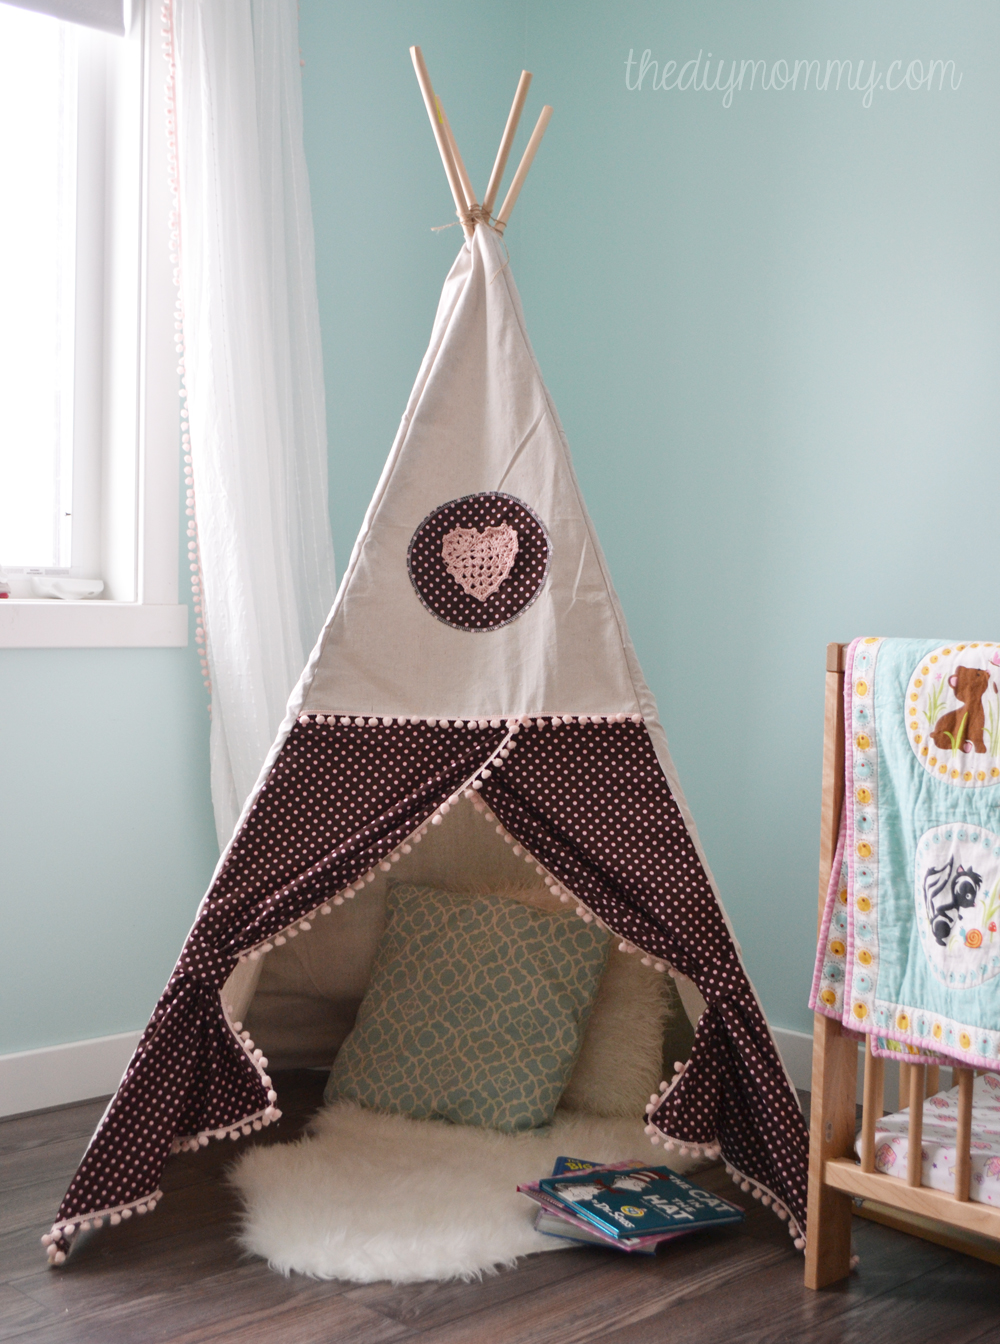
You’re all done. Wasn’t that fun? I absolutely love how this project turned out. It adds just the right amount of whimsy to Little A’s bedroom.
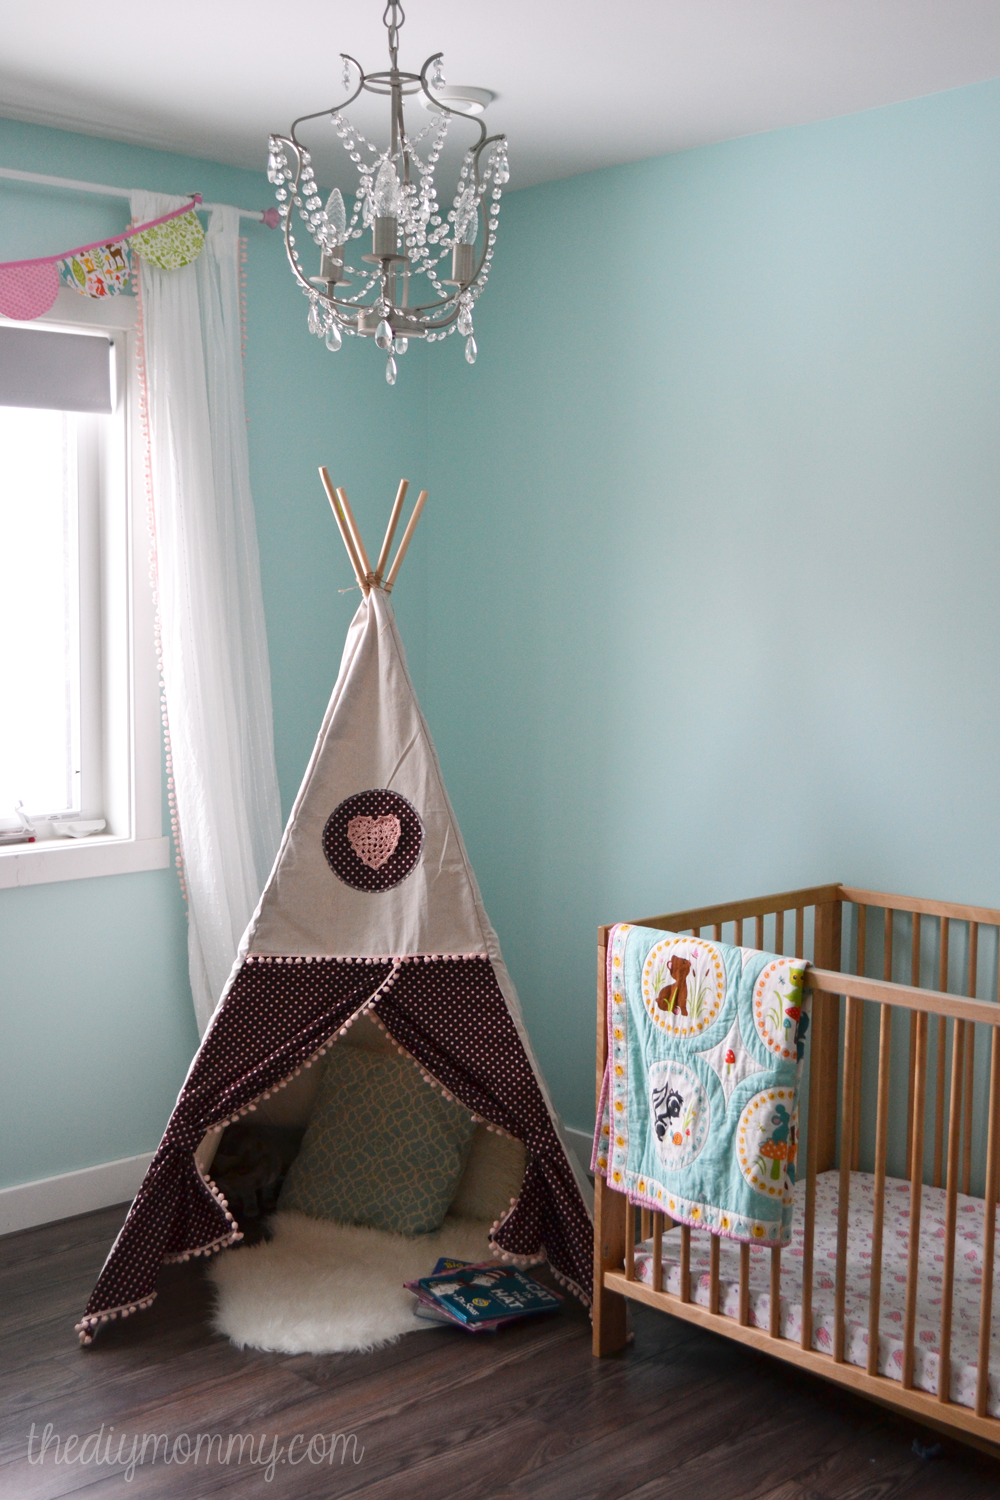
We’re SO CLOSE to finishing her room! There are just a few things left to do.
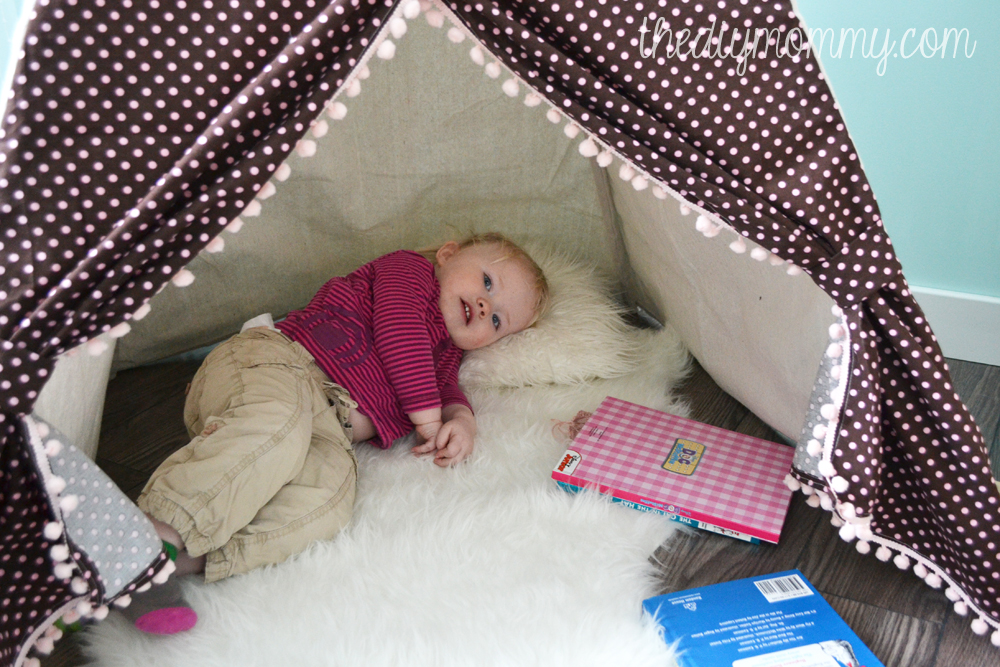
My favourite part about this project? I’ve caught Little A sneaking up the stairs a few times over the last couple of days and wandering into her room. A peek through the door reveals that she’s cuddled up in her new tent, pouring over books in her own, sweet sanctuary. It simply melts my heart!
Linked to: Made by You Monday at Skip to My Lou, That DIY Party at DIY Showoff, Frugal Crafty Home Blog Hop at Carrie This Home, Tip Me Tuesday at Tip Junkie, From Dream to Reality at The DIY Dreamer, Weekend re-Treat Link Party at AKA Design, Link Party Palooza at I Heart Nap Time, East Coast Creative Blog
Pin Me:
Where, oh where did you find your 6′ dowels? I searched and called every hardware and lumber store within 25 miles of me and none of them had dowels longer than 4′. I ended up cutting and splicing dowels together to get 6′. 🙁 Hoping it works okay, cuz I’m dying for a teepee like yours!
I found 14′ ones at Home Depot and cut them down to 6′. I think they were made of Hemlock?
Gotcha. Wish my Home Depot had them in stock too!
My husband found 6′ ones at Lowes. 🙂
Woohoo! That’s great!
Ordered mine from Amazon. I could not find them at Home Depot, Lowes or any local hardware store. Everyone has 4′.
Great tutorial! I especially love the bobble trim!
Thanks, Tia! I’m a sucker for pom pom trim.
You couldn’t tell me the size of the pom pom could you? I’m about to order everything of eBay but not sure what size pom pom trim to buy (no decent haberdashers near me)
I think they’re a half inch?
This is a fantastic tutorial. Ive been wanting to make one for my little girl ever since I found out I was pregnant! You’ve inspired me with your fantastic design – Thanks.
Thank you so much, Jo! My daughters love playing in here, so I’m sure you daughter would love it too! 🙂
I love this, such a great tutorial. I have been wanting to make a teepee for my girls for ages…you’ve inspired me to actually get it done!!
Thanks, Janice! I’d definitely recommend making one – it didn’t take too long and my girls just love it.
This is adorable! Great tutorial. I’d love for you to pop by and share it at week one of The Makers! It goes live tomorrow moringing (Tues.) at 8 am eastern! We will be doing features each week and featuring one blogger too! Hope to see you there.
Thanks so much, Corey! Ill have to check out your link party!
I’ve followed the instructions to the letter, but with the casings inside there’s no room for the dowels to emerge at the top! I do t know where I’ve gone wrong :0(
This is so cute! I love it – pinned it. Thank you so much for the amazing tutorial!!
Thanks, Krista!
I LOVE this teepee! What a fun place for a child to play and read. Your little girl looks so cute peering out from the inside. If I had any idea how to sew, I’d be hopping in the car to go to the fabric store stat. I may just have to enlist a friend for help I love this so much! Pinning as many places as possible.
Thank you so much! It was such a fun project! You should totally enlist a friend to help – it’s really not that hard to do. 🙂
Hi, this is great, we were debating on weather to just buy one, I was looking to see if you mentioned how much it costed you?
Thanks for sharing your project! It turned out great
Thanks, Nathalie! It cost me about $50. I bought the drop cloth and dowels, and I already had the other fabric and trim on hand.
I may just be missing it but I can’t seem to find the dimension for the bottom edge of the smaller triangle. I am all set to cut out the pieces and wanted to triple check everything before I make any cuts. Thanks! Love the tutorial!
Did you ever get the dimension of the bottom edge of the smaller triangle?
Nope. I just used the bigger triangles and cut it down to meet the required height.
Yes, exactly. Thanks, Lia!
Sorry, I keep forgetting to measure! But it doesn’t really matter as long as you have the same angle as the other panels! 🙂
if I don’t buy a drop cloth and use regular fabric, how many yards do you think I’d need? Thanks! looking forward to making this!
Hi Kelly! I’d buy decor fabric that’s at least 56″ wide, and then you’d need about 6 yards of that for the main pieces. HOpe that helps!
Thanks for the information Christina! And my other question is the same as Lia has above, what is the dimension for the bottom edge of the smaller triangle? I can’t find that either. My fabric is on it’s way and I can’t wait to make this for my daughter!
Hello writing to you from Australia!!!
I absolutely love this design and was more excited that you provided the template. I just have a query regarding the dowel diameter measurement? In the above instructions you said to use 3/4″ diameter or less but on the template you said it needs to be less than 2″ in diameter. Just checking that you used 3/4″ which is 1.9cm metric conversion and not 2″ which is 5cm metric conversion which seems like a big difference?
Hi Sarah! Thanks for stopping by. The measurement in the graphic is incorrect – the right one is 3/4″ diameter (1.9cm). Thanks for catching that!
Thankyou Christina for replying so quickly!!!
I just wanted to check because the cost of 4 dowels at 2″ in diameter was going to cost almost triple what it cost you to make the whole thing… Thanks again cant wait to get started
I made this teepee for my 16 month old son, and it is so adorable!! Thank you for the tutorial!! I’m good with crafts, but sewing has always been a challenge, but I knocked this out in TWO nap-times! He loves it. (My dowels came from Home Depot, and they had 6′ already cut!) Thanks, again!!
Thank you so much for your DIY teepee. My friend and I worked on our teepees together and had a great time. We picked a camp theme for our boys, which worked for both of their ages of 2 and 6. I finally finished it last night and was able to surprise my son when he came home from a baseball game with his dad. He loved it and insisted on sleeping in it:) Thanks for the idea, detailed description and pictures!
Alicia
That’s so wonderful, Alicia! I’m so glad your son loves it!
What is the length of the smaller triangle? Love the teepee. Im cutting fabric and getting excited!
Hi there, I’ve just made a gorgeous teepee following your tutorial for my god-daughter’s first birthday, your instructions are really clear and easy to follow, but I had to chop an inch or so off at the top to get all the poles to go through the hole, it all worked out OK in then end and she loves it, many happy hours of play ahead. Thanks
Louise
For some reason i cant seem to wrap my brain around how you sewed the pieces together. Does anyone have another way to explain this so that it makes sense to me? Thanks!
Hi! Great tutorial! Have one problem,I’ve followed all the measurements and the finished result is great BUT I can get all my dowels to poke through at the top its just too tight a fit! What do you think I’ve done wron? 2 go through but can’t get the other two to poke out, they all fit the channels ive sewn perfectly! Any suggestions at to how I can resolve it? Thankyou for your time x
Hi, Amanda! For a quick fix, you could try cutting little bit off of the top of your tent and see if that works (like another one of my readers did). Or, can you try to thread them through the casings all at once (with someone’s help, maybe)?
hya thanks for your reply! I made another and changed the measurements slightly and all is perfect!love it! Thankyou xx
Hi there! Wondering what the bottom measurement of the smaller triangle that is cut from the drop cloth is. Thanks!
Has anyone made this with 4 ft dowels? That was all my Home Depot had and I kind of want a smaller teepee for my tiny kid (I have an unusually petite toddler) Any success with it?
I love this! I helped my daughter make this today. We used pvc pipe instead of dowels. How do you keep the fabric from slipping down the poles??
Hi, Janette! My fabric seems to grip onto the poles on it’s own, but you could close the bottom of the casings so the poles don’t slip out with some hand stitching. Thanks so much for using my tutorial!
Thanks a lot for the Teepee-Tutorial. I sewed a Teepee with this tutorial and made a gift for a 7-Jear-old Girl on Christmas.
Take a look: http://sew-a-gift.blogspot.de/2014/12/tag-247-251-upcycling-tipi-zelt-fur-l.html
Kind regards, ella.
WOW! I love your teepee – it’s so adorable. Thanks so much for using my tutorial and sharing your version!
This is awesome! Thanks so much. Our local PB kids is being closed, so we got their TeePee for a steal, although just the cover. I knew that there had to be a DIY solution for the poles.
I’ll run to Home Depot, If they don’t have the long dowels, then I’m pretty sure that the bamboo poles would work as well.
Thanks!
Thanks for visiting, Tim! Yes, either the long dowels or some bamboo rods should work great!
Would pvc pipe in the same dimensions work as well? I am going bonkers trying to find the dowels but no such luck! 🙁
I don’t see why not! I would definitely try them.
Hello from Australia. Just wondering how big a toddler does this teepee house? I have an almost 5yr old as well as a almost 1 yr old that i would like to make this for them to share together.
My 2 and 5 year olds could both sit in the tent. It’s pretty small, but we only use it for sitting and reading!
Hi Christina, I’ve made this and it’s great but it keeps collapsing in on itself, ie – the tent walls don’t stay taught and the poles move closer together until it falls over. Did you have a way to prevent this?
I wonder if you could put boning, wire, or a small rod on the bottom of the panels between the poles to hold it? Ours doesn’t seem to have that problem for some reason, but I have seen teepees/tents with something rigid at the bottom.
Mine is doing the same. I’m going to make a square pillow for the bottom that will help it from collapsing in on itself. 35 in X 35 in X 6 in high.
Hi Christina
I’ve just got a quick (silly) question! When sewing your final triangle pieces together, do you sew the seam right sides together or actually on the right sides?? I’m a little confused as to how this will look:
“Sew each panel together at the sides of the triangles, lining up the tops and bottoms (and pinning if you wish) on the RIGHT SIDE of the fabrics using a 1/2 seam allowance. You will have 4 panels sewn together and four seams”
Thanks, i’m probably over thinking it!
Jess
Hi, Jess! You sew the seam actually on the right side, and then you fold it right sides together to sew the next line for the casing.It’s kind of like a french seam: http://sewsweetness.com/wp-content/uploads/2011/09/frenchseam.gif I hope that helps!
Thank you for this, I had the same question.
Love your teepee 🙂 recently made one for my niece and i linked your page on my blog hope that’s ok.
I need some extra help with making the casing for the dowels. Can you send me some additional instructions/help with this
Hi Denise,
I am having the same problem trying to sew in the dowel casings. Did you ever get any additional information?
You stich your triangle walls together with 1/2 inch seam allowance then stitch again 1 1/2 inches in from the seam. This creates a tube in the fabric.
Exactly. Thanks, Lyndsey!
Soooo cute! I got all the supplies and am going to start this week. I’m wondering how the front panel drapes when closed; have you any pictures of that to share, please? Thanks!
I wonder if this photo link will work for you, but this is how mine looks, drapes down
I love it! It turned out so good. Thanks for sharing!
Perhaps I am overlooking this, but I am not seeing the length measurement of the bottom hem edge for the small drop cloth piece??
I love this! I really wanted to make my one year old a teepee for her birthday and this seemed nice and simple. Only took 2 evenings to whip up. My measuring was a little off so it’s a little lopsided but it’s so cute and I can’t wait for my little one to wake up in the morning and see her new teepee.
Christina it’s so cute and I love the color combinations you used. Awesome tutorial too – thank you. Pinning to share and refer back to your instructions because I think my grandson needs one of these in his room!
Thanks so much, Marie. My girls still enjoy playing in it!
Hi Christina,
Thanks so much for this tutorial. I’ve made it today without any problems. Thanks for sharing.
Marianne
I want to make this for my son! Can an adult fit in this sized teepee too?
Love this! Made my son one out of the remnants of a roll of upholstery fabric and some curtain material. It’s quite dark inside so we got a little led camping light to go inside – my son loves it – he thinks it’s Makka Pakka’s cave! (If you don’t get “In the Night Garden” over there check it out on YouTube ?)
I LOVELOVELOVE this and wanna make one tonight. Looking at the patterns… the small triangle that you cut 1 from drop cloth, is 4″ across the top and 30″ high… but what is the bottom measurement?
Muchas Thanx from Bucerias Mexico (near Puerto Vallarta)
Christy Ann
Thank you Christy Ann! Hopefully, this measurement gets to you in time 🙂 The bottom is 20″. Happy crafting!!
Hi I’m making this right now and I cut the small triangle to match (30″ long and 20″ bottom) however the entire front panel is quite a bit smaller than the three sides. When I lay the smaller triangle against the large one it looks as if it should measure 25.5″ along the bottom, what do you think? Is the front of the teepee supposed to be smaller than the other sides?
Hello Shanelle, did you go ahead and keep making it? How did it turn out?
Hi Diy Mommy,
I just made the same tent by following your directions. The first one I made I did it with the poles on the outside. I was only able to get 1″ x 6′ poles and I found they fit great but the top the seams ripped a bit because it was tight when I crossed them. I just finished a second one for a friend, this time making the poles go on the inside like yours, I haven’t gotten my poles yet for it but there doesn’t look like there will be enough room at the top for all 4 poles to fit through, even if I am able to find 3/4″ poles. Did I miss a step? I made all the seams the size you said. Before I have to rip out all the sides on the second one and make the casings on the outside is there a solution you might be able to help me out with. Thanks!
The same thing happened to me when I made mine. There are two ways to fix it I think. I am going to try hemming the top a lot. By folding the top down you will have a larger opening. If you haven’t starred sewing I recommend doing a 1/4 ” seam on the panels (instead of 1/2″) and then do a zigzag top stitch to reinforce them and stop fraying.
I found my tent very small and I don’t want to rip the whole thing apart so I am going to add fifth panel.
Thanks for the tutorial, I just finished my little guys teepee and I know he will love it. A couple of things though…I thought I measured everything exactly as stated, but when it was time to insert the dowels the hole was way too small to fit even one dowel through. So I had to rework the top part a bit and will watch that more closely if I make another teepee. Also for the frugal mamas, I priced dowel at the Home Depot at $1.80 per foot, and at Rona it was $.90 per foot, big difference. I also opted to buy a king sized sheet from Value Village for $10 so it worked out to about $35 total for all materials.
Thank you Megan for the feedback. That is so great that you were able to find great deals 🙂
Thank you for sharing this Christina! I was looking for DIY tutorial on play tent recently. This comes in perfect time for me. Aside from that, great color combinations, I’ll still them 🙂
Keep coming these type of articles, I really like your work!
Thank you!
Hi Christina! Love this pattern. My mom and I are working on it right now. We are wondering how wide the bottom side of the “cut 1 from the drop cloth” piece is? The one that’s 4″ wide at top x 30″ tall, but it doesn’t say how wide it should be at the bottom. Thanks for any advice on this part! We are looking forward to making this for my son.
Hello Darcie, Hope you are your mom are having a blast making this play teepee tent. The measurement Christina used was 20″ for the bottom of the smaller triangle. 🙂
Thank you for posting this!
I finally got round to making it tonight and it looks great! I’m in the UK and the wooden poles can be quite pricey where I am so I used plastic plumbing poles which work just as well 🙂
So happy your teepee worked out for you! What a great idea to use the plastic plumbing poles
Kids loved this tent! Thank you for the step by step. I found some really affordable fabrics online at https://www.canvasetc.com/product-category/denier-fabrics-synthetic/ that will hold up with all the kids craziness. Thanks again!
That is wonderful, Susan! So happy you and your little ones are enjoying your DIY tent 🙂
Terrific instructions. I made it last week as a birthday gift for my nephew and it really came out great. I misread one part and ended up with the poles on the outside but it still looks good. My only other issue was with the poles. I used PVC pipes, I bought 3/4″ not realizing that the measurement was inside not outside so I had to rip out one casing and redo. All in all this is really a great project and you explained it really well. Thanks so much.
That is so wonderful, Veronica. You just got rock star auntie award! Your newfew must adore it ?
Did you need to make the pole inserts bigger? I want to try the pvc as I think it might be cheaper
Is it alright to reference part of this on my page if I post a backlink to this page?
mont blanc online http://www.barneyes.co.uk
Of course!
I am wondering about the stability of the teepee…. does it tip, or the dowels slide inward? my son for sure would be exploring the sides and playing with the dowels. Has anyone tried anything to make this so it wouldnt collapse on a little one?
Hello Cher,
The tee pee is fairly durable however, it’s definitely not meant for climbing on ?
Hi there, I made this tent for my son and it looks great – but every time he goes in it it’s in dager of collapsing. He is not rough, just clumsy, he knocks against the walls or catches the top of the door fabric while crawling in and the whole lot comes down. Is there any way of putting in dowels at the bottom to stop it collapsing? Or do I need to thow it away and buy a ready-made one for stability?
We didn’t have this problem with ours and are sorry to hear that your not having luck with yours. We are not sure how to insert the dowels
Hi. Do you sew the panels of the tee pee right sides of the material together? Or wrong sides together? I can’t decipher what is meant by Sew each panel on the RIGHT SIDE of the fabrics? All of the patterns i have used – you sew right sides together? Many thanks
The right sides together. Hope that helps
Hi Christina. Thank you for creating and sharing such an amazing DIY teepee!
I made this teepee for my grandaughter. I flew out to her with it last weekend. Bought the dowels out in BC at home depot! Cost me $75. For 4 6 footers, twice as much as here! I wish I had thought of the plastic pipes! I bought the fabric at Ikea, unbleached cotton for the bottom, so she can add her own decorating and a green plant print for the top, her dad is the Urban Farmer in Kelowna, so this was so perfect for her! I washed the fabric, so this tent is machine wash and dry. I serged and double stitched all seams, all seams are enclosed. I did make the casings on the outside, just my personal preference. I also sewed the floor ends of the casings closed so the pole ends are not exposed or can scratch the wood floors it it gets dragged around. Someone asked if an adult could fit in this teepee. As soon as I put it together in the middle of their home, dad went and sat inside and wanted one for himself! mom also had fun sitting in it! Later that day we moved it into her room, dad was laying in it, head first, with his little girl and he fell asleep in it, she eventually crawled out because he wasn’t playing with her! I am making our grandson one for Christmas! I am even more excited to make this one because I now have an idea how it all goes together, should be much quicker. Now to find the perfect material. I think I will keep the base the unbleached cotton so he can eventually add his own creative touches! I did take measurements to make a matching floor pad. I will make loops in each corner to be looped over the pole floor ends to keep it from sliding around. I also am making 2 matching cushion slips for cushions to go inside the tent, as per her mommy’s request! Also a friend of my daughter has asked if I could make her little guy one too! I like to think this is a great addition to many little lives, it encourages imagination and play with out the plastic noise toys!
Again, thank you for sharing such a great idea! I loved it the moment I first laid my creative eyes on it!
A huge fan of DIY for the last 58 of my almost 62 years!
Valerie
This is so wonderful, Valerie. Thank you for for sharing and that is the sweetest beginning to wonderful mememories. This just makes our hearts smile to be a little part of this DIY that is creating so much love!
Followed instructions but having completed project it is too tight at the top to turn it to the right side suggestions please
Just love it.I love sewing different things.Thing is just awesome idea and very exciting for my kid.will surely going to sew this.Also the material used is available with me.
That is wonderful. Happy sewing
Absolutely adorable!!!
Wish I would have seen this a couple months ago. Spent $60 on a children’s tepee for my grandson and it isn’t even half as cute as this!
I used 22” on the bottom of the small triangle and that worked fine. I also found the top too small for the 4 poles and ended up just cutting off the top til the poles fit. Worked fine. To avoid slipping I put rubber tips to cover the bottom of the piles ($2.99 for. 4 at my hardware store). Loved the results!
Just made my teepee for my grandson. I put a little mesh window in the back panel an flags on top of the posts. It looks great, if I say so myself! Thank you for the instructions.?
Love the window idea! It sounds like it’s really cute?
Do you suggest I wash the fabric (drop cloth) before I cut?
Hi Christina,
What a great project! Our children learned a lot from this. We went to a fabric store in our neighborhood and they got to pick their very own pattern! Their grandmother hemmed the edges with her old Singer! We even added fairy to the top portion! Thank you.
Regards,
Barbara Harris
Oh how very fun!!
I just finished sewing this for my little niece, I hope she loves it as much as I do?
I, too, found it impossible to pass the 3/4″ dowels into the 1.5″ pockets. I ended up cutting off some of the top ( about 1.5″) and then the dowels slid easily into their positions. Remember to sew these seams several times for strength. I made my original teepee out of the painter cloth, but will try the next one out of a king sized sheet. I also made several different front panels (some boy themes, some girl themes) so my photographer friend can switch front panels when she needs to. I used Velcro to attach them.
Hi, wondering if you have instructions or measurements on how to make the teepee bigger. Thanks
Just love it.I love sewing different things.Thing is just awesome idea and very exciting for my kid.will surely going to sew this.Also the material used is available with me.
Just made my teepee for my grandson. I put a little mesh window in the back panel an flags on top of the posts. It looks great, if I say so myself! Thank you for the instructions.
Oh wow! Sounds great! If you’re on facebook or instagram, you can tag Christina @thediymommy – she’d love to see your finished product!
I Just love it. Actually all the time I love sewing different things. Which you made is just awesome idea and very exciting for my kid. Hopefully will surely going to sew this. Also the material used is available with me. Thank you so much for your exclusive design.
Where can I get a printable copy of this teeper
The pattern? It’s too large to be printable but there’s a photo there will all of the dimensions you’ll need 🙂
Thanks Christina. Your tutorial gave me a headstart and saved me a lot of time sewing the birthday present teepee for my 2 year old granddaughter. I drew up my own pattern for a bigger teepee- 48″ X48″ on the bottom and an inside height of 61″ and added a window. I don’t sew much and this project only took 2 days for me. The teepee looks beautiful and both granddaughter and my daughter love it. I’m confident I can make the second one for my grandson in a much shorter time. Thanks again.
Hi Margie! If you have some time to snap a photo and share it with us on Facebook or Instagram, @thediymommy or sending us and email to [email protected] – we’d LOVE to see it!