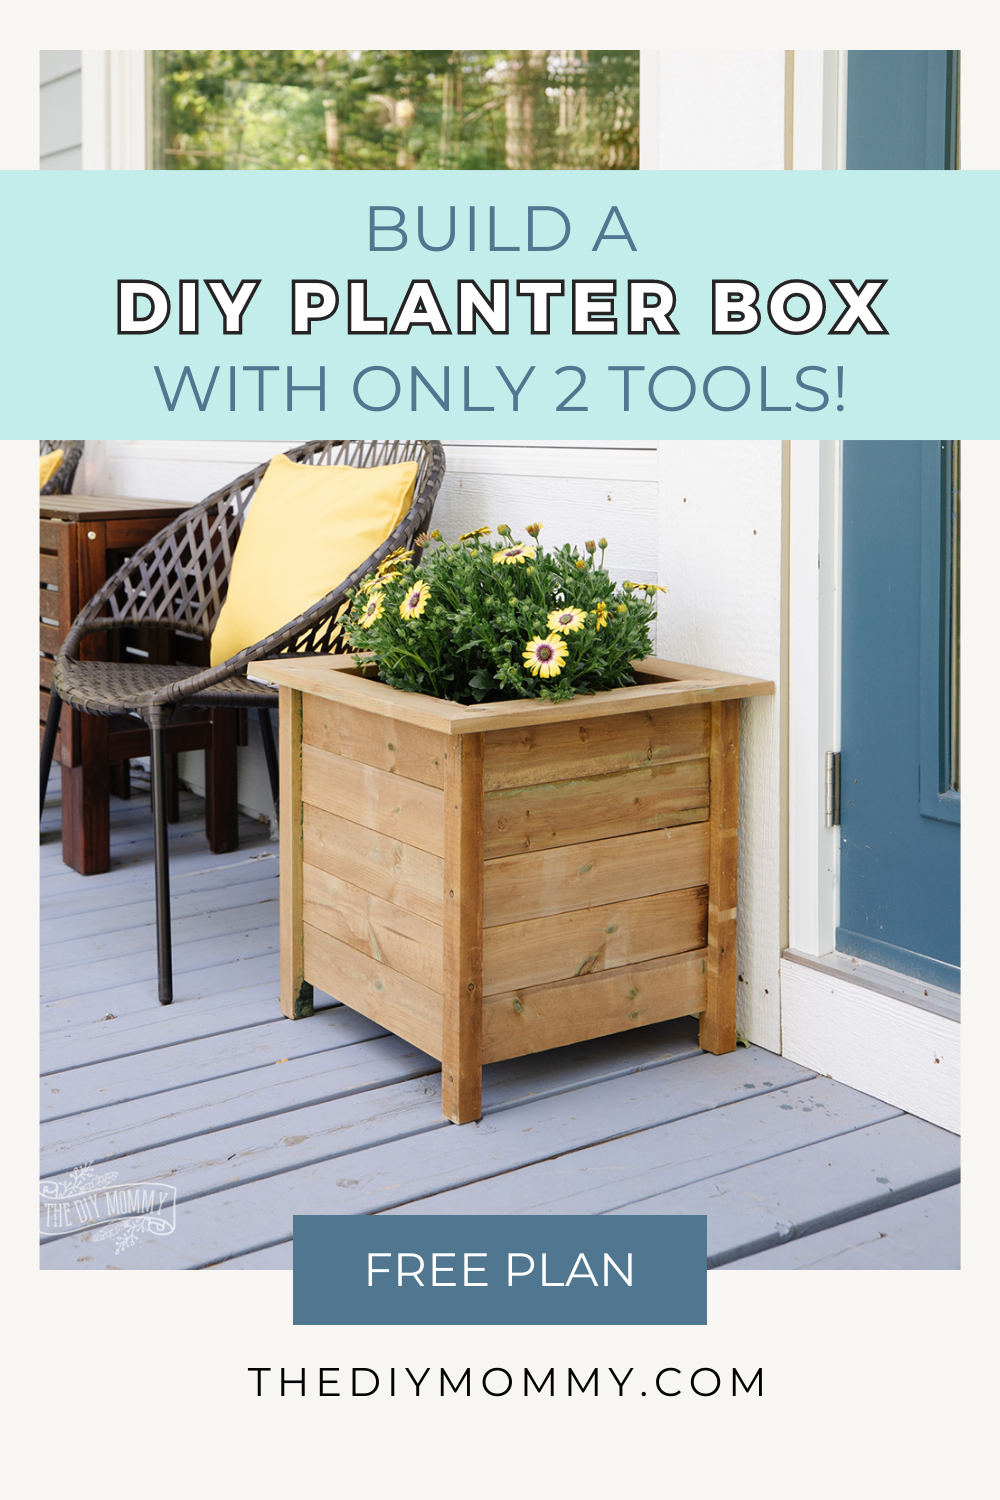
Build a DIY planter box with only 2 tools! (Free Plan)
This post may contain affiliate links · This blog generates income via ads
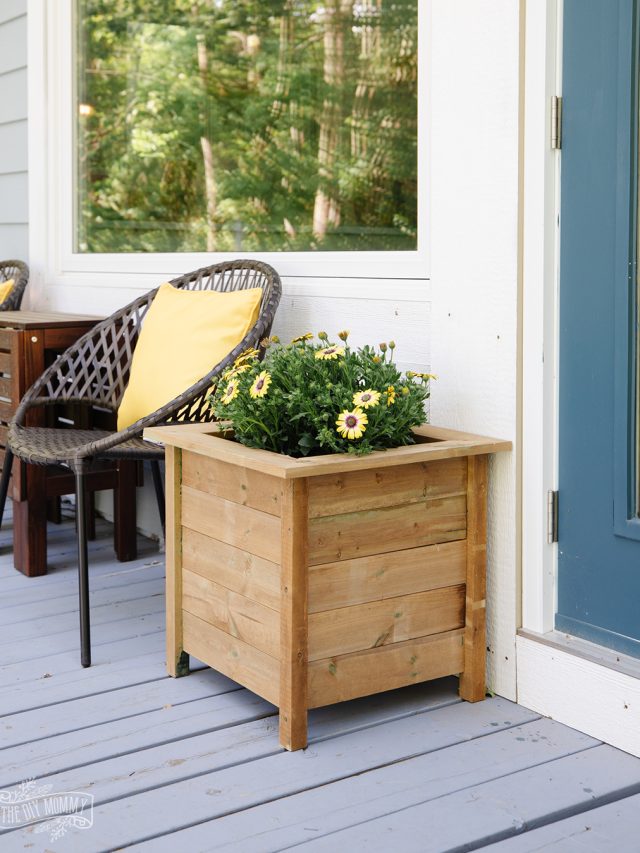
Looking for an easy weekend outdoor DIY project? Check out this simple wooden planter box that you can make with just a miter saw and a finishing nail gun! This free plan includes a cut list and instructions for building your own beautiful DIY planter box. This is a great project for anyone new to power tools, and a great way to add a beautiful feature to your front porch.
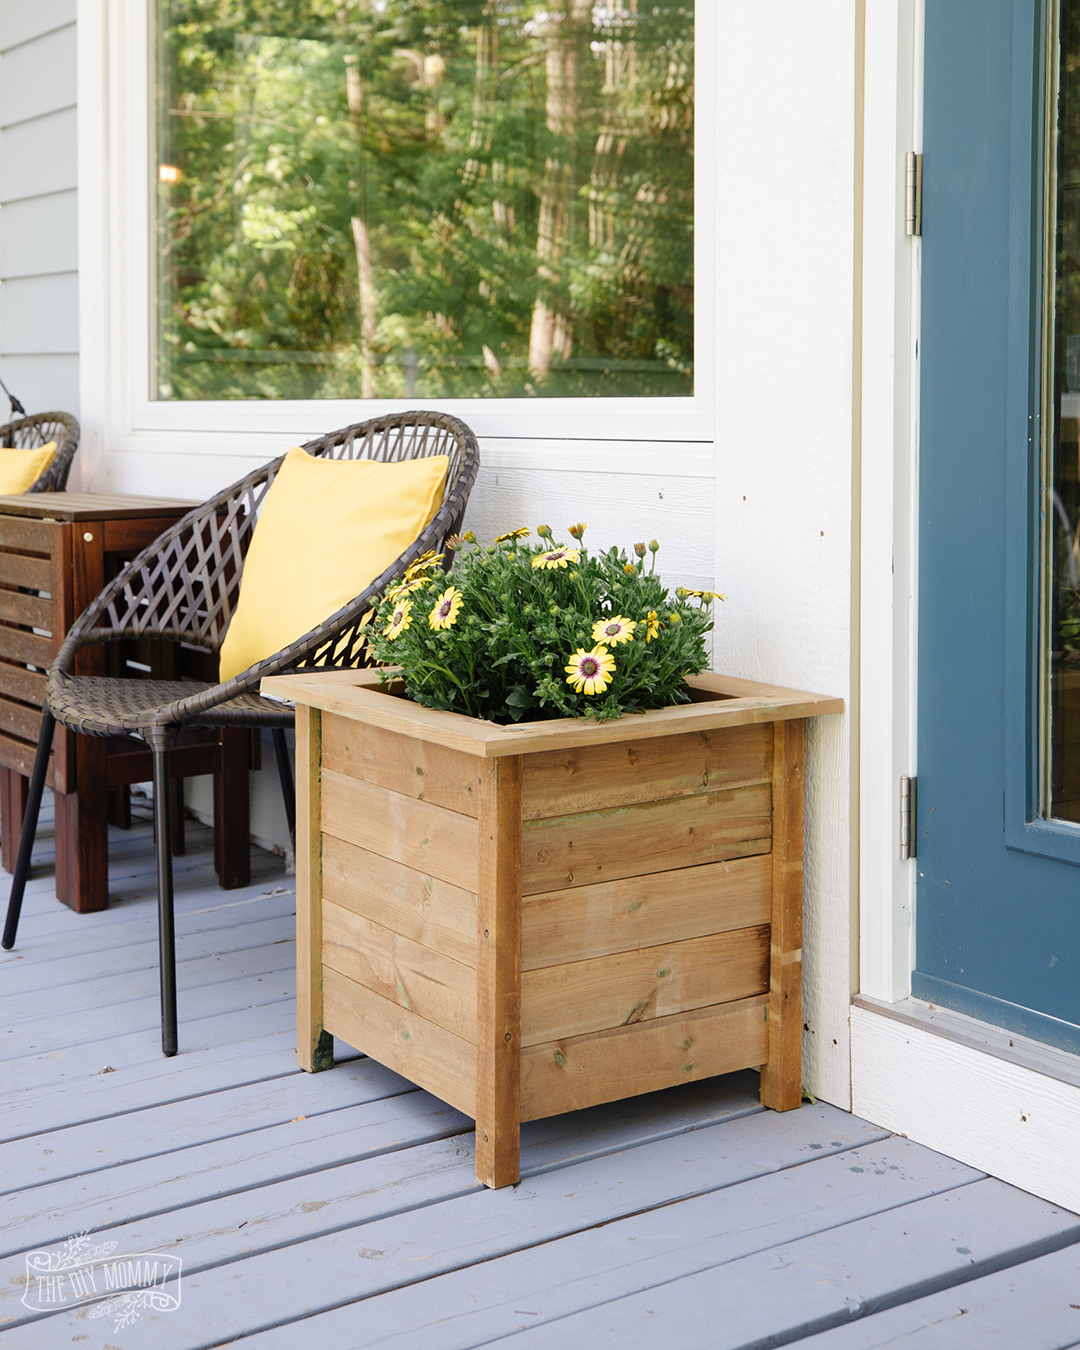
These DIY planter boxes are made from treated lumber, so they will last for years to come and I think they look stunning. With a simple design and only basic tools needed, this modern planter box is the perfect project for DIYers of all skill levels. Let me show you how I made them so that you can do it too, with this step-by-step tutorial and free DIY planter box plans!
Is it cheaper to make your own planters?
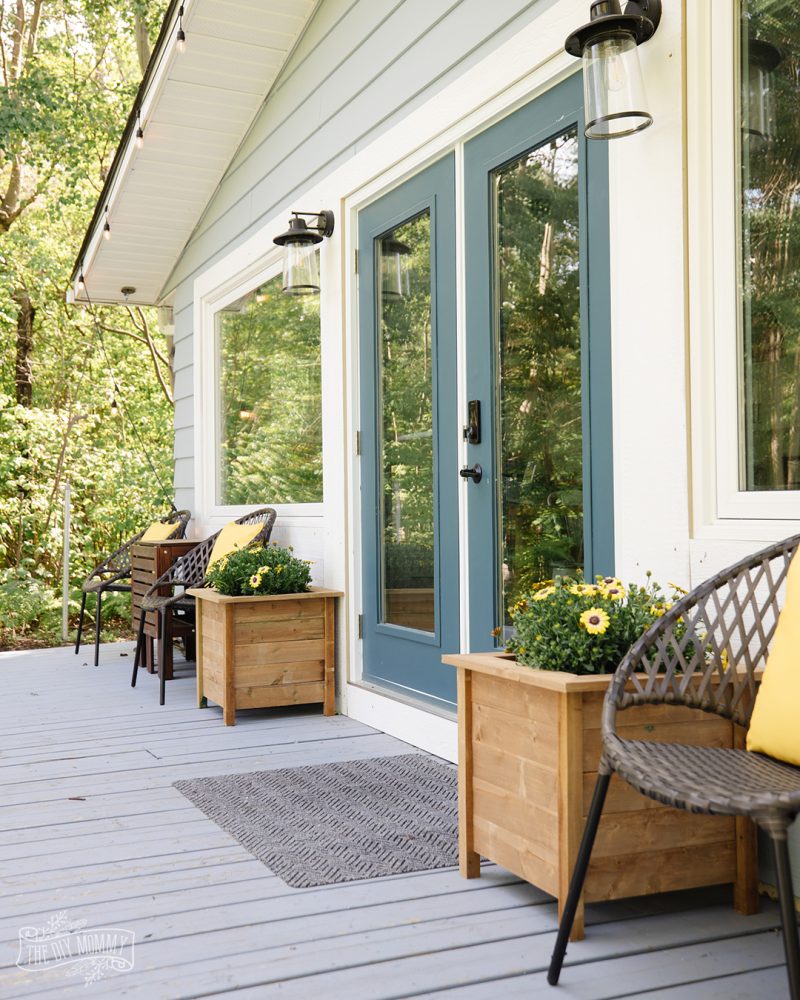
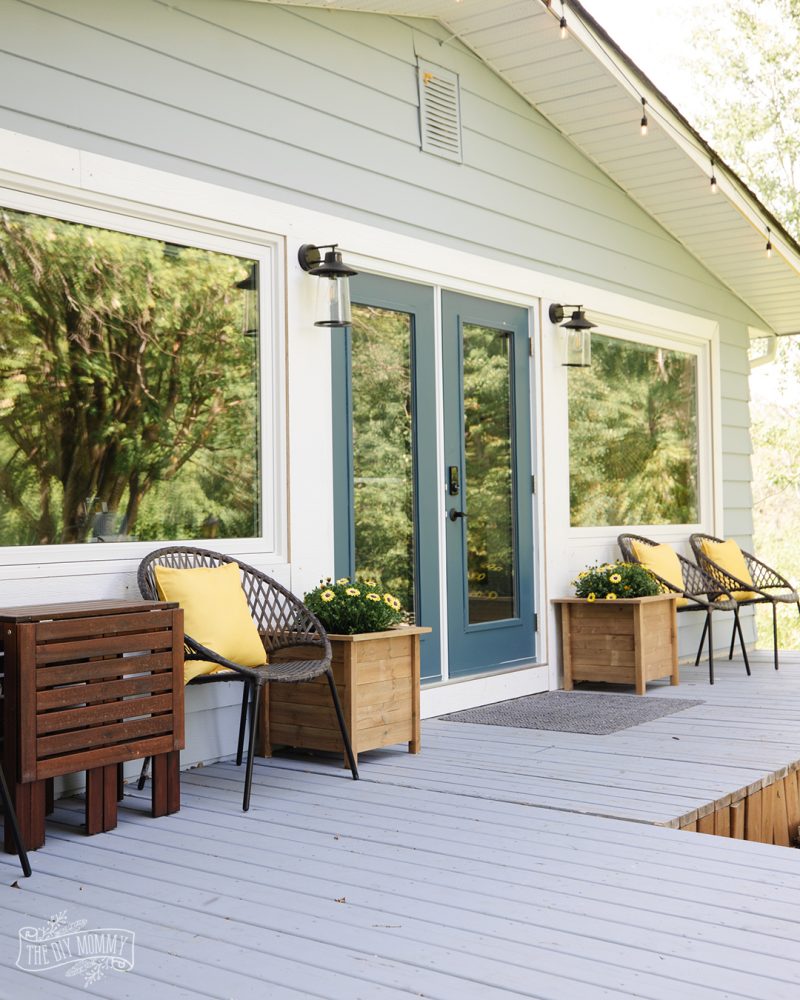
I wanted to add some substantial, high-end looking wooden planters to the back deck at our Little Lake House. Planters are usually very expensive, but I was able to make these square wooden ones for only about $50 each!
Watch my video to learn how to make an easy DIY planter box
How to build your DIY wood planter box
Materials list
- (5) 1x4x8 pieces of treated lumber (I used MicroPro Sienna from Home Depot Canada)
- (3) 2x2x8 pieces of treated lumber
- 30” of 1×2 scrap lumber (I used stakes from Home Depot)
- Wood glue
- Measuring tape
- Miter saw
- Finishing nail gun
- 2″ brad nails
What kind of wood should I use for a planter box?

For best results, I think treated lumber is best. Your planters are going to sit outside in all kinds of weather, and untreated wood will rot in these conditions. Another option if you don’t like the look of treated wood is making cedar planter boxes using cedar boards instead of treated. Cedar is a good choice for outdoor projects as it is naturally weather resistant.
If you want to go for a totally different look and use reclaimed wood or untreated pine boards, I would recommend adding an outdoor-compatible sealant to your planter when it is all finished. You don’t have to use exactly the same kind of wood I did, but make sure that your planter will hold up to the elements, whatever you do!
Once you’ve purchased (or found!) your lumber, it’s time to begin! Cut the lumber according to the cut list below using a miter saw. You can sand the ends of the lumber after it’s cut for a smoother look, depending on what you’re going for or the condition of the wood you chose in the first place.
Cut List
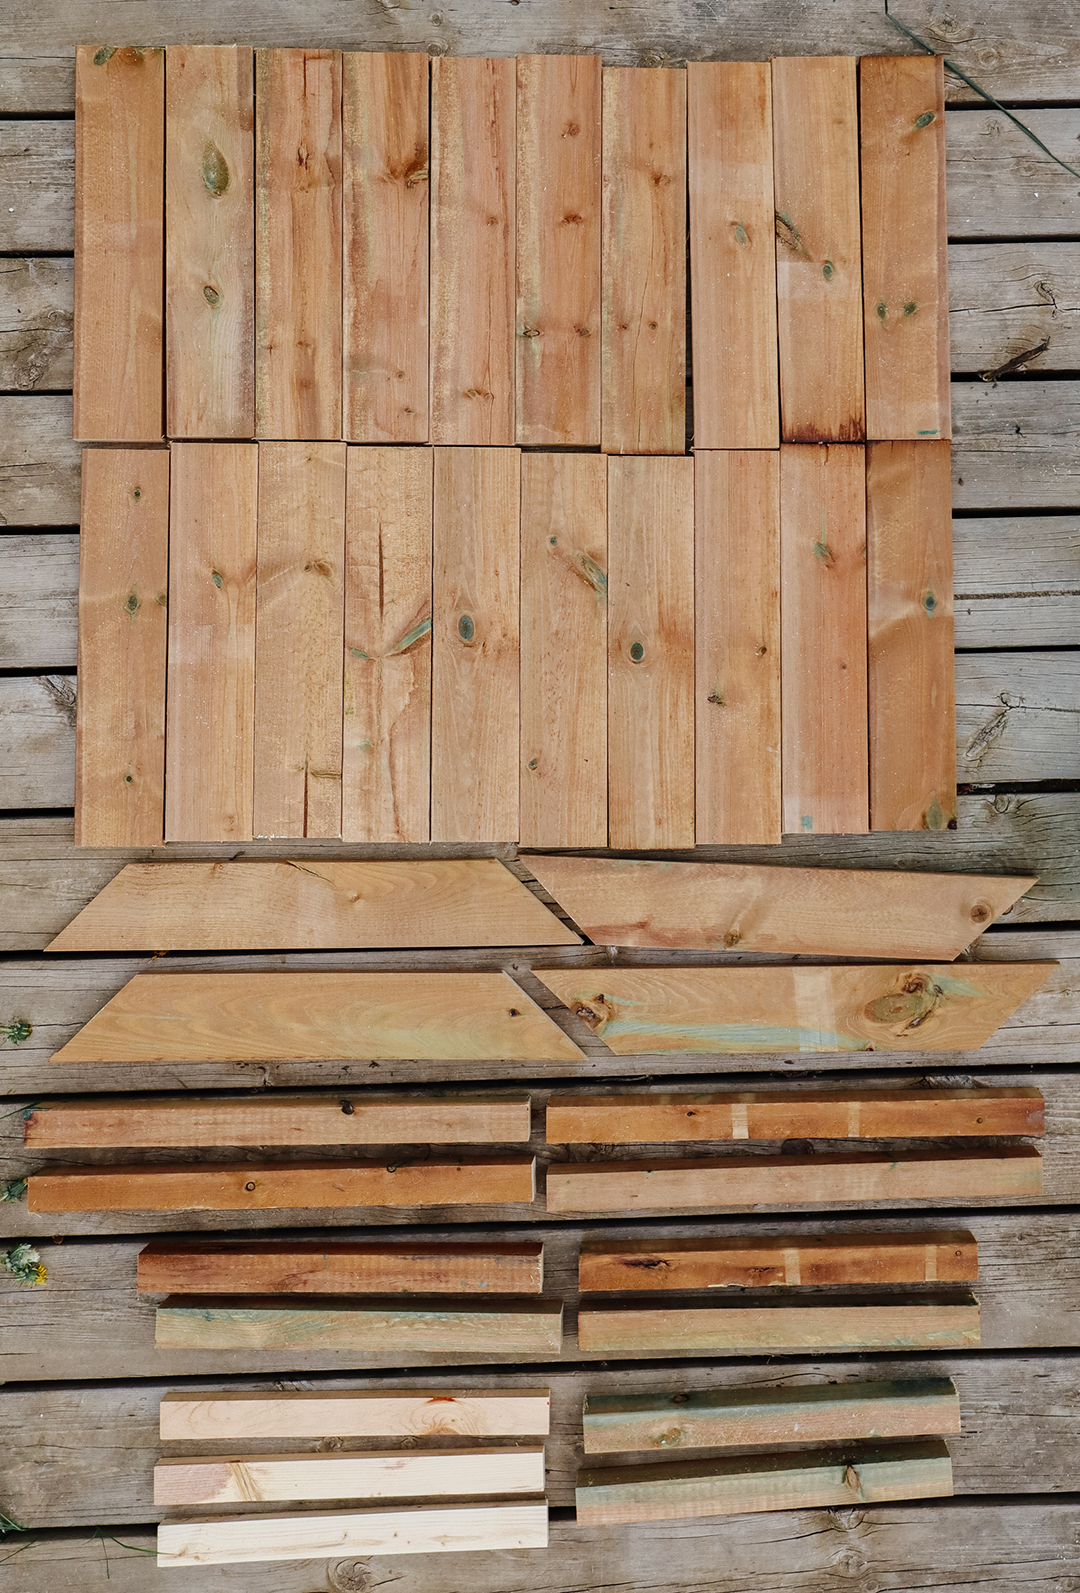
- (20) 1×4 at 16” long
- (4) 1×4 at 15” long (short side measurement) with 45 degree angled ends
- (4) 2×2 at 20” long
- (4) 2×2 at 16” long
- (2) 2×2 at 12” long
- (3) scrap wood at 15” long (for interior brace)
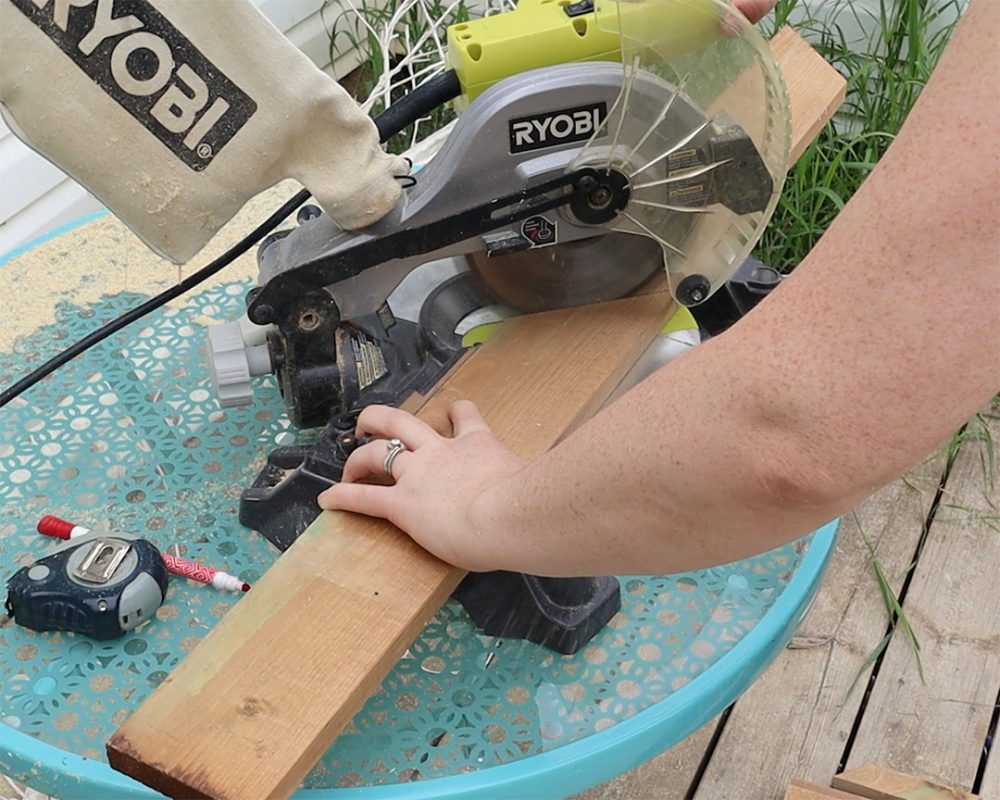
I used a 7.25″ miter saw, which is a little small but it did the job! I had to cut the 45 degree angled end pieces twice, flipping them over to cut all the way through. If your saw is a little bit bigger, you won’t have to do this extra step. It might be tempting to use a circular saw instead, and this would work for the straight cuts! But I really recommend the miter saw because it is the easiest way to get your angled cuts done correctly and easily.
It really is worthwhile making all your cuts at once instead of doing it as you go. Especially for this DIY planter box project where so many of the cuts are the same, it will be faster, easier, and more accurate to just do it all at once. Trust me!
Making two sides of the planter
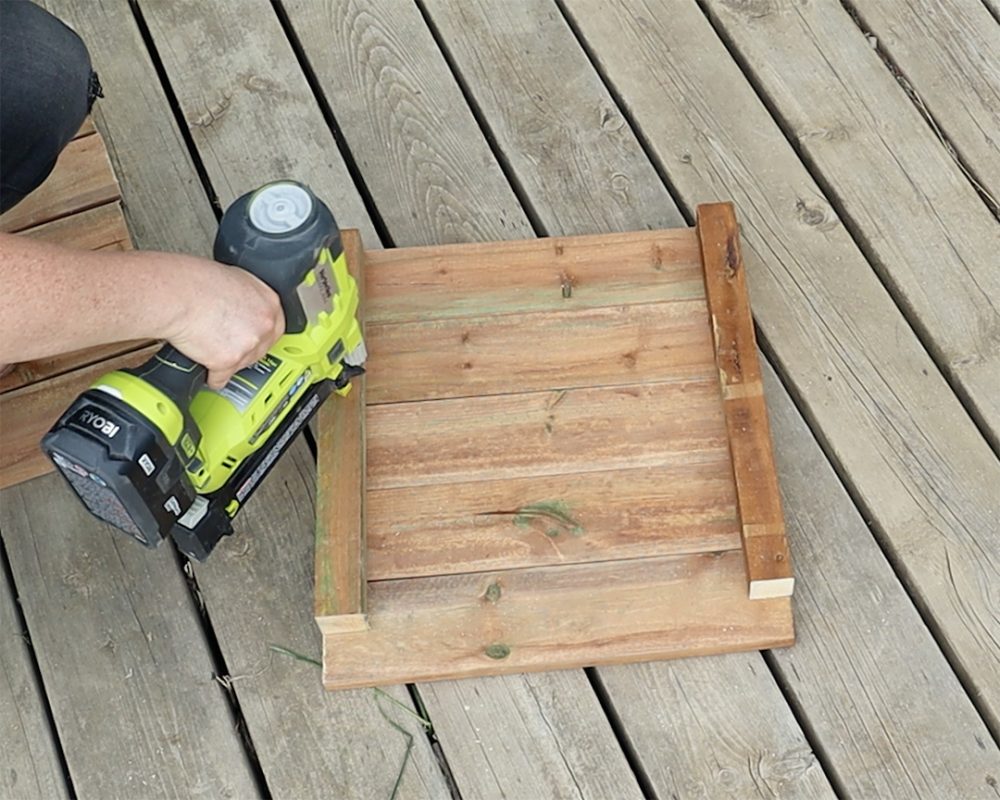
Now that your wood is all cut, it’s time to start making the sides of your planter. To make one side, lay five of your 16” 1x4s together with their long sides butted up against each other.
Then, place one 16” 2X2 on top of the 1x4s on each side as shown. To make sure that everything was lined up correctly before I attached all the pieces, I used a second 2×2 and placed it on the outside edge of the 1x4s. I used it as a straight edge and made sure those boards were all in line, and then I used it to make sure the 1×4 I was nailing in place was in line with them too. Once I was sure everything was in the right place, I nailed the 2×2 board in place with my brad nailer (also called a finishing nail gun) and 2″ brad nails. I used nine nails to hold the board securely in place. Once the first 2×2 was in place, I took the one I was using as a straight edge and nailed it in place on the other side too.
Repeat for the other side
Repeat to create one more side of your outdoor planter box.
I think it’s important to note here that I only used wood glue on the joints in one step of my own planter boxes (we will get to that in a moment!). If you are concerned about the strength of your planter box, feel free to use wood glue AND brad nails for any and all joints. I found that just brad nails were good enough for me in most places.
And in case you are wondering why the materials list I gave you and the measurements of your wooden planks don’t quite add up, don’t forget that the actual measurements of a 1X4 is 3/4″ x 3-1/2″, and a 2X2 is 1-1/2″ x 1-1/2″. You can learn more about actual vs. nominal lumber sizes right here.
Creating the rest of the DIY planter box
Now, lay five more 16” 1x4s together, just like you did when you made the sides. I used one of the not-yet-used 1x4s as a straight edge to make sure the five pieces I was using were in a straight line. Once you have them lined up, rest one of the finished side panels on top of it with the attached 2×2 at the bottom, butted up to the edge. Nail it in place by using your brad nailer and nailing through the 2×2 to attach it to the five loose boards. Then, add the other finished side panel to the other side. Now you have three sides of your simple planter box finished!
Next, lay the final five 16” 1x4s together on the ground just like you did for the previous step, and this time place the almost completed three-sided box you have assembled on top of them. Nail in place through the 2×2 pieces on either side. It’s starting to look like a planter, isn’t it?
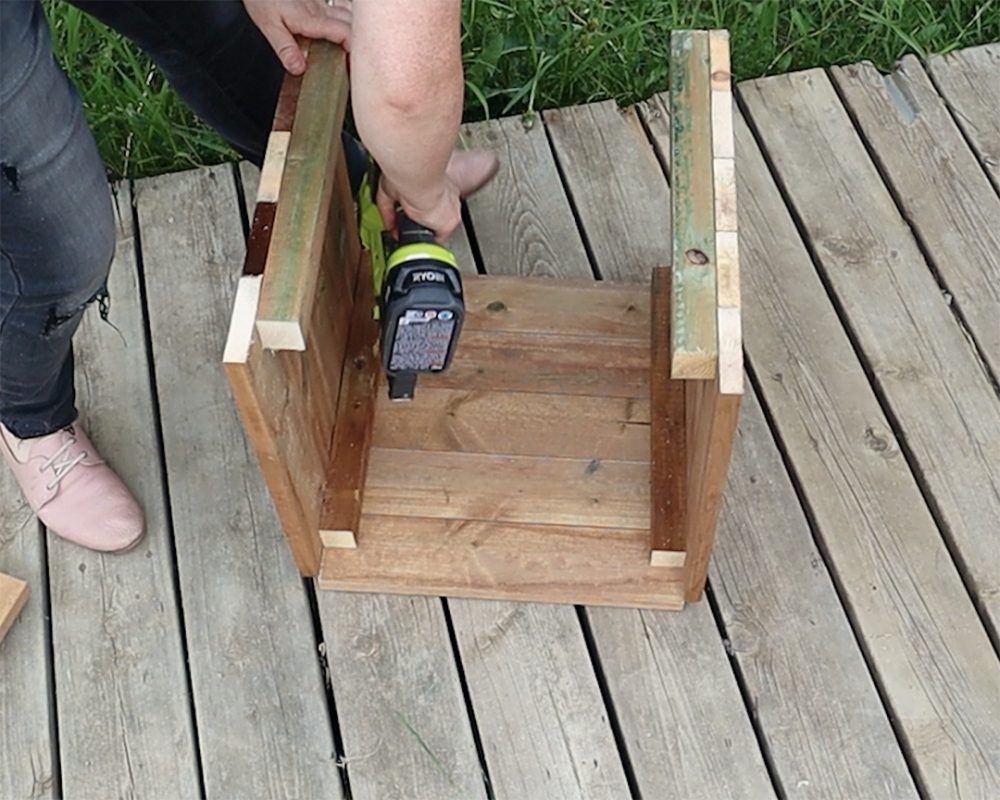
Adding the legs
Now, it’s time to add the legs! Attach the four 20” 2X2 leg pieces, one to each outside corner of the planter, with wood glue and brad nails. Make sure the top edge of each leg is flush with the top of the planter so your finished product will be level. I put nails through both available sides of the legs to make them as secure as possible.
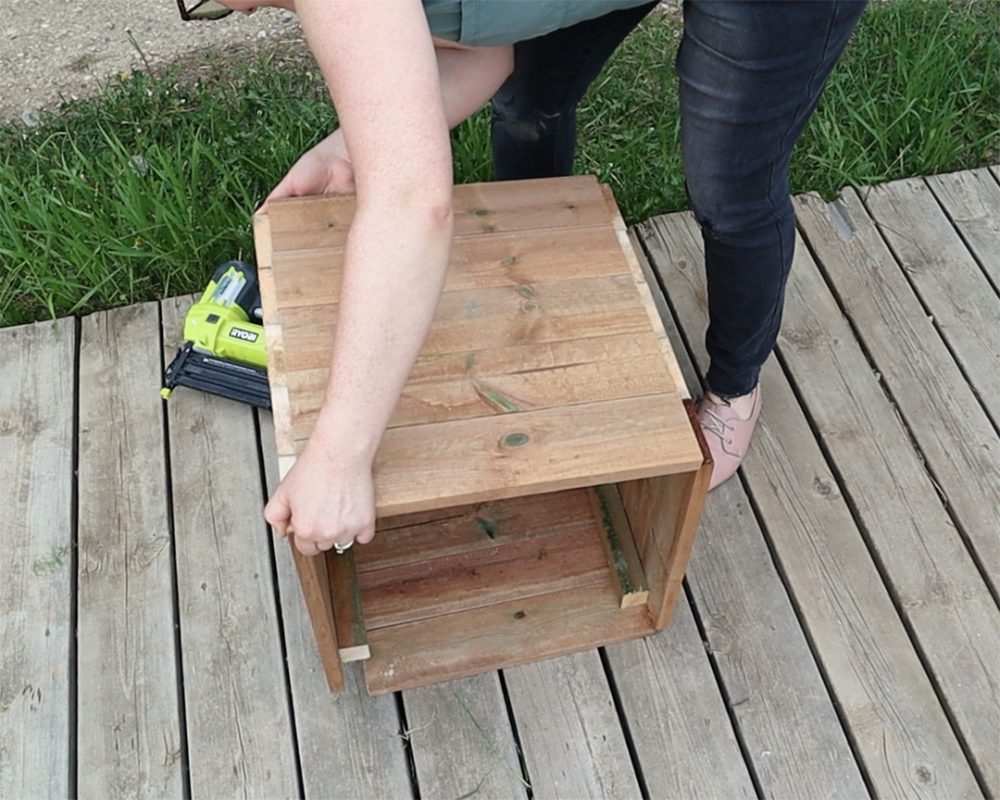
Making the platform for the bottom of the planter box
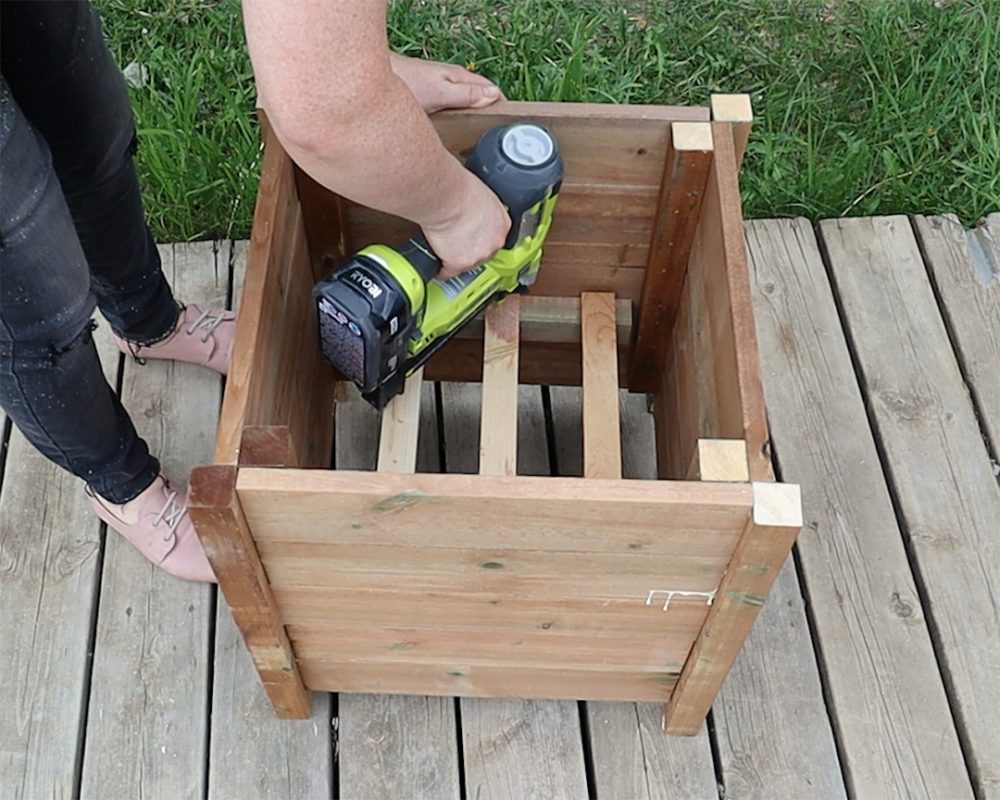
Next, you want to create a platform inside the planter a few inches from the bottom where your flower pot can sit comfortably inside. Do this by nailing the 12” 2x2s to two sides inside the planter, and then nailing the three scrap pieces of wood on top of them in the opposite direction. Make sure these pieces are evenly spaced. It doesn’t matter that this doesn’t create a full bottom, since it is just a resting place for a pot. This design will also allow excess water to drain easily from your planter when it rains or when you water your flowers.
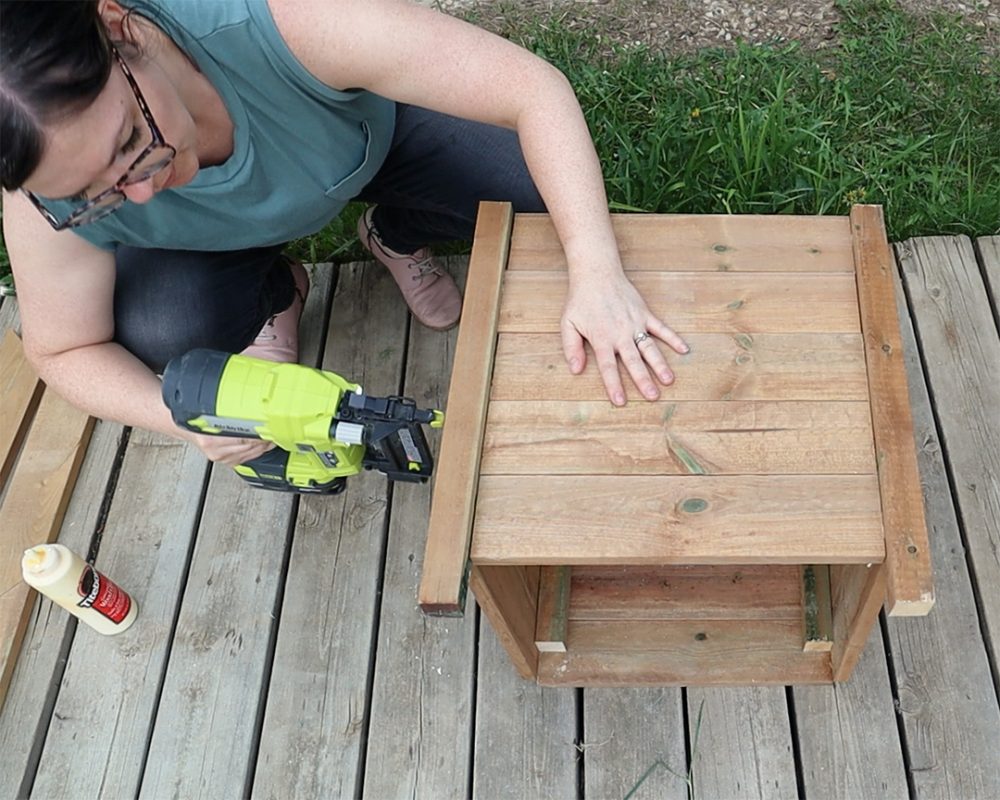
Adding the top trim
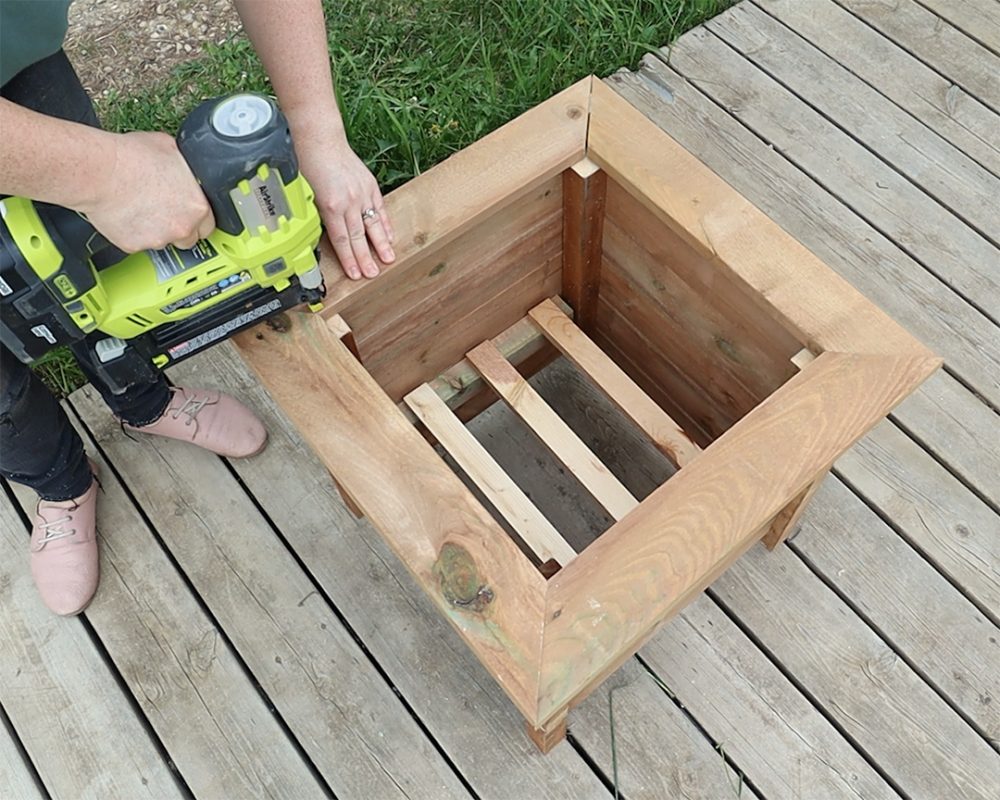
We are almost done! Finish the planter by attaching the four angled 15” 1x4s to the top of the planter with brad nails. Getting these lined up can be a bit tricky. I find it works best to put all four of them in place first without nailing them down, just to make sure they’re lined up nicely with each other on top of the planter. Then, I nail the corners of each one of the trim pieces to the planter first, making sure they are all butted up against each other properly as I go. Then I put a final nail through the corners horizontally from the outside edge to make sure they hold together.
Adding strength to the planter
Once you’ve got your DIY planter box put together, you can strengthen it by adding more nails to the sides of the 1x4s from the outside. This will ensure that your planter will hold your favourite flowers securely while also looking pretty!
This size of planter box will hold a pot up to 14″ in diameter. The ones I’m using here are 12″ in diameter.
I made two of these DIY planter boxes, and I think they look so gorgeous on the back porch at our Little Lake House! I love how versatile this project is too. You can change the look of these planters so easily by changing the type and colour of the wood you choose (never underestimate a good wood stain!), the length or height of the wood in the cut list, and the type of flowers you choose to put in them. Such a great way to modernize and beautify your front porch or back deck at minimal cost!
Tips and tricks
- It’s not usually necessary, but you can sand the ends of the lumber after it’s cut for a smoother look
- Adding wood glue to all the joints can add even more strength to the planter
- These can also be made from cedar wood, reclaimed wood… try out different materials for a different look!
Printable instructions

DIY Planter Box with 2 tools
Make a beautiful wooden planter box using two tools only. This is a great project for a beginner power tool user!
Materials
- (5) 1x4x8 pieces of MicroPro Sienna treated lumber
- (3) 2x2x8 pieces of MicroPro Sienna treated lumber
- 30” of 1x2 scrap lumber (I used stakes from Home Depot)
- wood glue
Tools
- miter saw
- finishing nail gun
- 2" brad nails
Instructions
- Begin by using a miter saw to cut all of the lumber according to this cut list:
- (20) 1x4 at 16” long
- (4) 1x4 at 15” long (short side measurement) with 45 degree angled ends
- (4) 2x2 at 20” long
- (4) 2x2 at 16” long
- (2) 2x2 at 12” long
- (3) scrap wood at 15” long (for interior brace)
- Lay (5) 16” 1x4s together and place one 16” 2x2s on top & on each side. Nail those in place with a brad nailer. Repeat to create two sides of the planter.
- Lay 5 more 16” 1x4s together and rest one of the finished side panels on top, butting it up to the edge. Nail in place. Repeat by adding the other finished side panel to the other side.
- Lay the final 5 16” 1x4s together and place the 3 attached side panels on top, nail in place.
- Add the 20” 2x2s to each outside corner of the planter with wood glue and brad nails, ensuring the top edge is flush with the planter.
- Create a platform inside the planter a few inches from the bottom by nailing the 12” 2x2s to two sides inside the planter and nailing the 3 scrap wood pieces evenly spaced on top.
- Finish the planter by attaching the 4 angled 15” long 1x4s to the top of the planter with brad nails.
- You can strengthen the planter by adding more nails to the ends of the 1x4s from the outside.
Have you built a planter box or other outdoor DIY that you are super proud of? Share a pic in the comments or tag me @thediymommy, I would love to see it!
Pin Me!
Step 1 is confusing. It says to lay (5) 1×4’s on long edge and then add a 16″ 2×2 to the sides. The Pic shows this but with the 2×2 being about half way from top. The math is not adding up here. 5×4 is 20 and the 2×2 is only gong to the top of the 4th board. Is this a typo? and if so what should the measurements be?
Hi Cheryl, the actual measurement of a 1 x 4 piece of lumber is 3/4″ x 3-1/2″. I’ll add a reminder note of this fact to the post. Let me know if you have any other questions!
Good morning – I am not seeing the finished size. Can you give that please.
Thank you Joanne
This worked so well, thank you! I wish I could attach a photo, but my MIL will love it :).
I’ll definitely make another for my own mom, this time with multiple 12-in “resting bars” for the flower pot at various heights so the 15-in base for the flowers can be moved up/down if necessary.
Thanks for the detailed plan!