• Skip to primary navigation
  • Skip to main content
  • Skip to primary sidebar
The DIY Mommy
  • Home Decor
  • DIY Crafts
  • Organize
  • Printables
  • Recipes
  • Life
  • Shop My Home
  • Lake House
  • About
  • Contact
    • Facebook
    • Instagram
    • Pinterest
    • Twitter
    • YouTube
menu icon
go to homepage
search icon
Homepage link
  • Home Decor
  • DIY Crafts
  • Clean & Organize
  • Recipes
  • Free Printables
  • Life
  • Our Little Lake House
  • Shop Our Home
  • About
  • Contact
    • Facebook
    • Instagram
    • Pinterest
    • Twitter
    • YouTube
  • ×

    Home » DIY Crafts » Upcycling Ideas

    How to Make a Wall Shelf for Kids' Collectibles from a Cutlery Tray (+ Little A's New Nightstand!)

    Published: Apr 1, 2016 · Modified: Apr 26, 2020 by Christina Dennis · This post may contain affiliate links · This blog generates income via ads · 5 Comments

    I've had another run-in with a cutlery tray and paint, and I have to say that the results of this upcycle are even more fun than the last cutlery tray project I did! Today I'm going to show you how to make a wall shelf for kids' collectibles from a cutlery tray, plus I want to share Little A's adorable new nightstand with you. Ready?!

    How to make a wall shelf for kids' collectibles out of a cutlery tray

    The preschool years seem to be the age that kids start collecting the tiniest, most pokey little toys that they just LOVE to leave lying on the floor for mama to step on. I can't tell you how many times I've stepped on jaggedy edged toys and felt the instant urge to toss them in the garbage! If you're a mom of a preschooler or a grade-schooler, you might know exactly how I feel.

    How to make a wall shelf for kids' collectibles out of a cutlery tray

    My two oldest daughters are obsessed with tiny little figurines and have amassed quite a collection. My Little A loves her "Shopkins". We've tried keeping them in a shoe box, a tin box, and even one of her drawers, but she always takes them out so that she can admire them. That's when they get lost and trampled on.

    I finally decided that we needed to come up with a better storage solution for these teeny little collectibles. I thought about my jewelry holder that I made from a cutlery tray, and decided we could do a fun kid's version of this for Little A's collectibles!

    How to make a wall shelf for kids' collectibles out of a cutlery tray

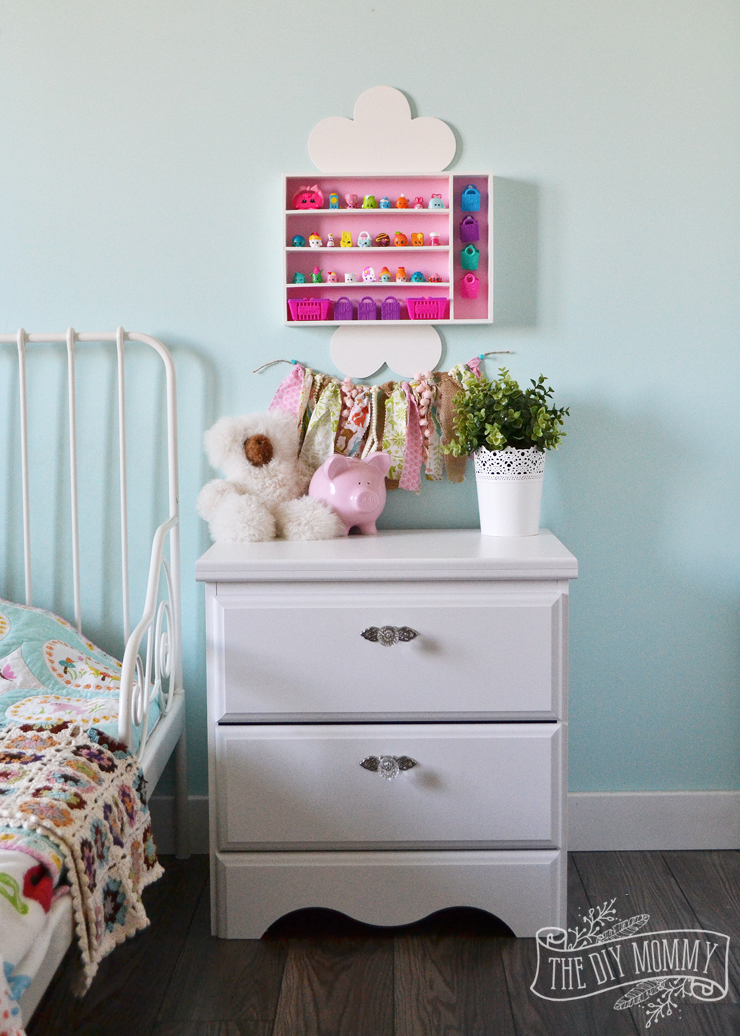
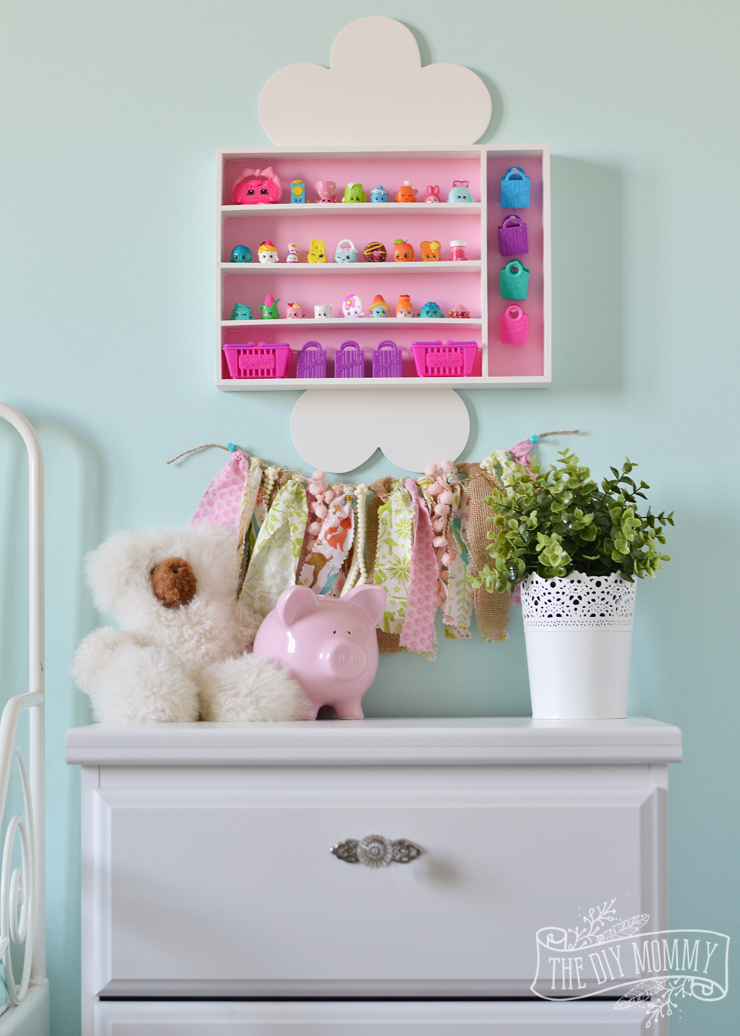
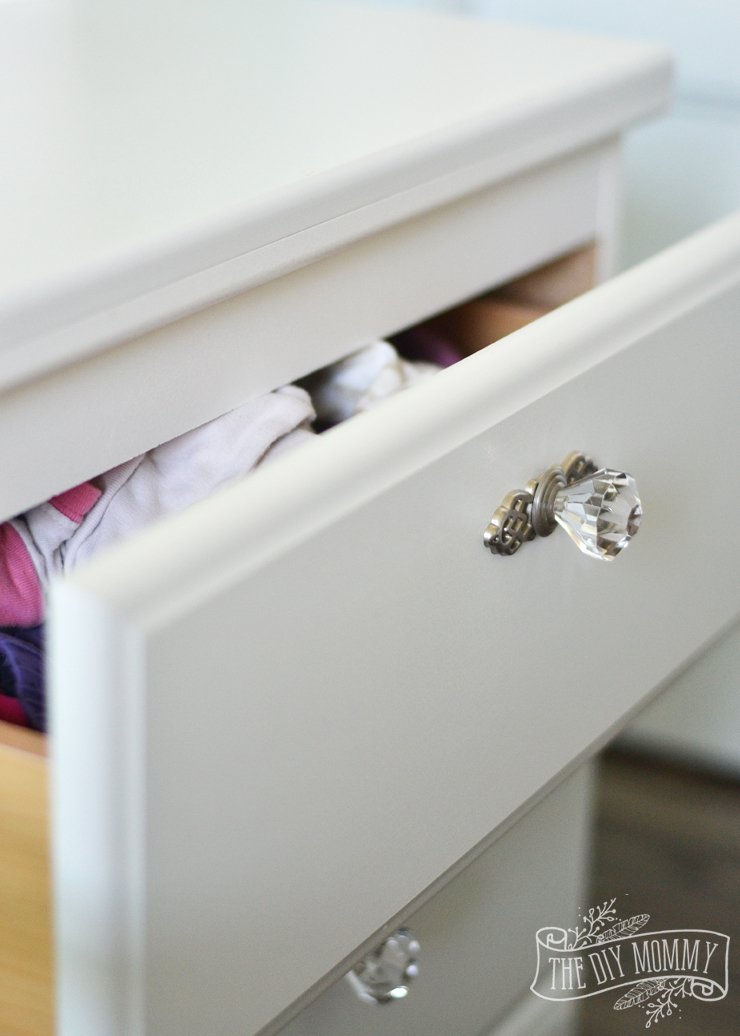
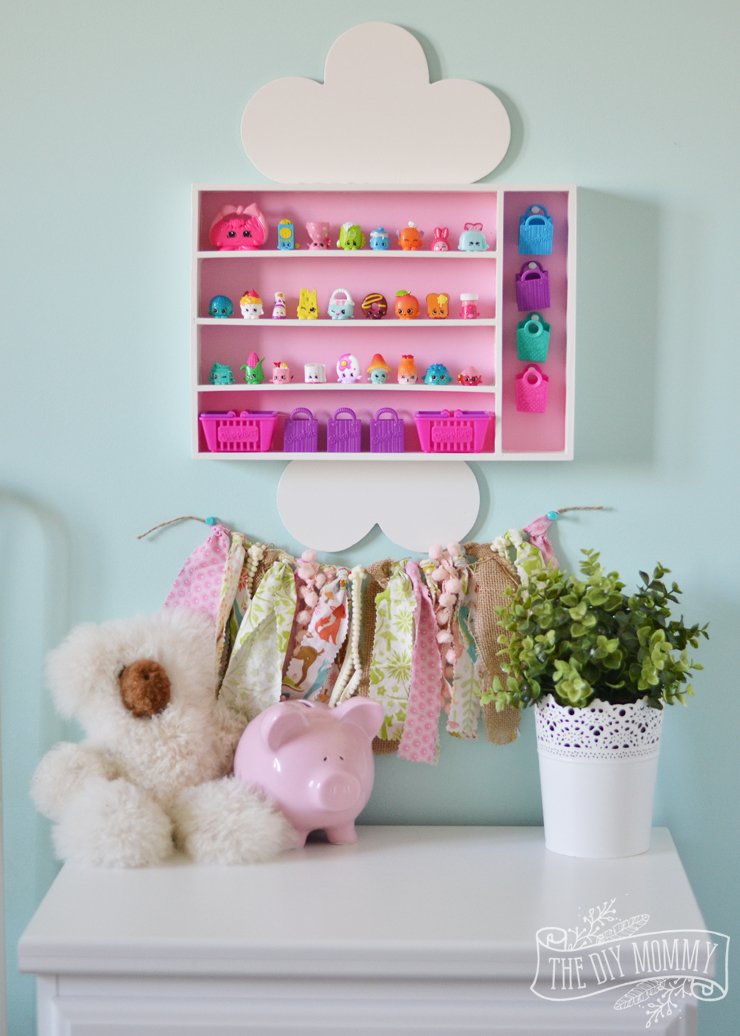
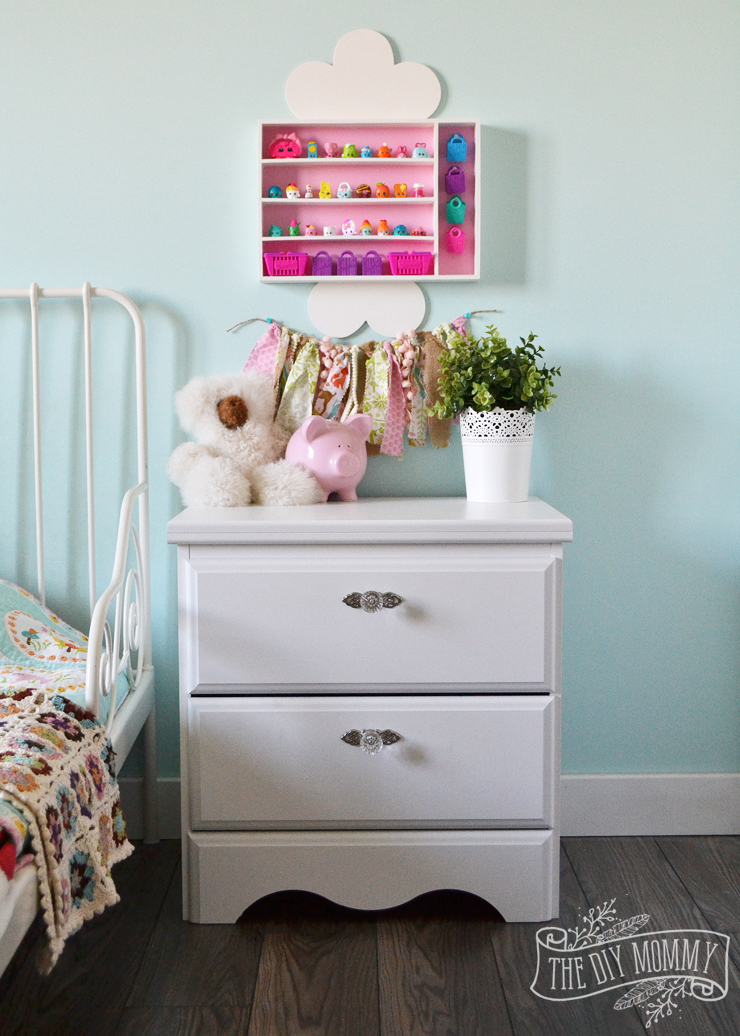
    I really love how this project turned out, and the perfect place for it is over Little A's new nightstand. Isn't it so sweet here? Little A can easily reach for her treasures with the wall storage at this height, and she stores all of the rest of her special things (and her pajamas) in her new Diamond Dreams nightstand from The Brick.

    Diamond Dreams Nightstand - The Brick

    We chose this nightstand because it's white and bright, because it has beautiful jeweled handles to match Little A's other vintage furniture pieces, and because it was so sturdy. Plus, at only $160 this piece is a steal of a deal!
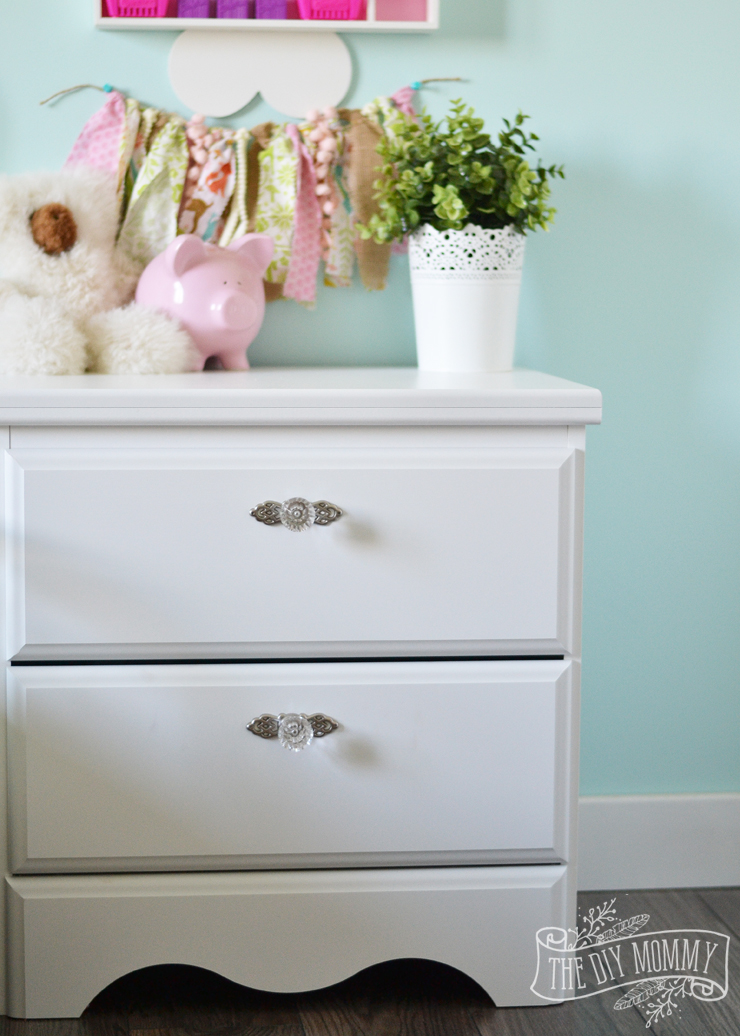
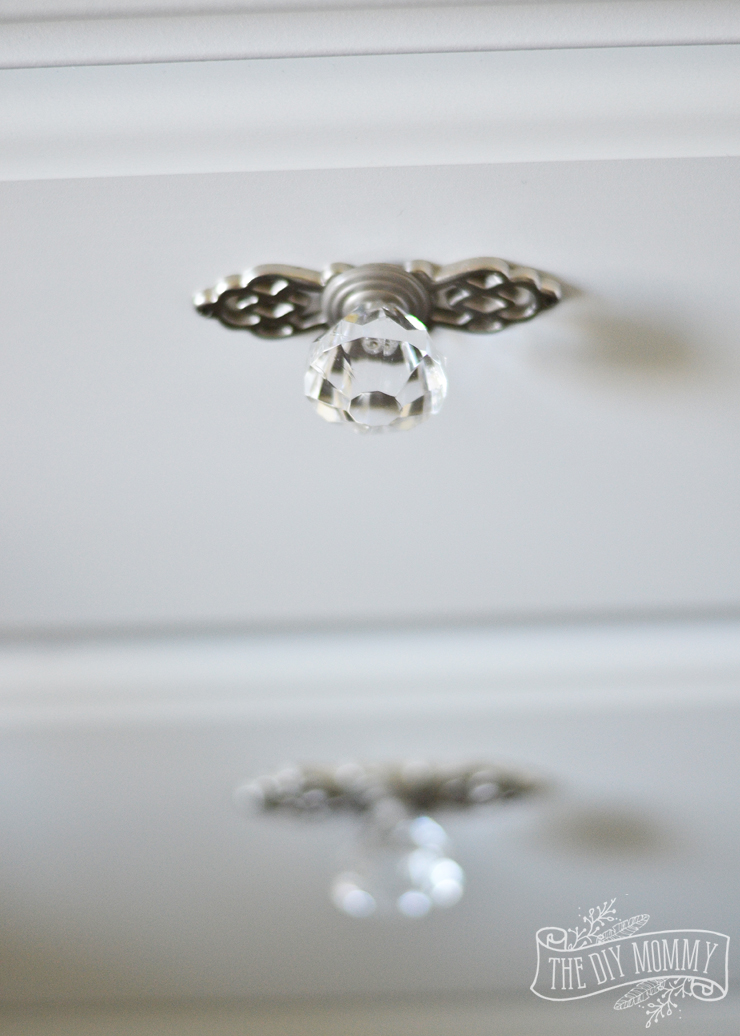
    How to make a wall shelf for kids' collectibles out of a cutlery tray

    Diamond Dreams Nightstand - The Brick

    Little A is enamoured with her "diamonds".

    This is just a little peek at how her bedroom is being transformed from a baby nursery to a preschooler's dream room - I can't wait to share with you the full reveal soon! {Here's how her "sunny woodland nursery" bedroom looked before.}

    And she sure is loving her new wall storage shelf for her treasures too!

    How to make a wall shelf for kids' collectibles out of a cutlery tray

    Here's how to make this collectibles wall storage shelf.

    Supplies:

    • wooden cutlery tray with straight sides
    • large wooden cutout shape (I used a flower shape)
    • chop saw
    • acrylic or latex paint
    • paint brushes
    • wood glue
    • push pins

    How to make a wall shelf for kids' collectibles out of a cutlery tray

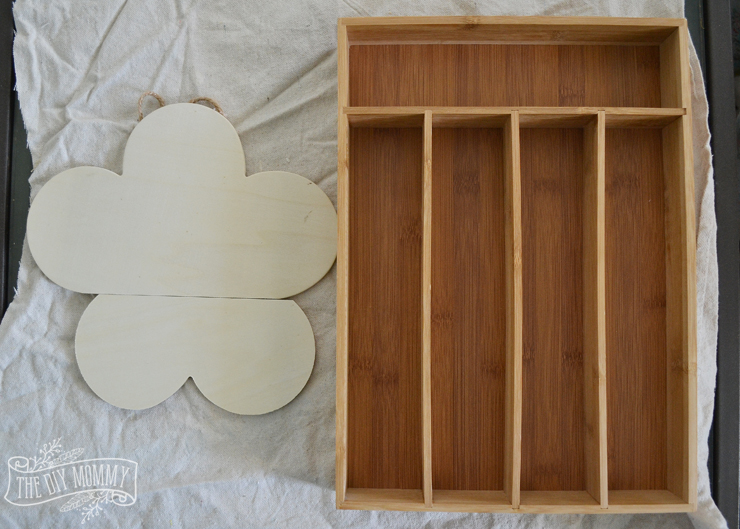
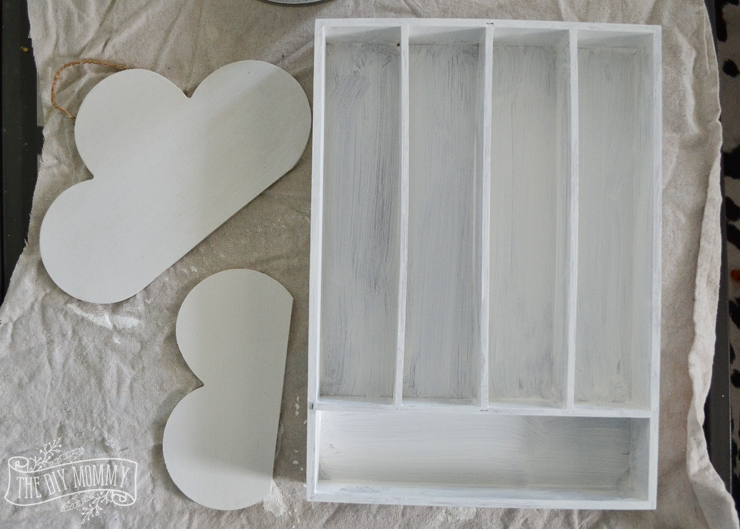
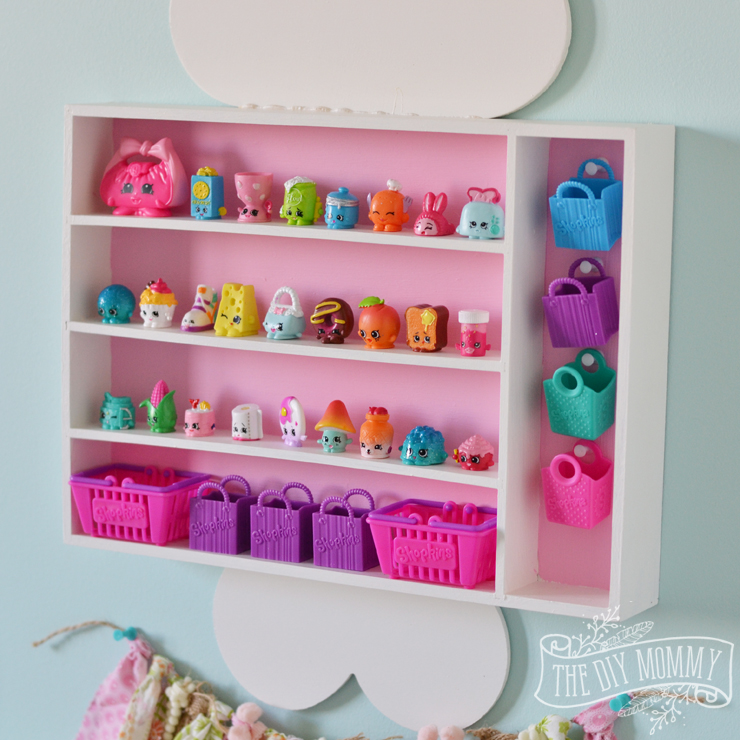
    Gather your supplies and then cut your large wooden shape in half horizontally with a chop saw.

    How to make a wall shelf for kids' collectibles out of a cutlery tray

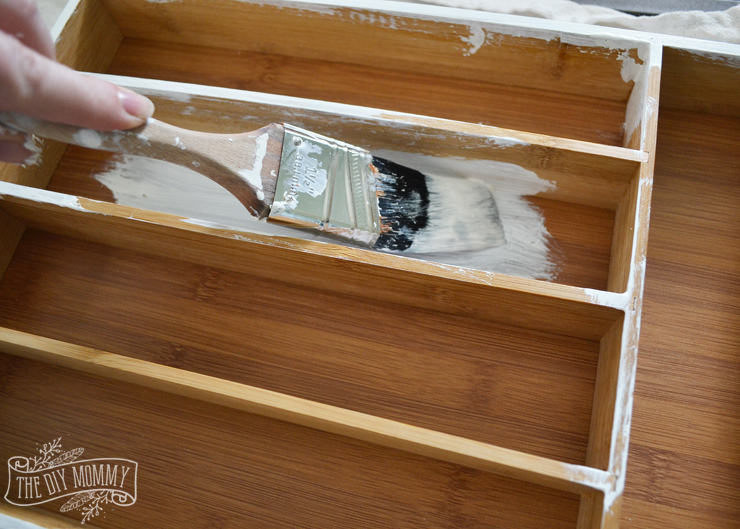
    Paint the wooden shape and the cutlery tray with acrylic or latex paint. I used a white latex.

    How to make a wall shelf for kids' collectibles out of a cutlery tray How to make a wall shelf for kids' collectibles out of a cutlery tray

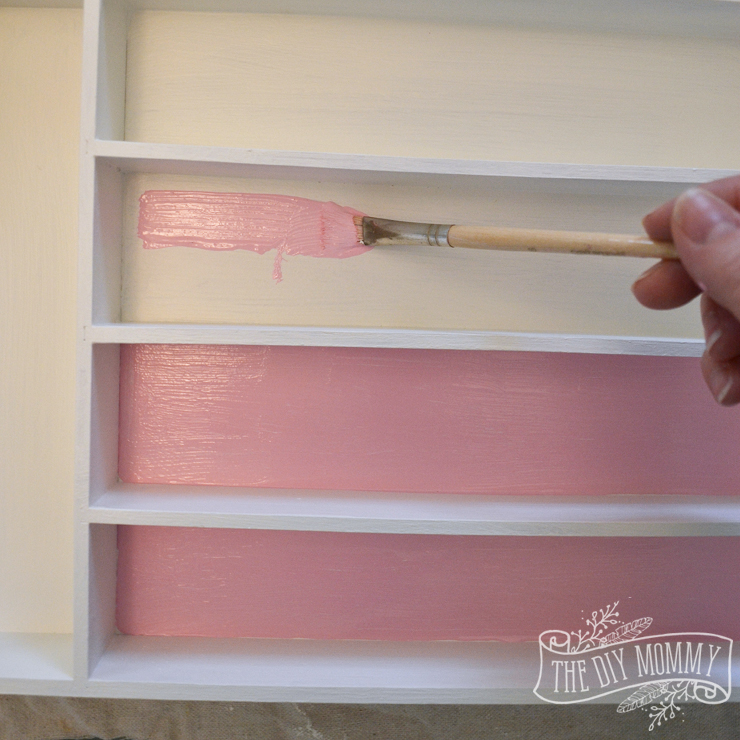
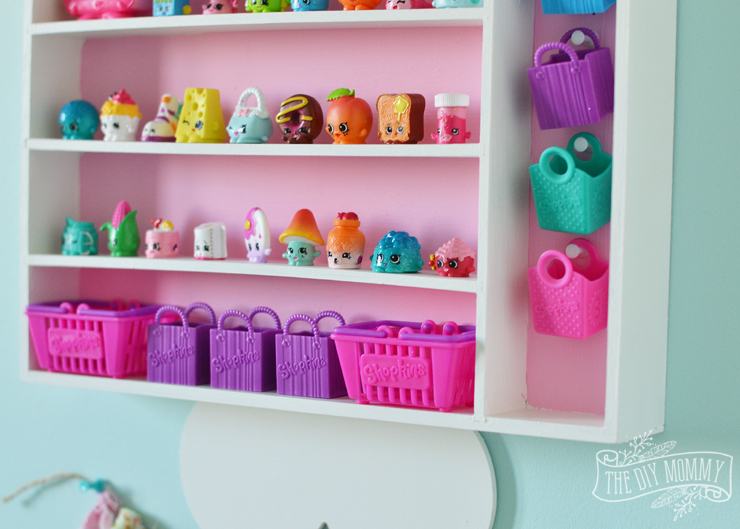
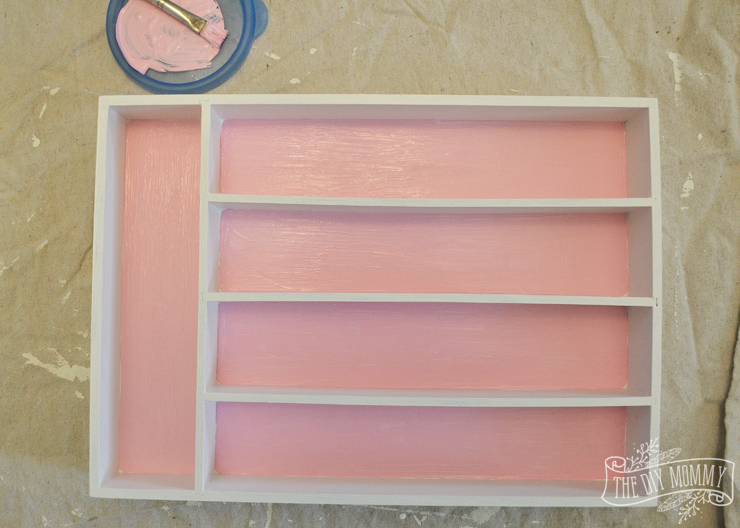
    After a few coats of paint have dried, paint the interior bottom of the tray with a contrasting colour of paint. I used a pink acrylic paint.

    How to make a wall shelf for kids' collectibles out of a cutlery tray How to make a wall shelf for kids' collectibles out of a cutlery tray

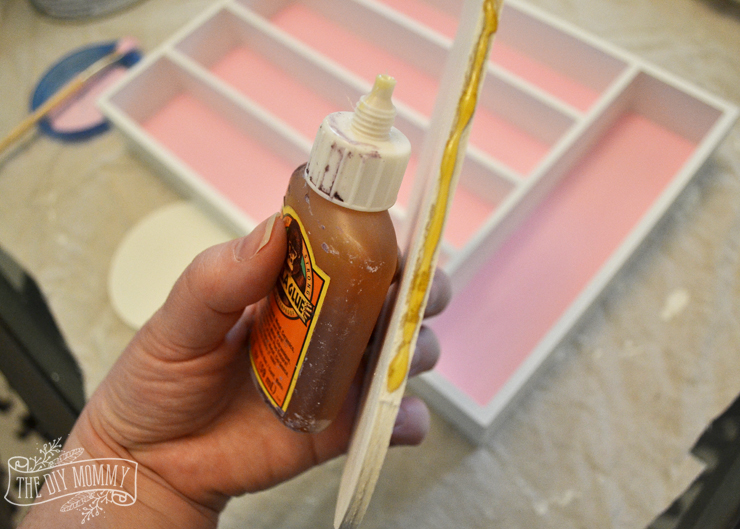
    Once the paint has dried, apply a strip of wood glue to the cut edges of your large wooden shape.

    How to make a wall shelf for kids' collectibles out of a cutlery tray   

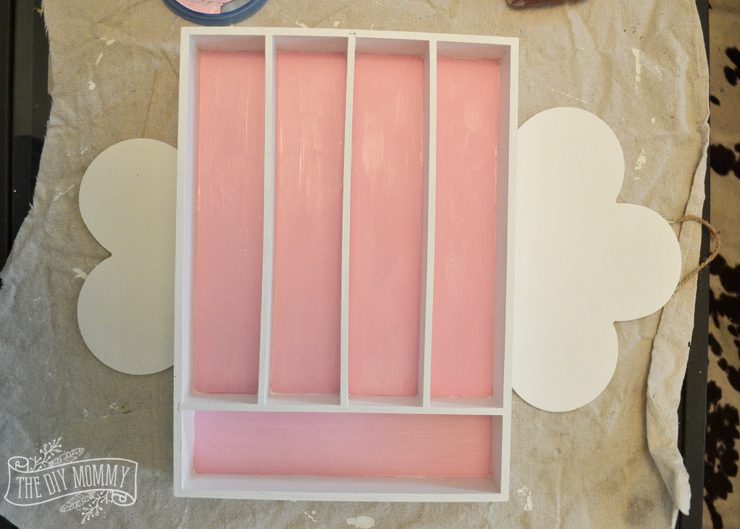
    Adhere each half of the shape to the top and bottom of the shelf as shown. (The original sides of the tray become the top and bottom of the shelf so that you have long rows for collectible toys.)

    How to make a wall shelf for kids' collectibles out of a cutlery tray

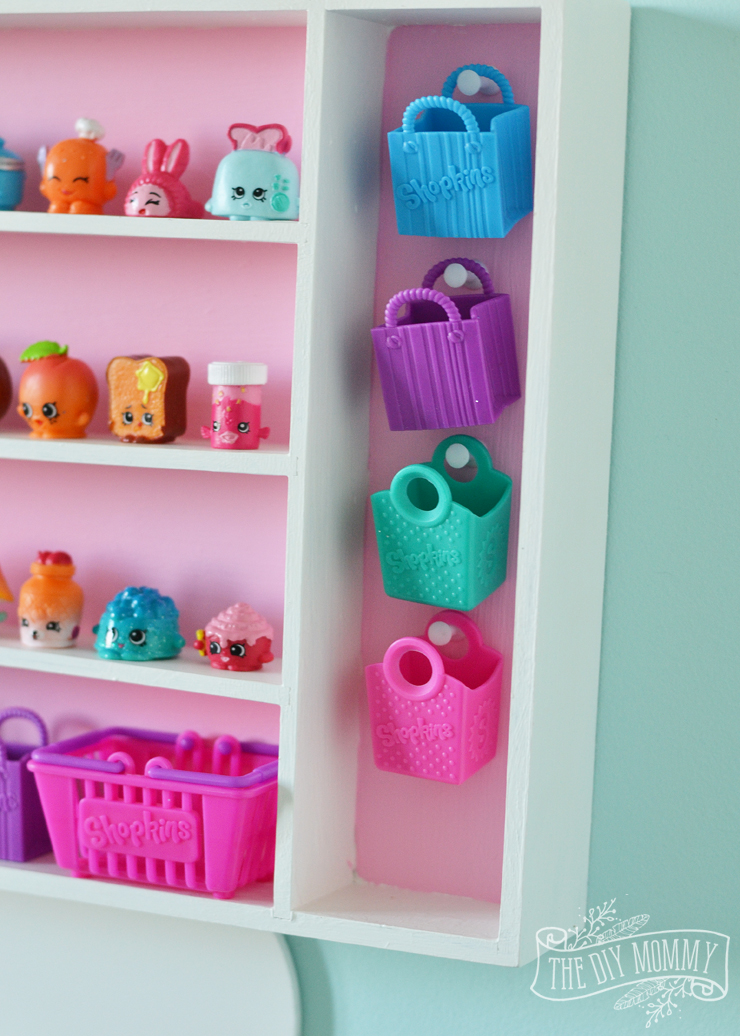
    Push some push pins into any vertical compartment you might have in your shelf to hang things. In my case, I used push pins to hang these little shopping bags.

    How to make a wall shelf for kids' collectibles out of a cutlery tray

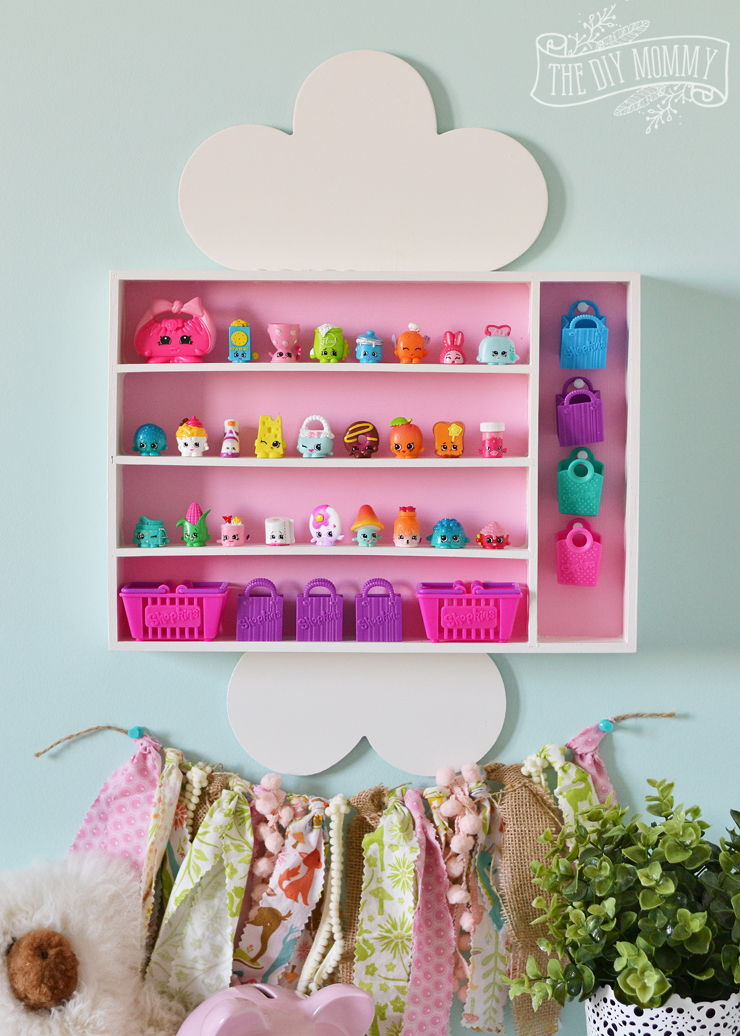
    Hang your shelf up, and have your little one fill it with their favourite toys!

    How to make a wall shelf for kids' collectibles out of a cutlery tray      

    When my oldest daughter, Little C, saw Little A's new shelf, she announced that she wanted one too - but in gold and hot pink. Let the search for another cutlery tray to upcycle begin! 🙂

    How to make a wall shelf for kids' collectibles out of a cutlery tray

    How do YOU store your kids' little pokey toys? I'd love to get more ideas!

    Disclaimer: This post is sponsored by The Brick. As always, all of the opinions here are my own. I only recommend companies that I use and love myself.

    More Inspiration

    • DIY Dollar Tree Heart Shaped Wreath
    • How to Set Up a Cricut for the First Time (Step by Step!)
    • Inexpensive Gift Wrapping Ideas that look stunning!
    • Free Printable Christmas Coupon Book for Kids

    Reader Interactions

    Comments

    1. Laura

      April 02, 2016 at 2:09 pm

      How did you hang the tray onto the wall?

      Reply
      • Christina Dennis

        April 10, 2016 at 9:04 pm

        There was a little ledge on the back, so I hung that on nails in the wall. If yours doesn't have that, you could just attach one of those picture hanging brackets to the back.

        Reply
    2. Julia Chiarella-Genoni

      June 16, 2016 at 2:37 pm

      This is genius!! What a great idea for those little things. I can't wait to show my son so we can craft one up too! Thanks!!

      Reply

    Trackbacks

    1. A Pink, White & Gold Shabby Chic Glam Girls’ Bedroom Reveal (Little C’s Room Makeover for the ORC) | The DIY Mommy says:
      May 12, 2016 at 12:24 am

      […] like my 4 year old (here was her storage solution for her toys), my 7 year old LOVES Shopkins and other collectibles, so a place to store them is […]

      Reply
    2. A DIY Toddler Room | Sew Bright Creations says:
      February 26, 2017 at 11:57 am

      […] Little People? We made this shelf using a utensil holder from the Dollar Store. Find the tutorial HERE from The DIY Mommy. The WISH decal is another Upper Case Living design from […]

      Reply

    What do you think? Cancel reply

    Your email address will not be published. Required fields are marked *

    This site uses Akismet to reduce spam. Learn how your comment data is processed.

    Primary Sidebar

    Welcome!

    Christina Dennis, The DIY Mommy

    I'm Christina and I'm sharing budget-friendly DIY & decor ideas to create a cozy home and life you love!

    Read more about me

    Latest Posts

    • We built a small bathroom wet room from scratch!
    • Creative And Unique DIY Wall Art Ideas
    • DIY Dollar Tree Heart Shaped Wreath

    What's my home decor style?

    Discover the home decor style that best fits your personality and lifestyle. This two-minute quiz is going to give you the direction you need to start the big, bold room makeovers that you've always wanted to try!

    Find out now!

    Archives

    Footer

    ↑ back to top

    About

    • About The DIY Mommy
    • Privacy Policy
    • Disclosure Policy
    • Terms of Service

    Newsletter

    • Sign Up! for emails and updates

    Contact

    • Contact

    As an Amazon Associate I earn from qualifying purchases.

    Copyright © 2009 - 2023 The DIY Mommy. "The DIY Mommy" is a registered trademark.