• Skip to primary navigation
  • Skip to main content
  • Skip to primary sidebar
The DIY Mommy
  • Decor
  • DIY
  • Clean + Organize
  • Printables
  • Recipes
  • Life
  • The Academy
  • Shop My Home
  • About
  • Contact
    • Facebook
    • Instagram
    • Pinterest
    • Twitter
    • YouTube
menu icon
go to homepage
search icon
Homepage link
  • Decor
  • DIY
  • Clean + Organize
  • Printables
  • Recipes
  • Life
  • The Academy
  • Shop My Home
  • About
  • Contact
    • Facebook
    • Instagram
    • Pinterest
    • Twitter
    • YouTube
  • ×

    Home » DIY Crafts

    A Vintage Cane Chair Pair Makeover in Grey Velvet

    Published: May 20, 2015 by Christina Dennis · This post may contain affiliate links · This blog generates income via ads · 24 Comments

    Once upon a time - well, almost exactly one year ago - an avid Vintage Treasures Hunter spotted a pair of mid-century cane chairs on Kijiji. "Dear husband," she said as she peered up at her Main Squeeze, "would you mind driving an hour both ways to pick up these amazing-I'll-never-find-a-deal-like-this-ever-again-totally-vintage-tufted-i-love-them chairs with your truck?" The treasure hunter's husband nodded his head, rolled his eyes, and picked up the vintage chair pair for his wife whose love language he knew was Antique Shopping. It took a full year and the help of the Vintage Treasure Hunter's talented mom to fully reinvent the darling Vintage Chair Pair, but they were worth every bit of effort. These special chairs will be loved again for years to come with their new paint job and gorgeous new upholstery.

    This is the story of a pair of mid-century cane chairs I found, and how it took us a year to fully finish redoing them.

    Vintage midcentury cane chairs painted white and reupholstered in grey cotton velvet.

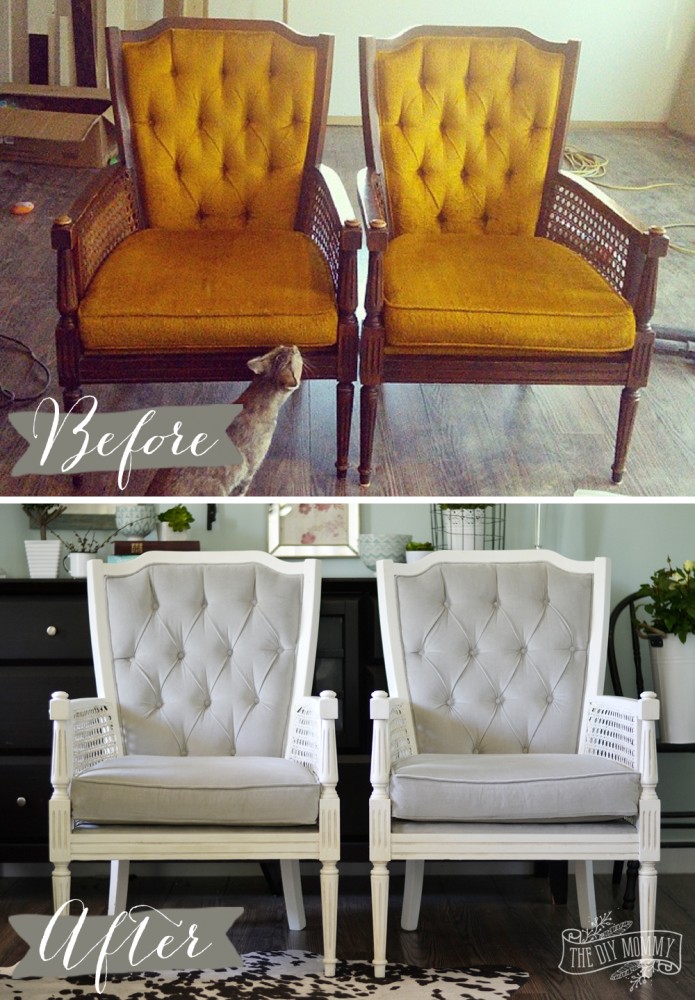
    Originally, I thought that I would take on the daunting task of reupholstering these babies. The more I thought about it, the more the prospect scared me. I knew that painting them wouldn't be hard, but I really didn't want to botch the upholstering. It's not that I paid a whole lot for the chairs, but they're of good quality and lovely - I wanted to make sure that they were finished properly and would be sturdy and beautiful for years to come.
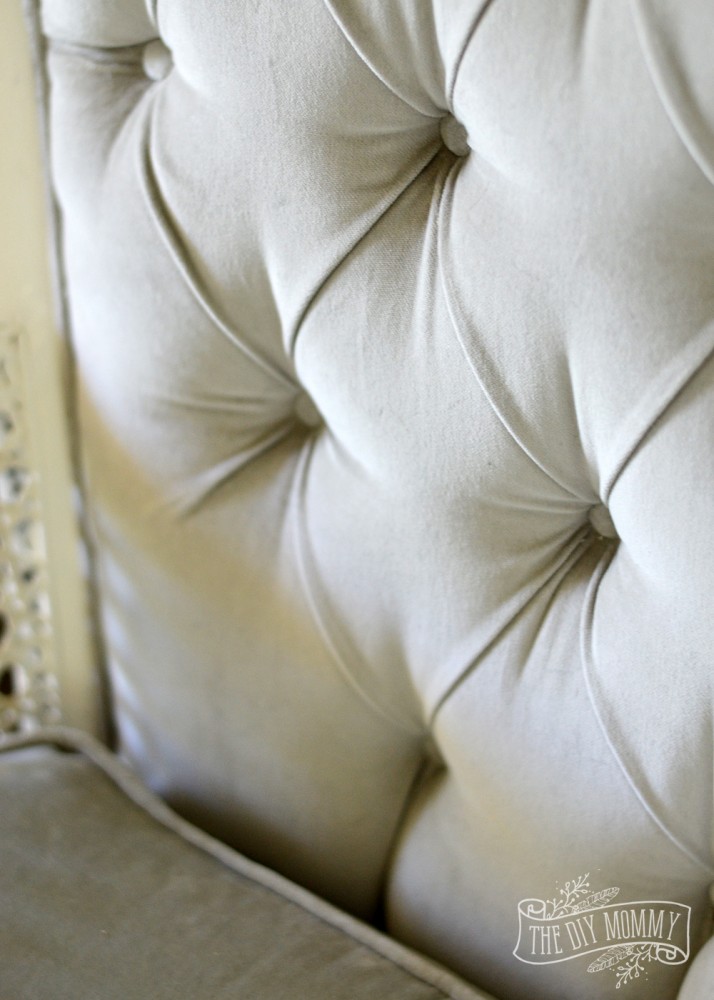
    Vintage midcentury cane chairs painted white and reupholstered in grey cotton velvet.

    That's when I turned to my mom who is a professional upholsterer. She's had many years of practice, and she lovingly offered to reupholster my chairs for me. Isn't she the best?! She helped me choose the perfect fabric - a silver coloured cotton velvet - and she spent hours and hours working on making these chairs exactly how I had pictured them in my head.

    Vintage midcentury cane chairs painted white and reupholstered in grey cotton velvet.

    I think that one of the tricks to being a smart DIYer is knowing when NOT to DIY. In this case, my desire to create heirloom pieces out of this vintage pair that my husband lovingly picked up for me outweighed my desire to learn and possibly fail at trying my had at upholstery.

    Vintage midcentury cane chairs painted white and reupholstered in grey cotton velvet.

    Here's what my mom and I did to transform these chairs into updated, heirloom pieces.

    Vintage midcentury cane chairs painted white and reupholstered in grey cotton velvet.

    I pulled off all of the old upholstery and foam, and pulled all of the old staples out with some pliers and a staple removal tool. This was by far the worst part for me, but it is necessary!

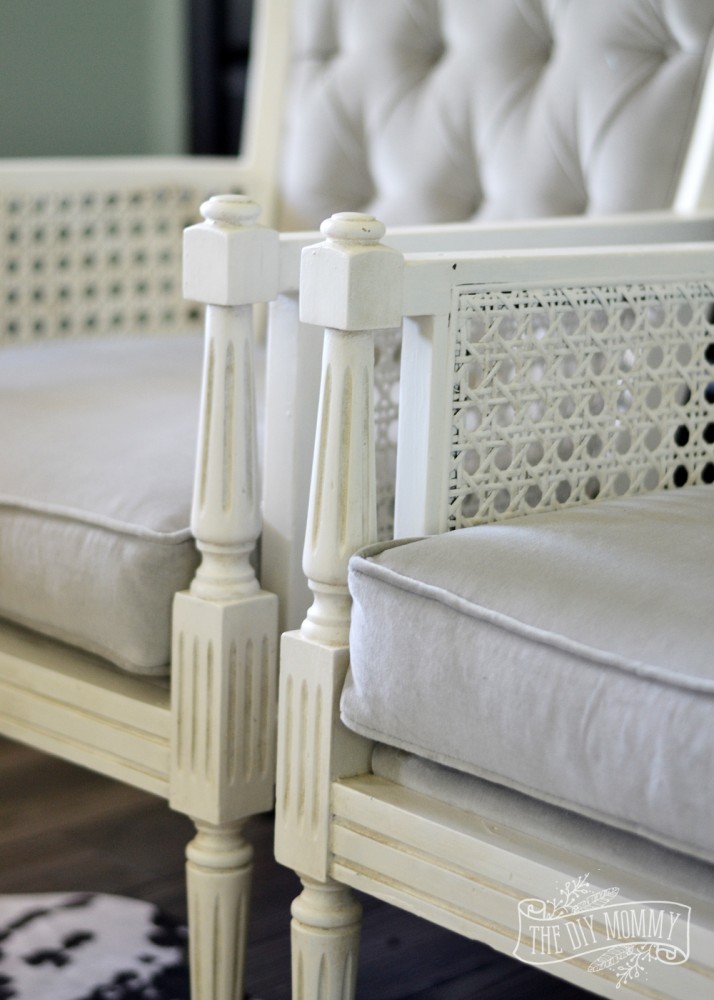
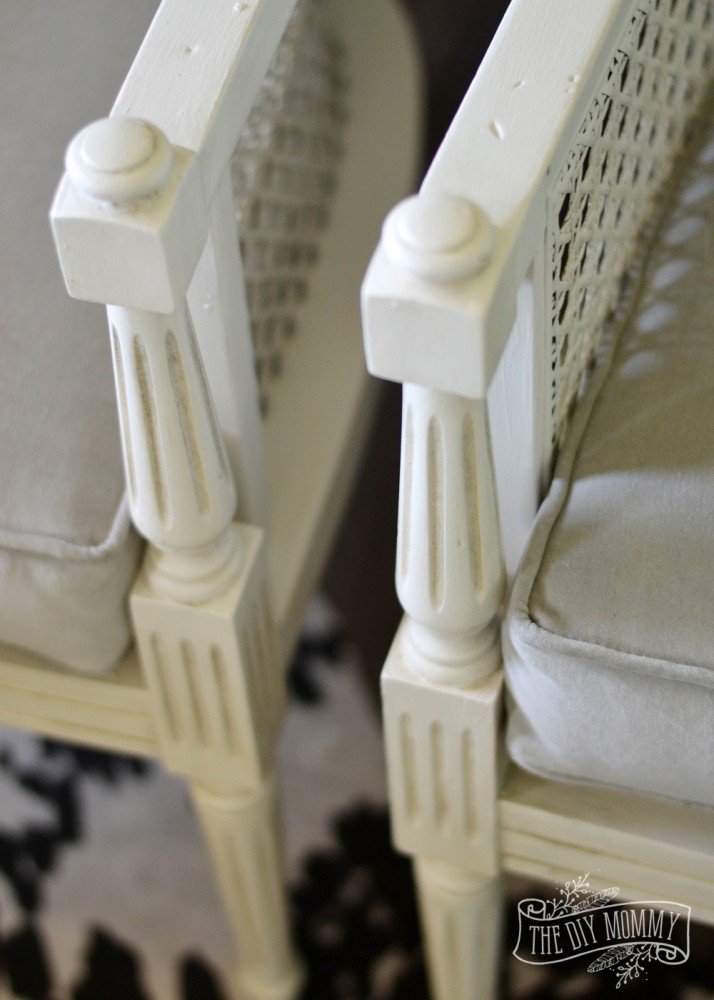
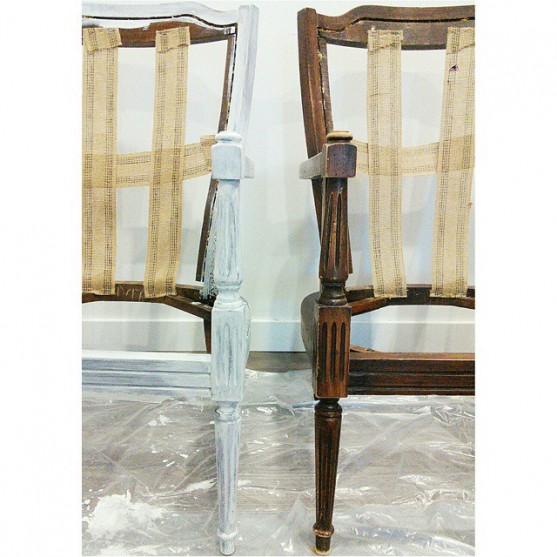
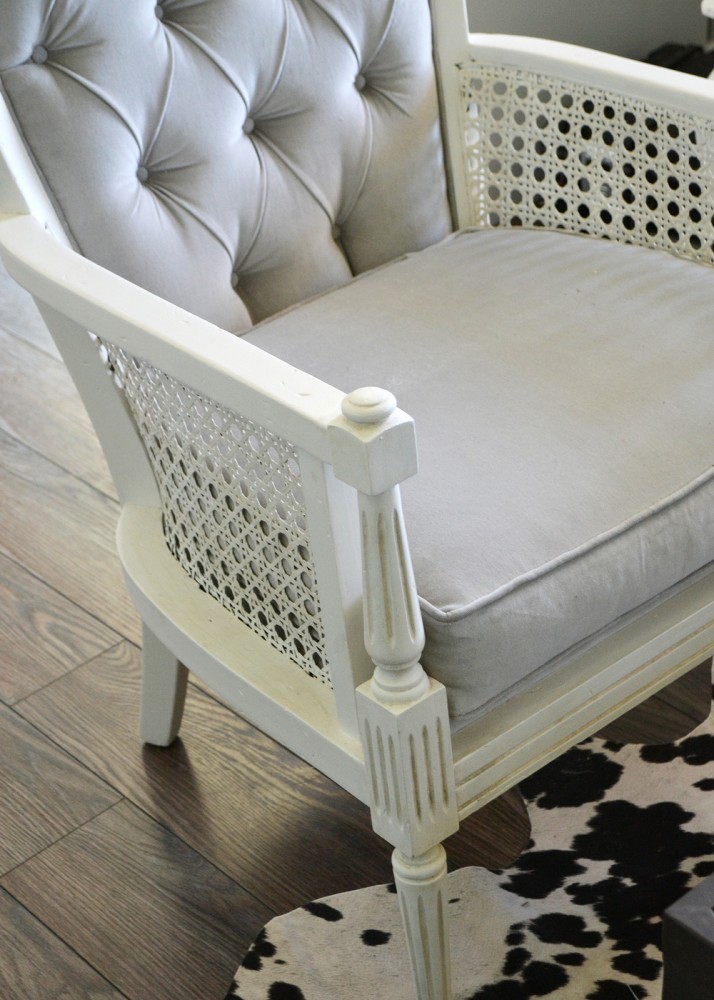
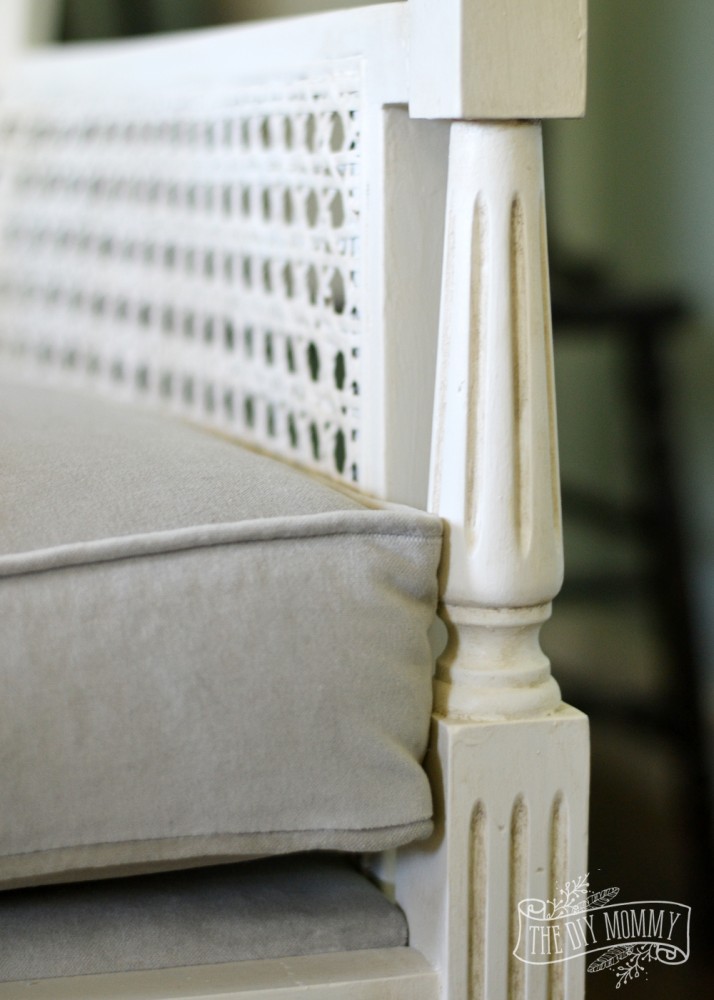
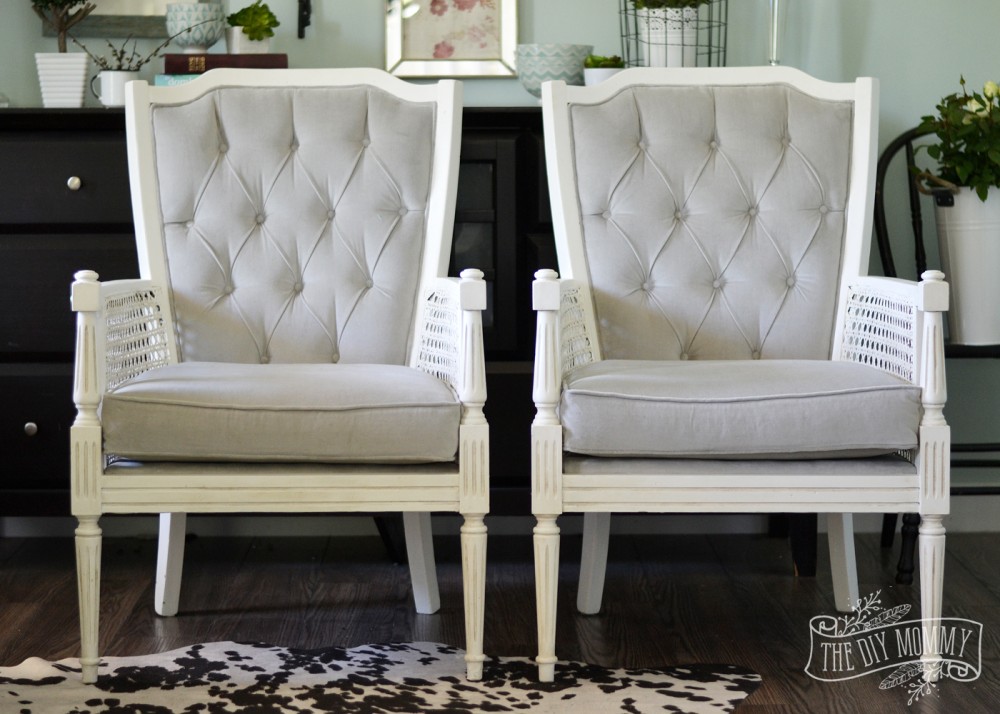
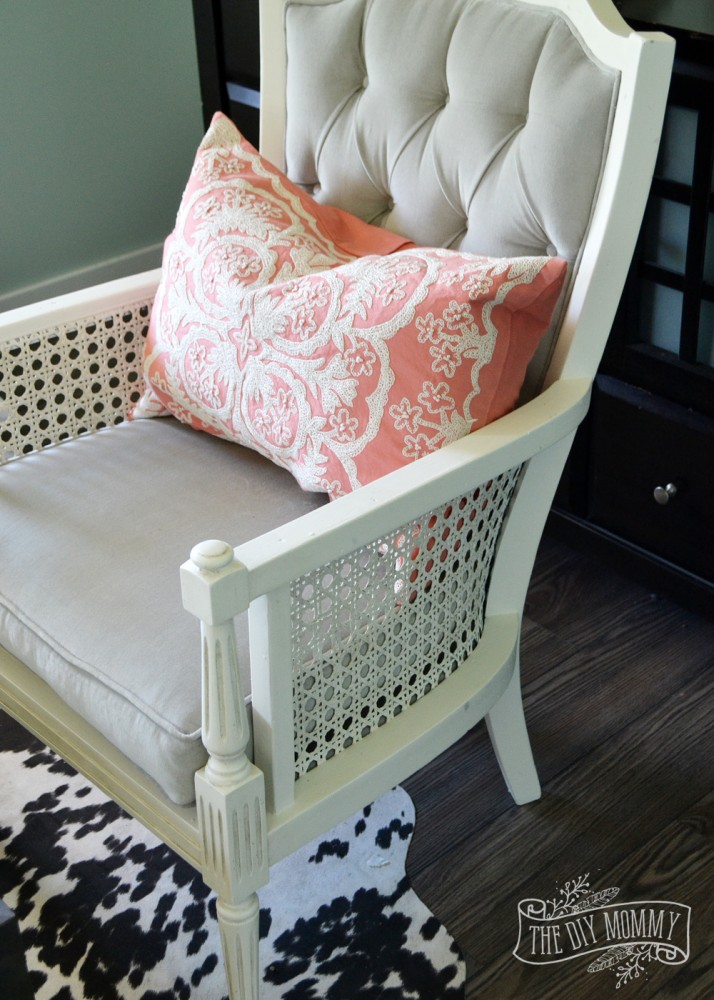
    I cleaned the wood with a degreaser and gave it a light sanding. I decided to use DIY chalk finish paint on these because I didn't want to sand off the old finish completely and I wanted a painted look. I ended up painting the chairs with 3 coats of chalk finish paint that I mixed using Benjamin Moore's Cloud White - a soft off white colour.

    Vintage midcentury cane chairs painted white and reupholstered in grey cotton velvet.

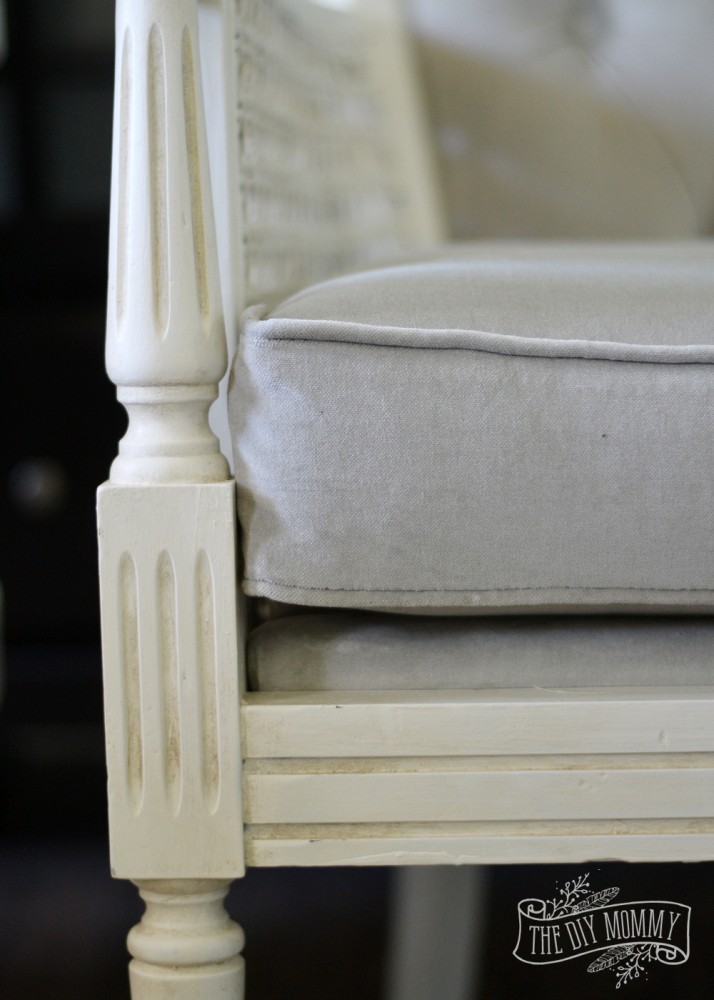
    It took me a while to come up with the perfect finishing idea for the paint job on these babies. I finally decided on waxing them with a custom coloured wax I made by mixing a bit of Annie Sloan Paris Grey paint into some clear soft wax. This antiqued the details of the chairs slightly, but not so much that they looked dirty (which was how they looked when I tried using dark wax).

    Vintage midcentury cane chairs painted white and reupholstered in grey cotton velvet.

    My mom was the mastermind behind the reupholstery of these chairs.

    Vintage midcentury cane chairs painted white and reupholstered in grey cotton velvet.

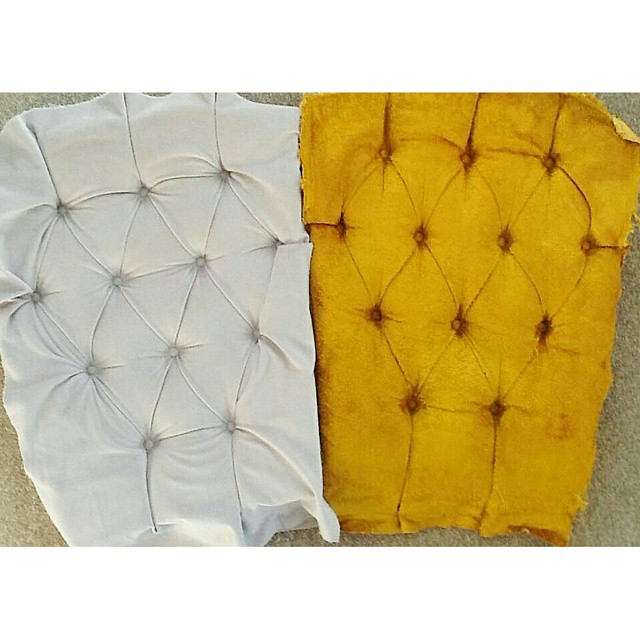
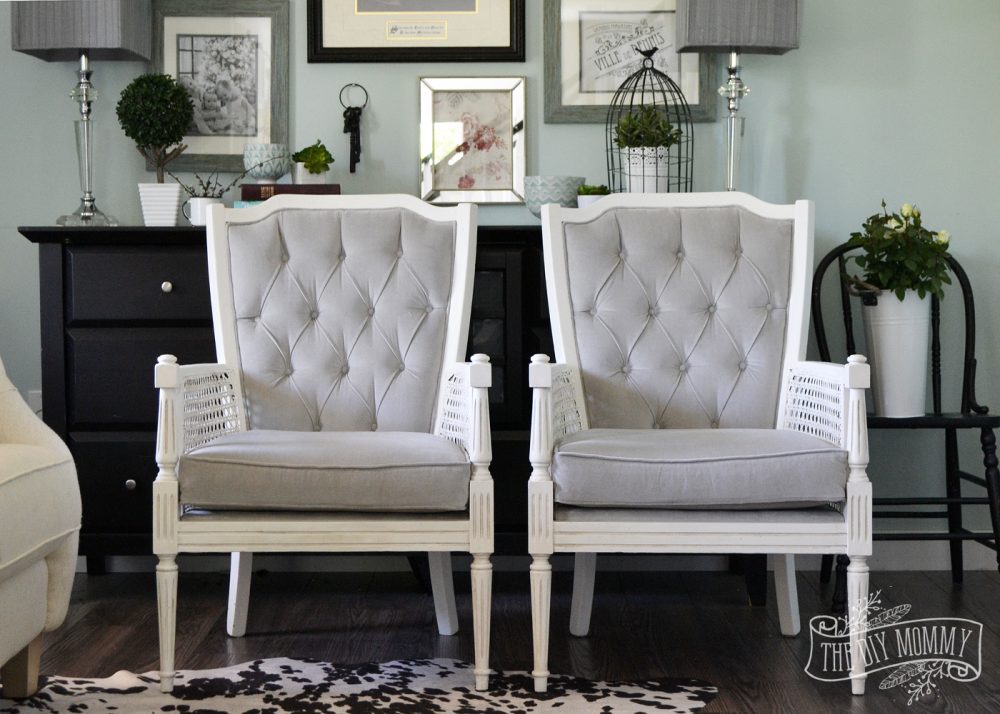
    As you can see, she did a spectacular job on the tufting on the back of the seats. The cotton velvet was really tricky to work with, but it sure feels lovely!

    Vintage midcentury cane chairs painted white and reupholstered in grey cotton velvet.

    She replaced all of the foam & batting in the chair backs.

    Vintage midcentury cane chairs painted white and reupholstered in grey cotton velvet.

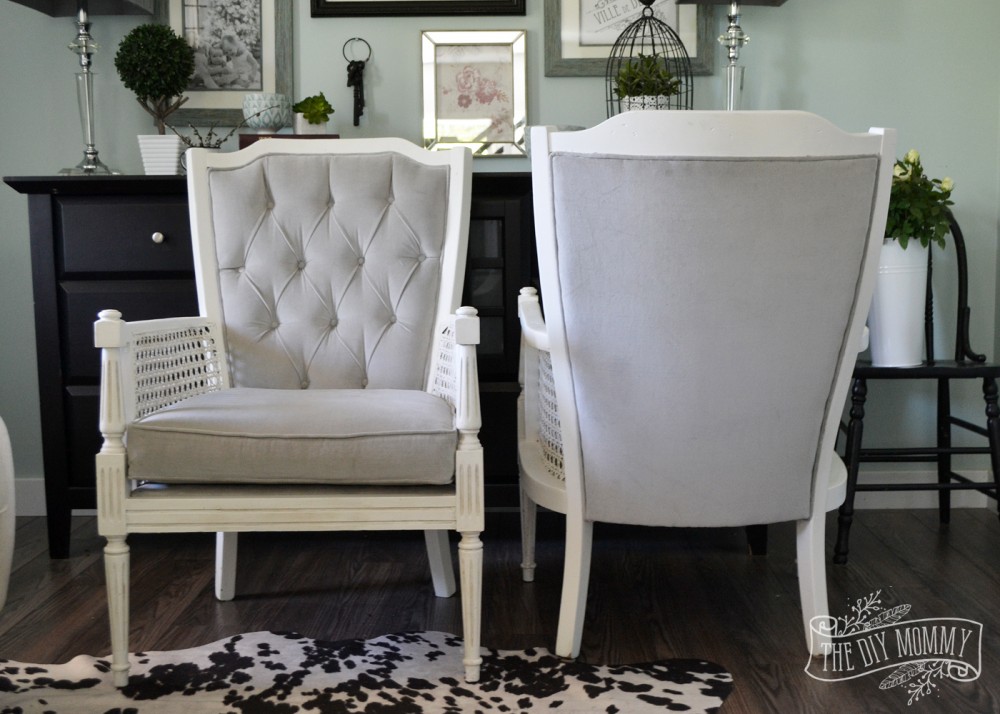
    Look at how perfectly smooth she got the curved backs of the chairs to look. Wow!

    Vintage midcentury cane chairs painted white and reupholstered in grey cotton velvet.

    Vintage midcentury cane chairs painted white and reupholstered in grey cotton velvet.

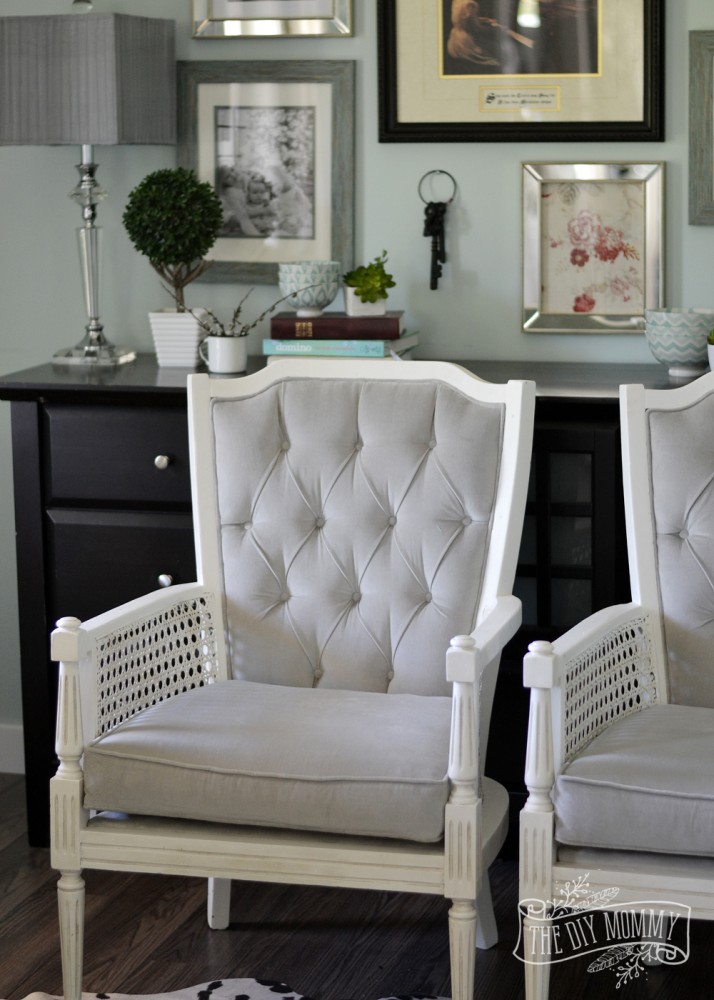
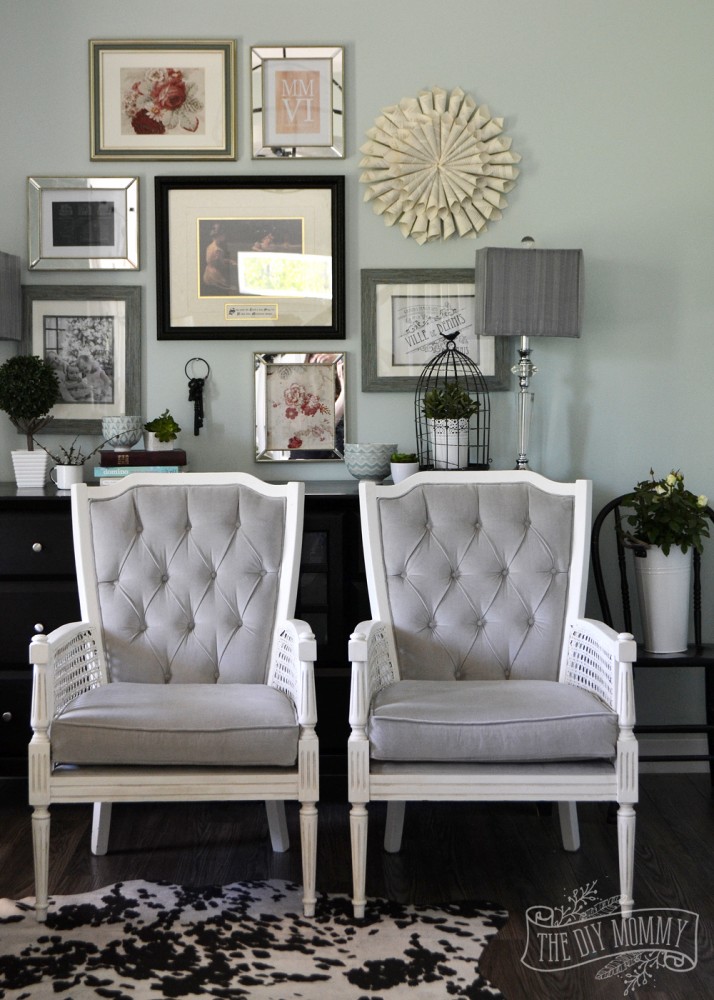
    These are now resting in our formal sitting room, and they look so lovely here. I can't wait to finish this room up and show you the rest!

    Vintage midcentury cane chairs painted white and reupholstered in grey cotton velvet.

    For now, I'm fiddling with this gallery wall and coming up with a solution to make my keyboard look prettier on the opposite wall. Stay tuned!

    Vintage midcentury cane chairs painted white and reupholstered in grey cotton velvet.

    What do you think of my vintage chair pair makeover? Have a great Wednesday!

    Vintage midcentury cane chairs painted white and reupholstered in grey cotton velvet.

    More Inspiration

    • Build a Simple DIY Boho Picnic Table (Low Profile)
    • Beginner DIY Macrame Keychain Tutorial (2 Easy Patterns)
    • Cricut Must Haves for Beginners: Materials & Tools Guide
    • Modern coastal bedroom makeover with deep blue shiplap wall, vinyl plank flooring, IKEA furniture, and gold accents
      How to Make a Shiplap Wall - Step by Step Tutorial

    Reader Interactions

    Comments

    1. Emily, Our house now a home

      May 20, 2015 at 9:18 am

      These are stunning! I adore the fabric and the finish of the wood. I redid a pair of cane chairs last year. They were simple with no back, just the seat cushion. I have a second set, almost identical to yours now and am eagerly wanting to start doing them and avoiding them. I cannot wait for the end result, but not looking forward to the work! I will he looking for the living room reveal of yours, that space looks like a dream!

      Reply
    2. Virginia Fynes

      May 22, 2015 at 6:52 am

      these are STUNNING!!! Your mom Rocks, that is some amazing upholstery work, go mom!!!

      Reply
    3. Sara

      June 10, 2015 at 3:08 pm

      Those chairs turned out SO gorgeous! Your Mom did a really fantastic job, and I have no doubt that it was very complex and work-intensive! I hear tufting is. . . tough. 😉

      Reply
      • Christina Dennis

        June 21, 2015 at 9:59 pm

        My mom is so talented. The tufting was really hard, as was the curve of the back. I'm so glad she was able to do these for me - they would have looked horrible if I had attempted them. 😉

        Reply
    4. Sharon

      August 26, 2015 at 7:13 am

      WOW these are STUNNING!

      Reply
    5. Jennifer

      January 29, 2016 at 7:33 pm

      Just curious how much they were. I just found a pair like this for $70 and thought that was pretty good even though I wasn't sure what they were worth. I knew it had to be more than that. I love what you did with these. I hope mine turn out as beautiful.

      Reply
      • Christina Dennis

        February 09, 2016 at 2:58 pm

        They were $125 CDN for the pair, so $70 is a great deal!

        Reply
    6. Crystal

      February 04, 2016 at 10:56 am

      Such a gorgeous transformation! I have some similar waiting to be refinished. Just gotta figure out what exactly I want to do with them!

      Reply
      • Christina Dennis

        February 09, 2016 at 2:57 pm

        Thanks, Crystal! They were a lot of work but definitely worth it.

        Reply
    7. TwoPlusCute

      February 04, 2016 at 8:26 pm

      Hi there! I found you on pinterest and wanted to say you rocked this project. The chairs are stunning.
      Your mom did an amazing and such a detailed & elaborate work with the upholstery!
      I'll re-pin. 🙂

      Reply
      • Christina Dennis

        February 09, 2016 at 2:56 pm

        Thanks so much! This was one of my favourite projects!

        Reply
    8. Susan

      September 04, 2017 at 4:16 pm

      I have the same chairs and debating what to do with them. Where is your mom located? In need of a good upholsterer..

      Reply
    9. Yajahira Guzman

      March 08, 2018 at 9:10 pm

      They came out wonderfully!!! I have one similar but I want to keep it in the mid-century design. I need to figure out what to use to sand out the lines in the design because I want to do a walnut wood stain. Any suggestions what to use. Thanks in advance!

      Reply
    10. Julia

      May 09, 2020 at 10:20 am

      I have a pair of chairs very similar and I'm trying to date them or get any info really before I start them. Any idea what time period yours are? Brand? Thanks

      Reply
    11. Desiree

      August 01, 2021 at 6:53 am

      Theses turned out amazing! Do you know how many yards of fabric it took for the 2 chairs? I have the same ones. thanks.

      Reply
      • The DIY Mommy

        August 05, 2021 at 11:18 am

        We're not sure! Sorry!

        Reply

    Trackbacks

    1. Motivational Monday | Craft Blog Link Up says:
      May 24, 2015 at 7:01 pm

      […] Vintage Cane Chair Makeover […]

      Reply
    2. DIY Patio Planter for Summer | Southern Couture says:
      May 24, 2015 at 7:01 pm

      […] Vintage Cane Chair Makeover […]

      Reply
    3. Motivational Monday #50: Craft, DIY & Home Decor Link Party | The DIY Mommy says:
      May 24, 2015 at 7:43 pm

      […] Vintage Cane Chair Makeover […]

      Reply
    4. Motivational Monday – Burlap and Babies says:
      May 24, 2015 at 7:43 pm

      […] Vintage Cane Chair Makeover […]

      Reply
    5. Make DIY Velvet Fabric Pumpkins (Video) | The DIY Mommy says:
      September 3, 2015 at 7:00 am

      […] they wouldn’t cost much at all. I like the natural look of the cotton velvet (leftover from this project) and dropcloth (left over from this project) I used, but these would be cute in any […]

      Reply
    6. Fall 2016 Home Tour: Cozy, Colourful & Relaxed | The DIY Mommy says:
      September 29, 2016 at 4:01 am

      […] moved my vintage reupholstered cane chairs from our other room to here, and I’m loving how they look in this […]

      Reply
    7. 17 How to Reupholster a Chair [Tutorials] | Tip Junkie says:
      May 28, 2018 at 5:35 pm

      […] Get tutorial here: Vintage Cane Chair Pair Reupholster […]

      Reply
    8. Upcycle My Stuff Armchair Makeover Inspiration – Our Top Upcycled Armchair Ideas says:
      May 28, 2019 at 1:07 pm

      […] Photo: The DIY Mommy […]

      Reply

    What do you think? Cancel reply

    Your email address will not be published. Required fields are marked *

    This site uses Akismet to reduce spam. Learn how your comment data is processed.

    Primary Sidebar

    Welcome!

    Christina Dennis, The DIY Mommy

    I'm Christina and I'm sharing budget-friendly DIY & decor ideas to create a cozy home and life you love!

    Read more about me

    Latest Posts

    • Learn how to find FREE vintage botanical art to print at home. This is a fantastic, budget-friendly wall art solution!
      How to find FREE vintage botanical art to print at home
    • Build a Simple DIY Boho Picnic Table (Low Profile)
    • Modern coastal inspired bathroom renovation with marble tile, shiplap, gold and black accessories, clear shower door, blue and white colors & rattan accents
      Easy IKEA Makeover: DIY Painted Bathroom Vanity

    What's my home decor style?

    Discover the home decor style that best fits your personality and lifestyle. This two-minute quiz is going to give you the direction you need to start the big, bold room makeovers that you've always wanted to try!

    Find out now!

    Footer

    ↑ back to top

    About

    • About The DIY Mommy
    • Privacy Policy
    • Disclosure Policy
    • Terms of Service

    Newsletter

    • Sign Up! for emails and updates

    Contact

    • Contact

    As an Amazon Associate I earn from qualifying purchases.

    Copyright © 2009 - 2023 The DIY Mommy. "The DIY Mommy" is a registered trademark.