How to Use Midjourney to Create Stunning Interior Design Renderings
This post may contain affiliate links · This blog generates income via ads
Are you ready to transform your interior design dreams into stunning photorealistic renderings? Look no further than Midjourney, a powerful AI image generation tool that can turn your vision into reality. In this tutorial, I’m sharing how Midjourney works and guiding you through the process of creating beautiful interior design renderings. Plus, I’ll share a free alternative program for those on a budget.
I love making over rooms, but sometimes it’s hard to imagine the finished space and how all of the elements will work together. Because I don’t have the time or budget to use a full-blown interior design rendering program, Midjourney has been a game changer for my design process! With this program, I can input my design idea as text, and Midjourney will create a stunning rendering using generative AI so I can get an idea of how my design will look. Today I’m excited to share with you how to make Midjourney work for your room makeover needs!
Understanding Midjourney
Midjourney is a revolutionary artificial intelligence tool for interior designers and DIY homeowners alike. With its intuitive interface and advanced rendering capabilities, Midjourney allows users to create lifelike representations of interior spaces with ease. Whether you’re redesigning a single room or planning an entire home makeover, Midjourney empowers you to visualize your ideas like never before. I’ve been LOVING playing with this platform and I’ve learned how to make it work to create stunning interior design renderings.
Step 1: Creating a Mood Board
Before creating your interior design renderings, it’s important to establish a clear vision for your project. Start by creating a mood board to gather inspiration and define the aesthetic direction of your space. My Canva Mood Board Templates & Mini Course is the perfect way to make your own gorgeous mood boards in a snap! Collect images, textures, colors, and furniture pieces that resonate with your desired style. Websites like Pinterest or design magazines are excellent sources for finding inspiration.
Dark Feminine Bedroom Mood Board
I created this bedroom design mood board with my Canva Mood Board Templates:
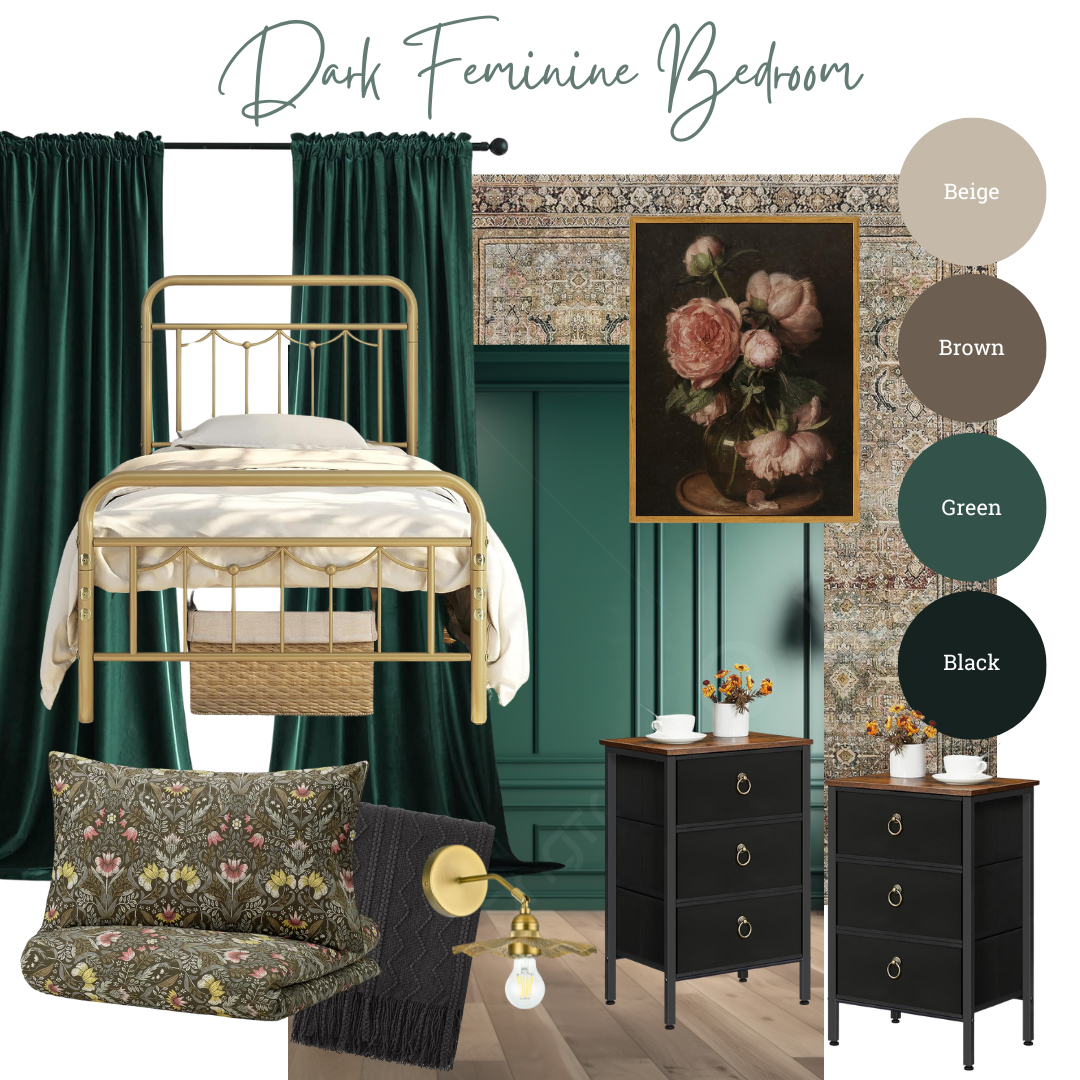
I’ve noticed a lot of people have been searching for “dark feminine bedroom” ideas lately, so I thought it’d be fun to create a Midjourney interior rendering for this aesthetic.
Here are the products featured in this mood board:
- Vintage Style Moody Peonies Art
- Antique Gold Metal Bed Frame
- Dark Green Velvet Curtains
- Rustic Black & Brown Nightstands
- Loloi II LAYLA Collection Area Rug
- IKEA Duvet Cover Set
- Antique Gold Wall Sconce
- Black Knit Throw Blanket
Step 2: Setting Up Your Midjourney Account
To access Midjourney’s powerful rendering capabilities and make them work for you, you’ll need to have a verified Discord account before joining the Midjourney official Discord server. What’s Discord? It’s a popular voice, video, and text chat app for people to hang out with their communities. Discord is very popular in the gaming community, so I’m rather new to it!
Follow these guides to create or verify your Discord account:
Midjourney offers a subscription-based model, with plans starting at around $10 CAD a month. While there’s a cost associated with using Midjourney, the investment is well worth it for the quality of renderings it produces. Simply visit the Midjourney website, click “Join the Beta” on the bottom right of the screen, and you’ll be sent to Discord to continue setting up your account.
Step 3: Joining the Midjourney Server on Discord
How does Midjourney work? You’ll need to start interacting with the Midjourney Bot by joining the Midjourney Server:
- Open Discord and locate the server list on the left hand side.
- Press the “+” button at the bottom of the server list.
- In the pop-up window, click the “Join a Server” button
- Go here and press “join”.
For additional information, Learn more about Discord servers.
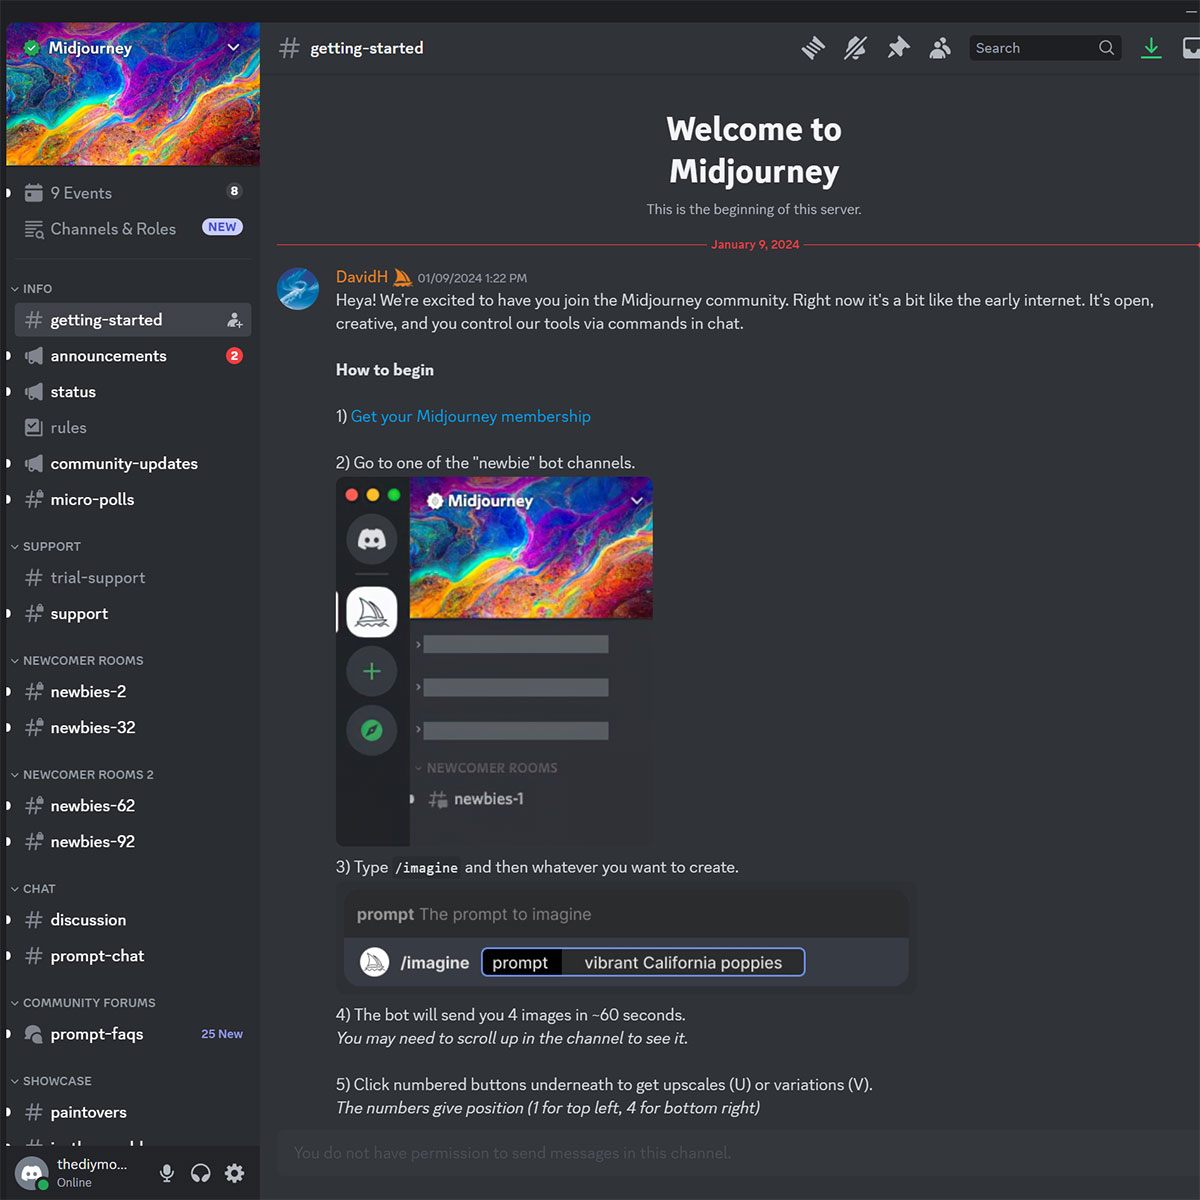
Step 4: Going to any #General or #Newbie Channel
After joining the Midjourney server on Discord, you’ll see lots of different channels listed in the sidebar (#newbies-2, #support, etc).
Select any channel labeled “general” or “newbie”. These are channels for beginners to start using the Midjourney Bot which will not generate images in other channels.
Step 5: Using the /imagine Command
About Discord Commands
Once in your “room”, you can start rendering images using the Midjourney Bot on Discord using the Command “/imagine”. This command generates a unique image from a short text description (a “prompt”).
Get Midjourney to work for you with the /imagine command:
- Type ‘/imagine prompt:’ in the message field.
- Type a description of the image you want to create in the “prompt” field.
- Send your message & the Midjourney Bot will read your text prompt and begin generating the renderings.
Step 6: Creating a Detailed Prompt so Midjourney Works Best for You
With your mood board as a guide, it’s time to translate your vision into a detailed prompt for your interior design rendering. This is what you’ll write after the “/imagine” command. Consider factors such as room dimensions, layout, lighting, and materials. Be specific about the furniture pieces, decor items, and color palette you want to incorporate. The more detailed your prompt, the better Midjourney will be able to bring your vision to life. Take your time to refine your prompt, ensuring that it accurately reflects your design intentions.
The prompt I’m using for this dark feminine bedroom design is:
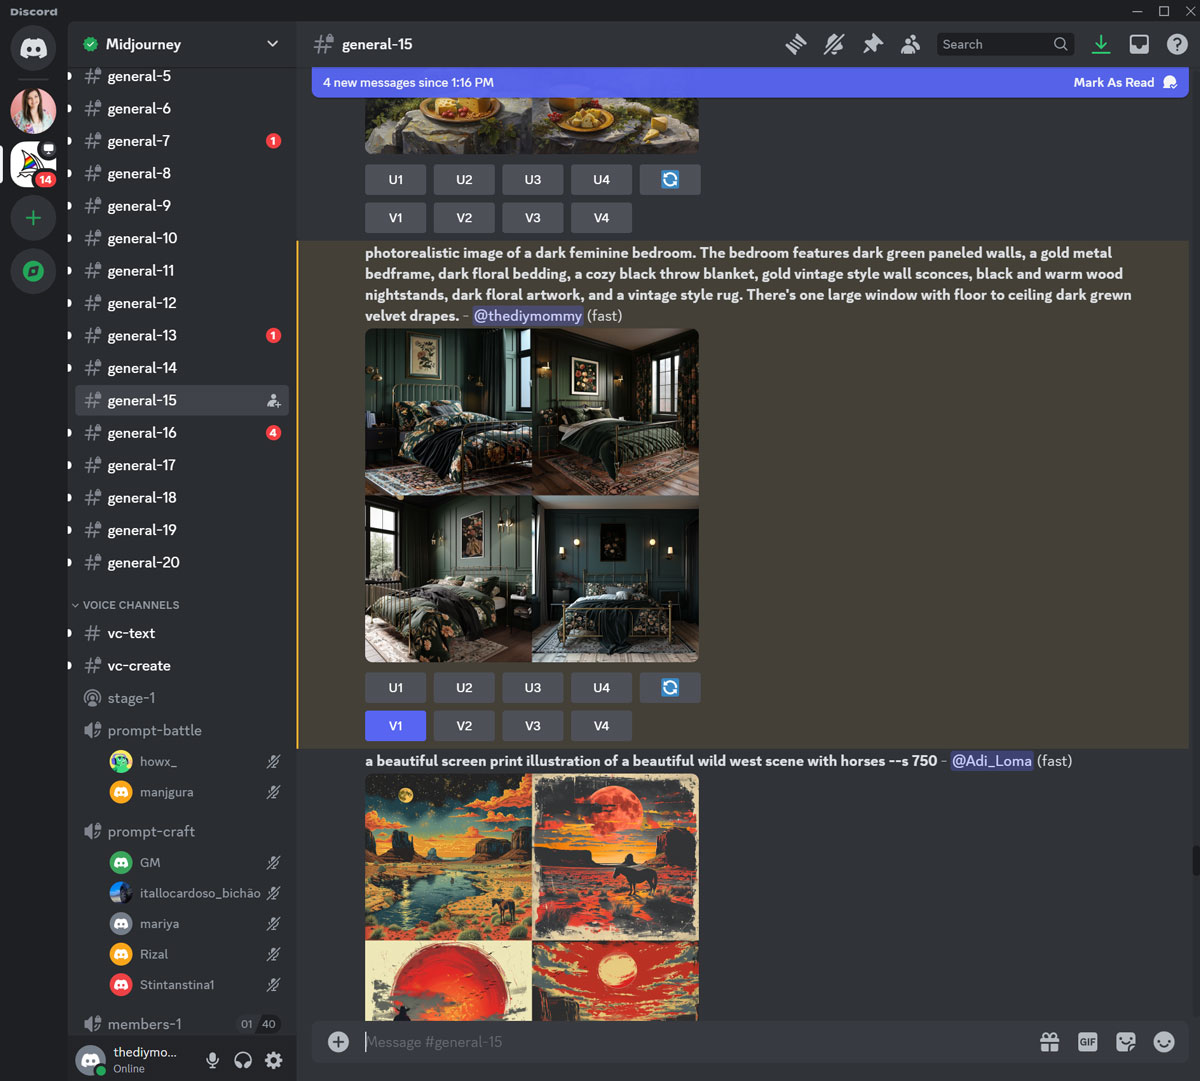
/imagine prompt: photorealistic image of a dark feminine bedroom. The bedroom features dark green paneled walls, a gold metal bedframe, dark floral bedding, a cozy black throw blanket, gold vintage style wall sconces, black and warm wood nightstands, dark floral artwork, and a vintage style rug. There’s one large window with floor to ceiling dark green velvet drapes.
Step 7: Generating Your Interior Design Rendering with Midjourney
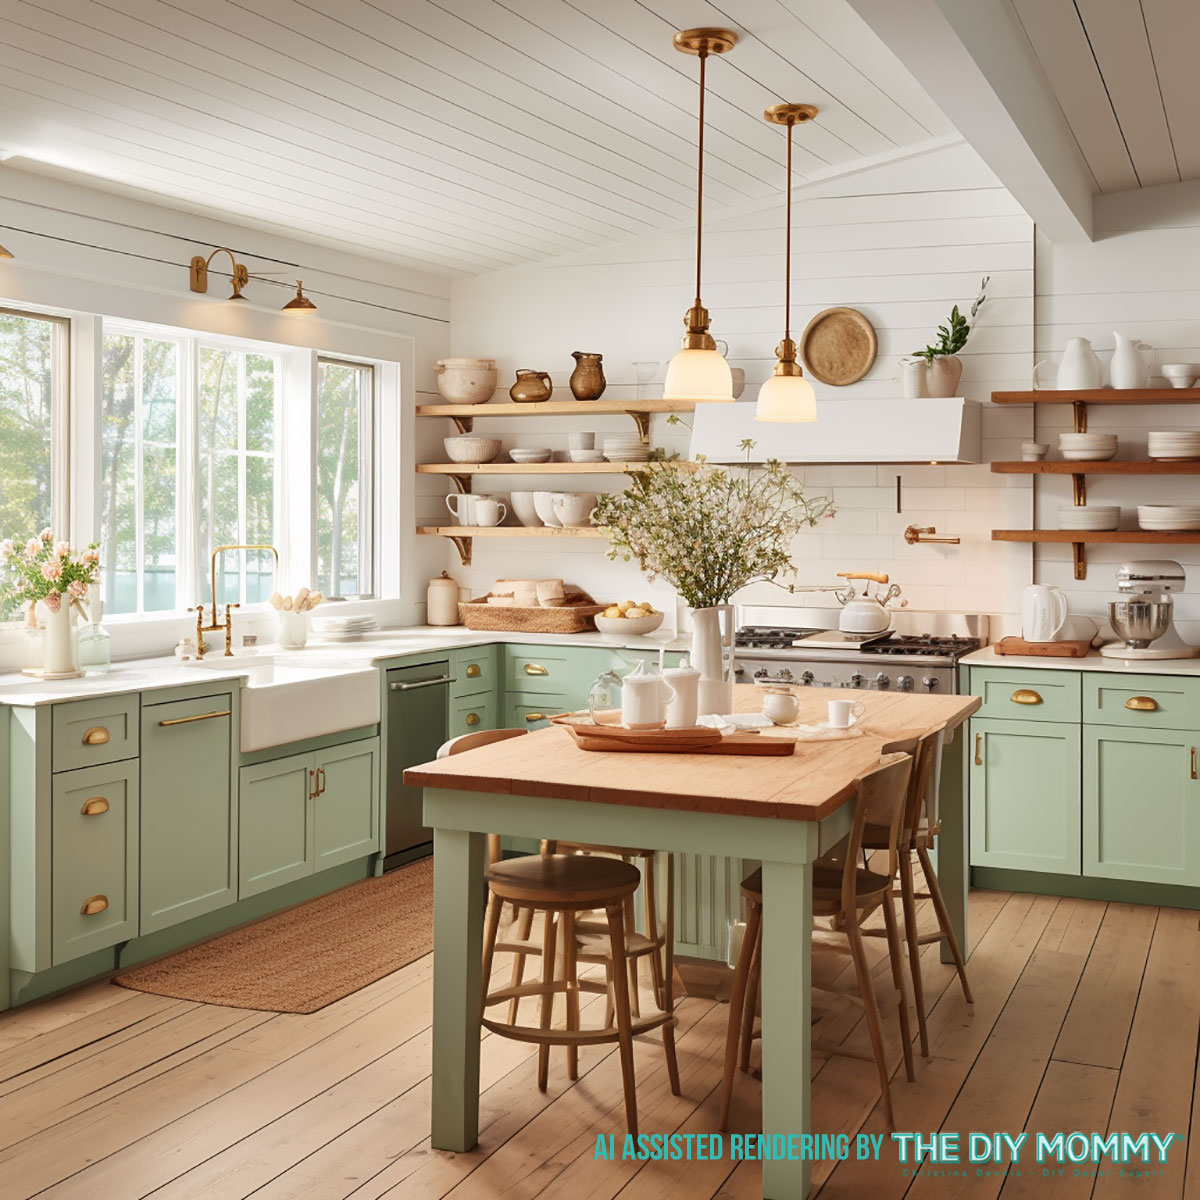
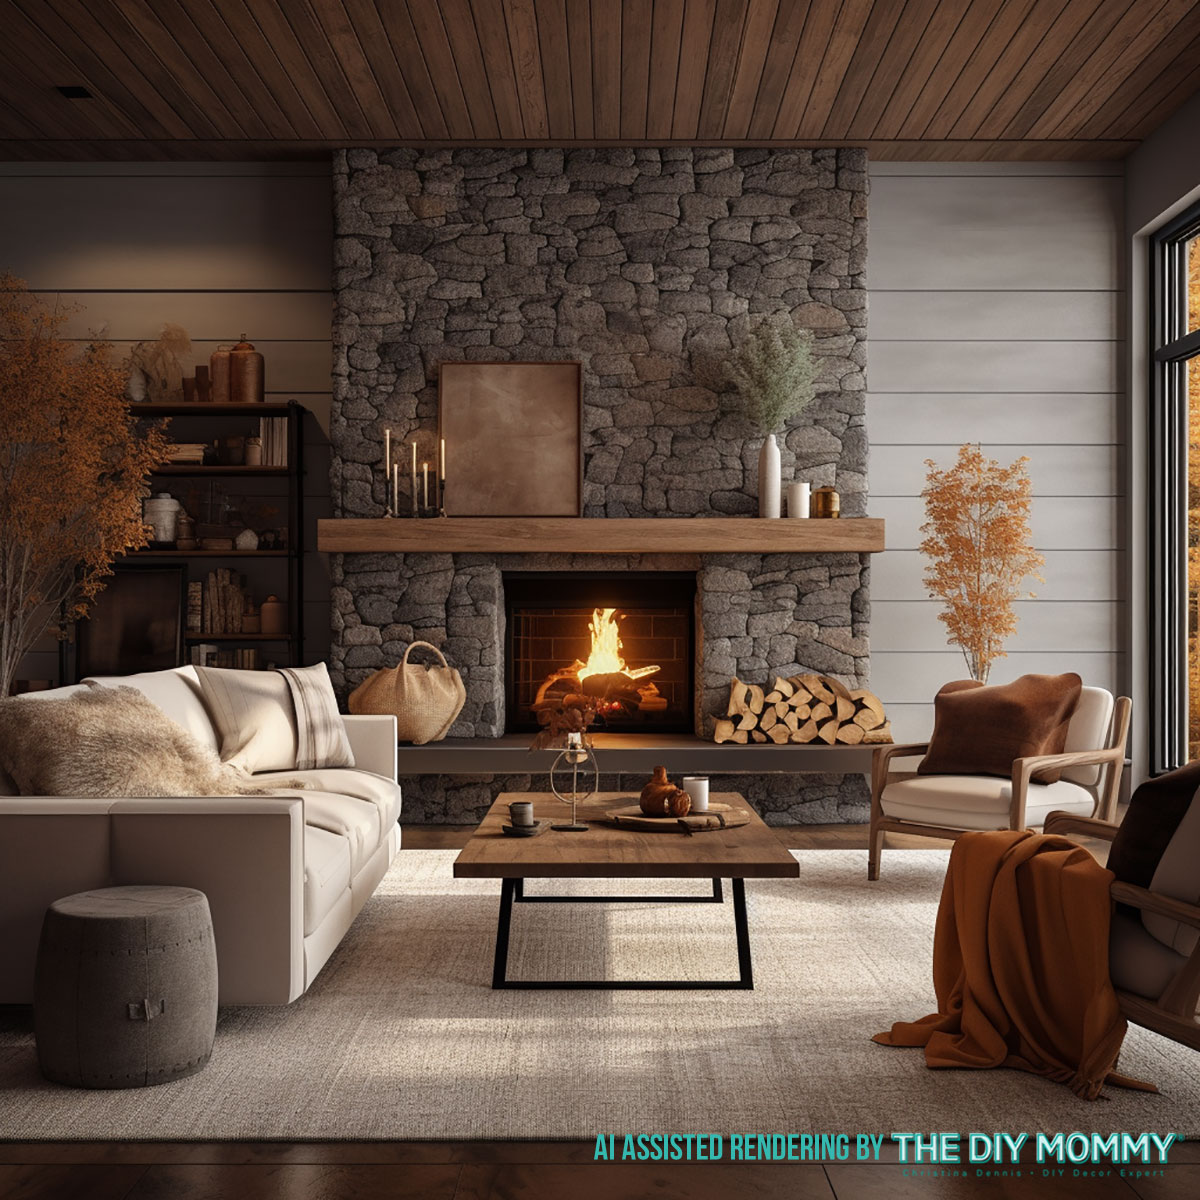
After submitting a text prompt, the Midjourney Discord Bot processes your request and creates 4 different images within a minute. Each minute the Bot takes to render your images counts towards your “GPU time” in your subscription. Here are the four images the Bot created for me after I typed in my prompt:
Step 8: Selecting an Image or Creating Variations
Once your initial grid of images has been generated, you can click on any of the buttons created under the grid for more options.
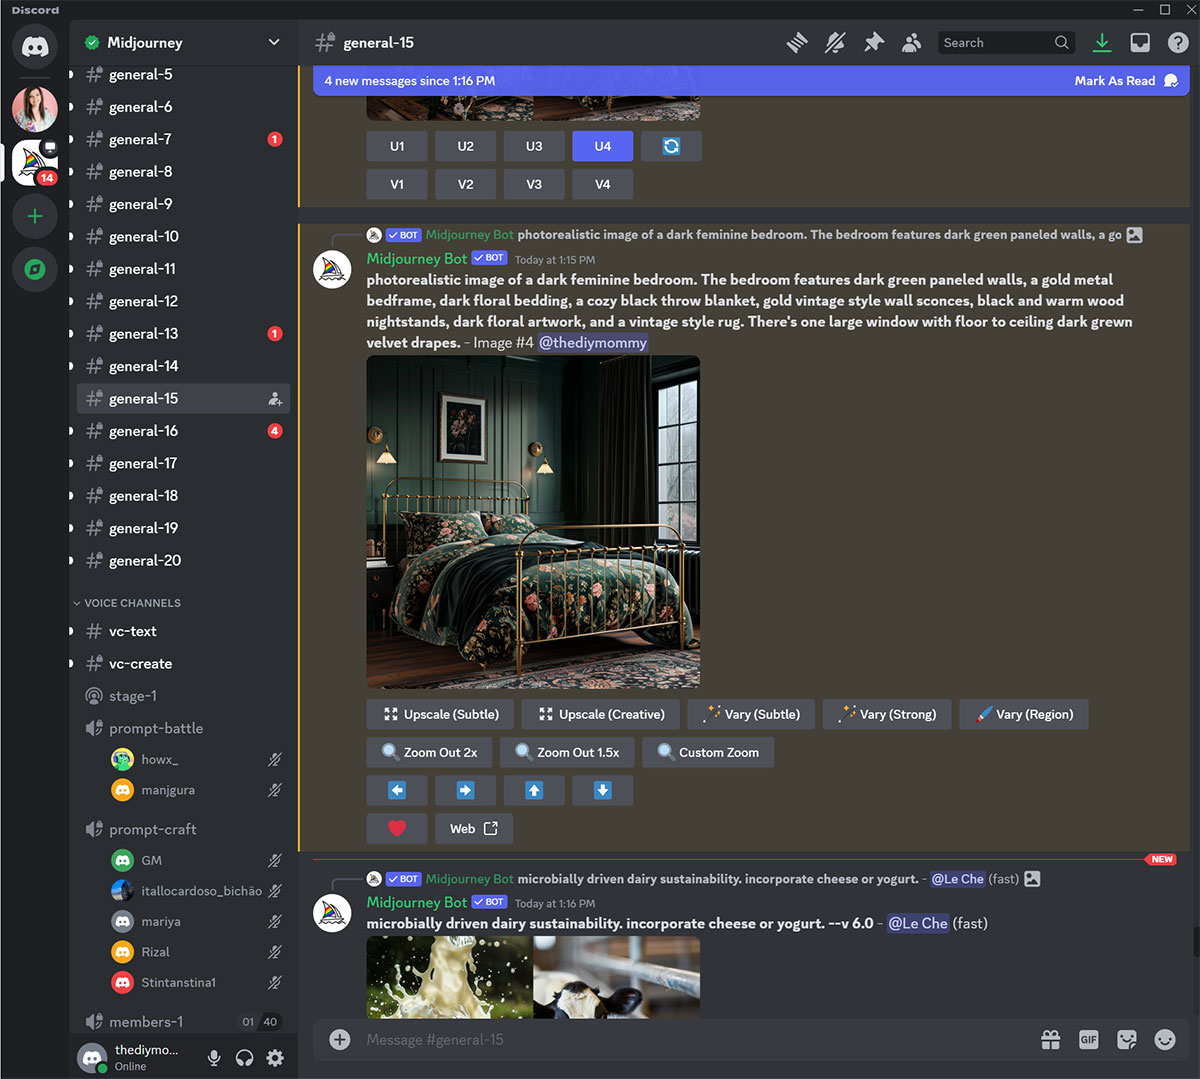
Click the “U1, U2 etc.” buttons to upsize any of the images on the grid.
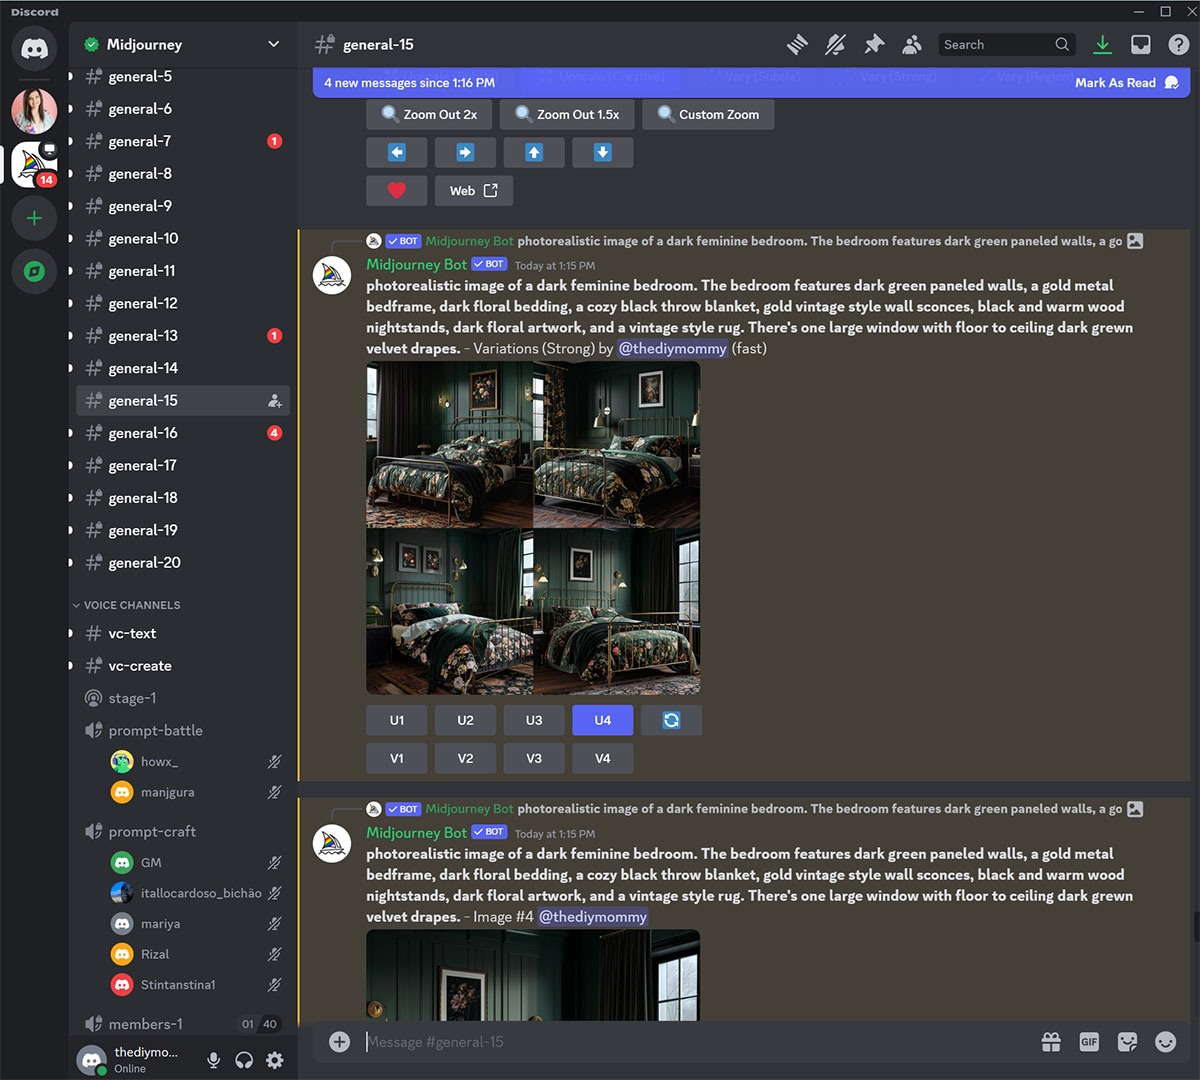
Click the “V1, V2 etc.” buttons to create a variation of any of the images from the grid.
For my dark feminine bedroom images, I clicked “V4” to create another variation of the 4th image in my grid. This was close to what I wanted, but not quite. Creating a variation got my image selection closer to the look I wanted.
Step 9: Enhancing or Modifying Your Image
After singling out an image with the “U1, U2 etc.” buttons, an expanded set of options becomes available.
You can zoom out or pan your image if you want a different view or composition of your interior design rendering.
Once the Midjourney Bot has created images for you, you can also open & download the images in your gallery on midjourney.com
Step 10: Saving Your Image
To save your images, click on the image to open it to full size, and then right-click and choose “save images”.
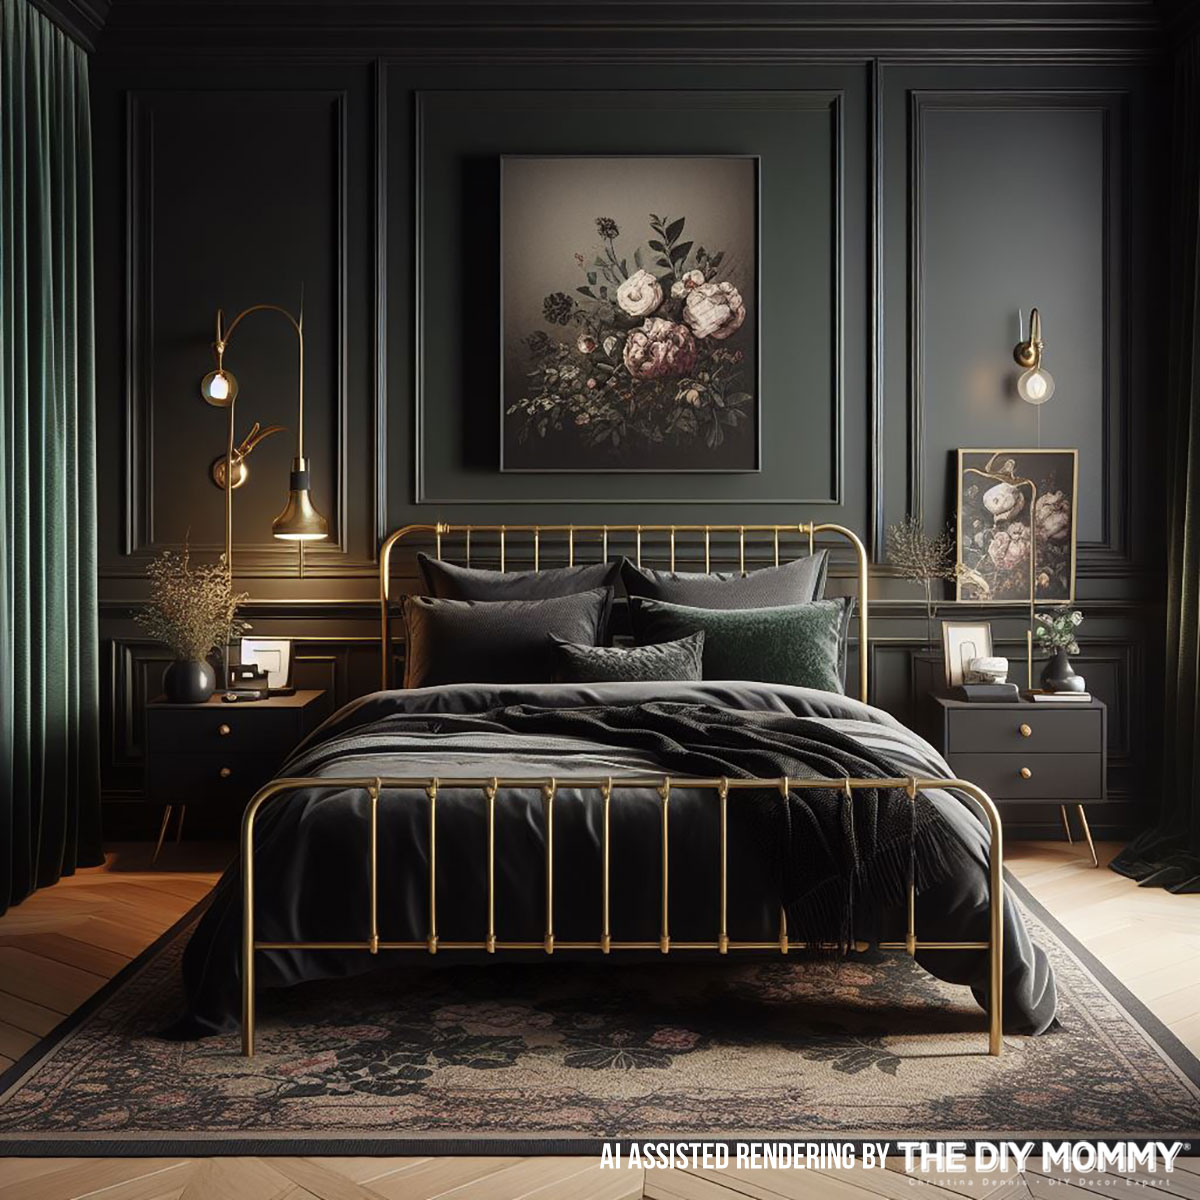
Here’s my final Dark Feminine Bedroom design rendering that I loved the most created by Midjourney:
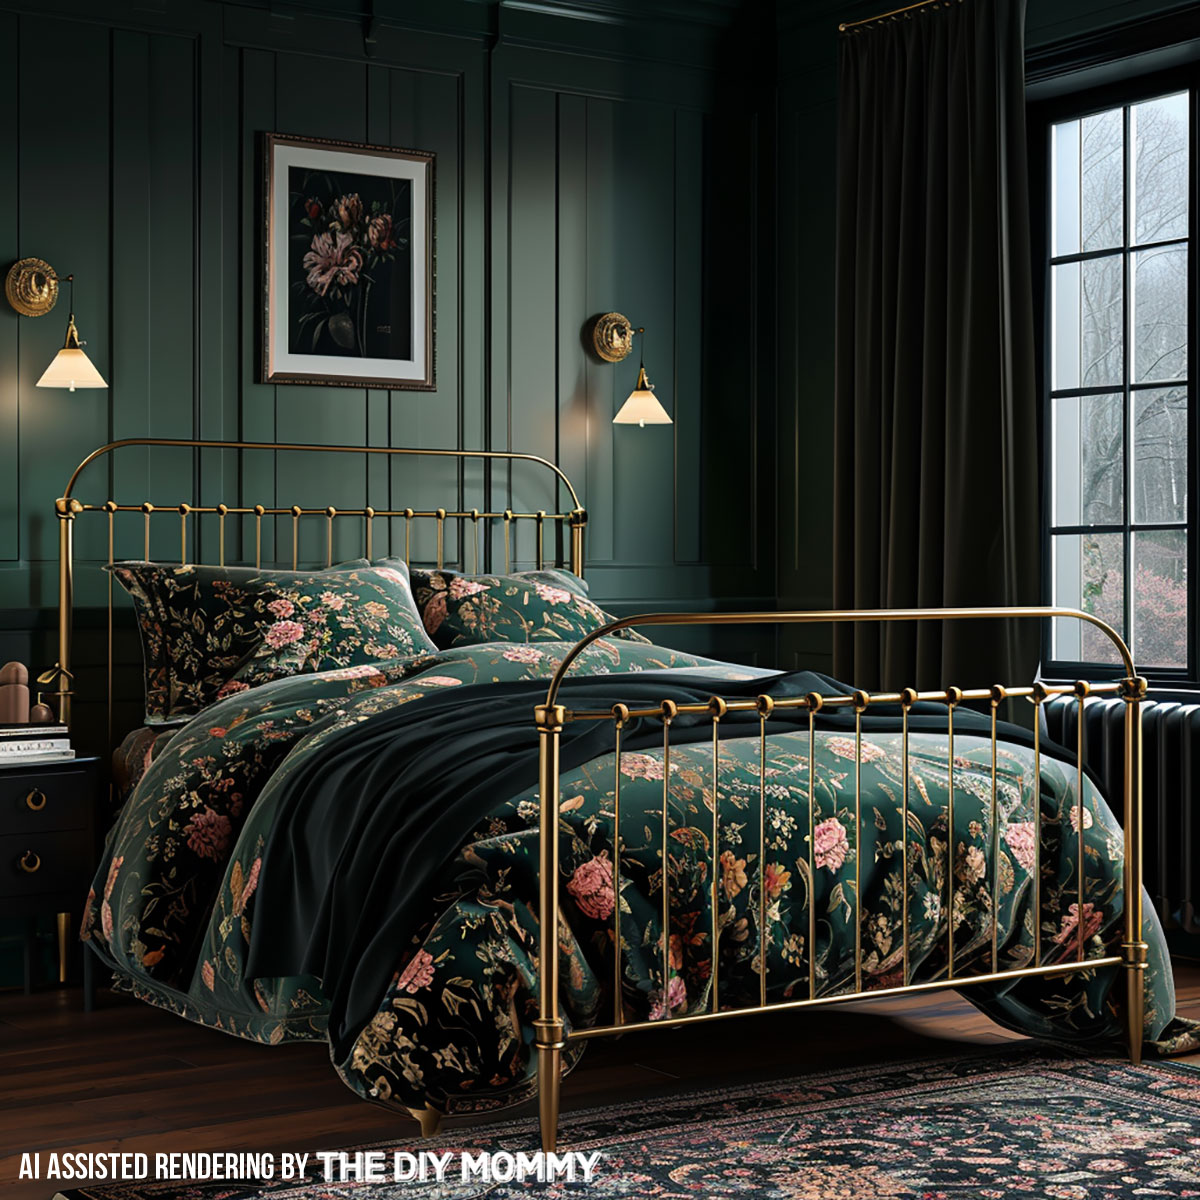
I like to add a watermark to any renderings I’ve made with AI image generators so that it’s clear how they were made. I simply put the text “AI assisted rendering by The DIY Mommy” on the image. It will be interesting to see if Google will recommend any standardized AI disclosures in the future; I know YouTube & Meta are already rolling them out!
Exploring Free Alternatives: Microsoft Designer
While Midjourney offers unparalleled rendering capabilities, I understand that not everyone may be able to justify the subscription cost. Thankfully, there are free alternatives available, such as Microsoft Designer. Although Microsoft Designer may not offer the same level of realism as Midjourney, it’s still a capable tool for creating interior design renderings on a budget. With features like 3D modeling, material customization, and basic rendering capabilities, Microsoft Designer provides a viable option for those looking to explore the world of interior design rendering without breaking the bank.
Here’s a rendering of the Dark Feminine Bedroom design that I created using the exact same prompt in Microsoft Designer:
I think this image turned out quite well too, however I do notice that Designer’s images are usually a little duller and softer. There are also some more strange rendering issues in this image like the double lamps on the left and the way the throw blanket is seen through the bed frame.
Microsoft Designer only comes up with 2 options in its set of images rendered. However, you may find this program easier to use than Midjourney because you won’t need a Discord account.
Another Midjourney Alternative: Dall-e 3
DALL-E 3 is an AI system that can create realistic images and art from a description in natural language. You can access this system via a paid subscription in ChatGPT which is around $20 per month. I don’t have any experience with this option since I already pay for my Midjourney subscription, but I’ve seen some lovely renderings created with this option, too. I like that ChatGPT has machine learning, so I’d assume it’d also learn your prefered interior design style… but I haven’t tested this yet!
With Midjourney and other AI art generators, there’s no limit to what you can achieve in the world of interior design rendering. Whether you’re a seasoned professional or a DIY decorator, these tools empower you to turn your design dreams into reality. I hope you have fun creating with Midjourney, and don’t forget to tag me if you share your designs on social: @thediymommy!
2 Comments