• Skip to primary navigation
  • Skip to main content
  • Skip to primary sidebar
The DIY Mommy
  • Home Decor
  • DIY Crafts
  • Organize
  • Printables
  • Recipes
  • Life
  • Shop My Home
  • Lake House
  • About
  • Contact
    • Facebook
    • Instagram
    • Pinterest
    • Twitter
    • YouTube
menu icon
go to homepage
search icon
Homepage link
  • Home Decor
  • DIY Crafts
  • Clean & Organize
  • Recipes
  • Free Printables
  • Life
  • Our Little Lake House
  • Shop Our Home
  • About
  • Contact
    • Facebook
    • Instagram
    • Pinterest
    • Twitter
    • YouTube
  • ×

    Home » DIY Crafts » Sewing

    Sew a Patchwork Duvet Cover

    Published: May 8, 2013 · Modified: May 16, 2013 by Christina Dennis · This post may contain affiliate links · This blog generates income via ads · 33 Comments

    Sew a Patchwork Duvet Cover by The DIY Mommy

    With the impending completion of Our DIY House arriving soon (I hope!), I've been trying to get as many decor things done in advance as I possibly can.
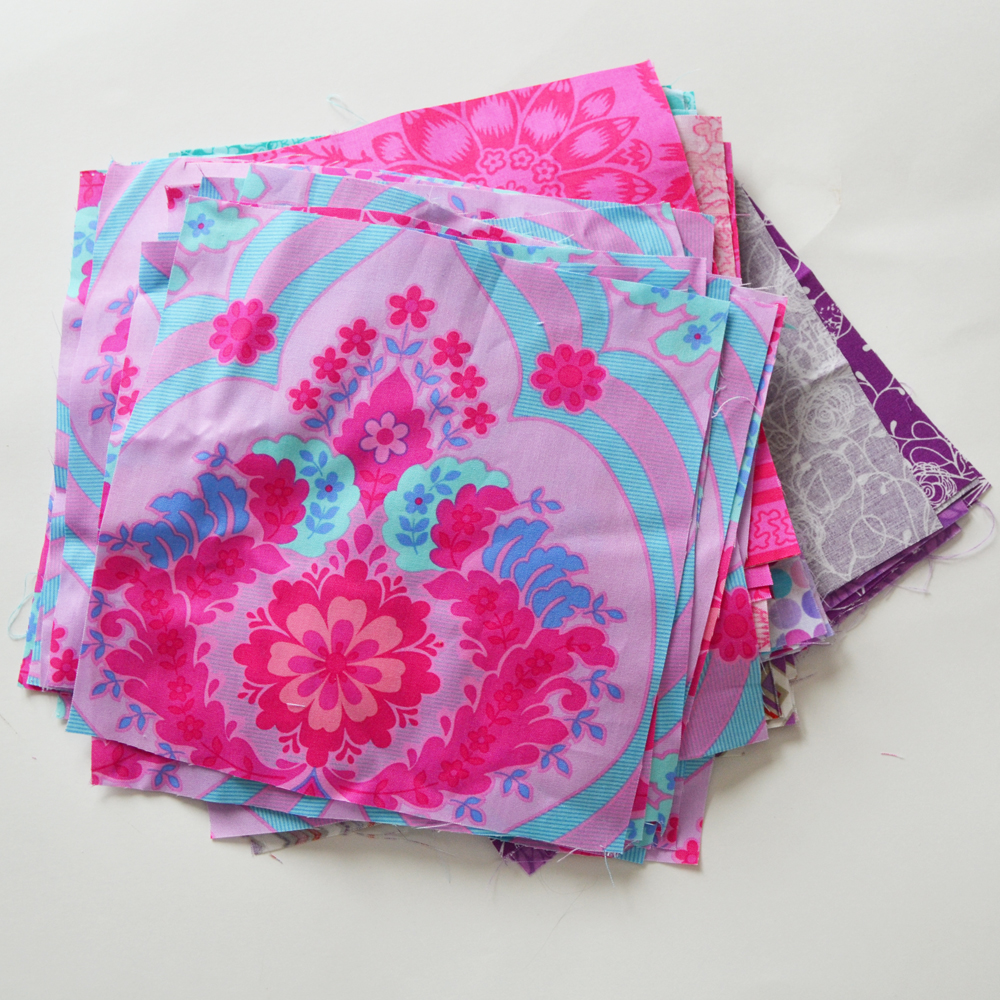
    Little C's room is one of the easier ones. She knows exactly what she wants, and I purchased coordinating fabrics for her new room before we ran out of funds (house building is expensive, FYI).

    I wanted to make a DIY duvet cover for her that was fun and bright - just like she is. We both love fabric and patterns, so I decided on patching together a bunch of fun prints to make a unique duvet cover. It was easy and we both love the result!

    Materials (for a twin bed sized duvet cover):

    • 11 different coordinating quilting cotton fabrics (I used about ½ yard of each)
    • twin sized flat sheet
    • snaps or buttons (I chose snaps because I find them easier to work with)

    Sew a Patchwork Duvet Cover by The DIY Mommy

    Directions:

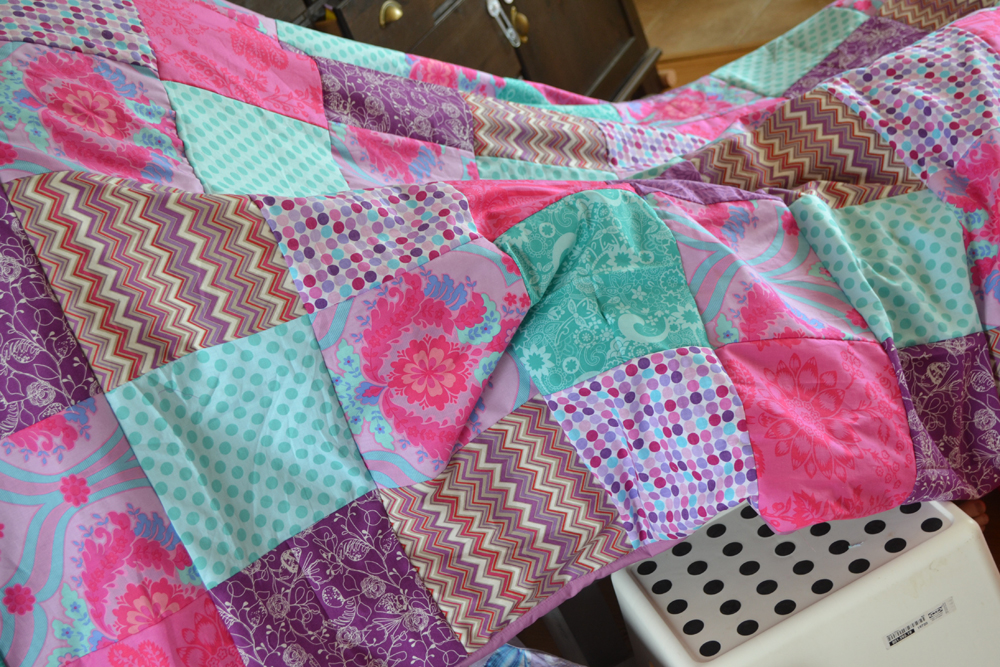
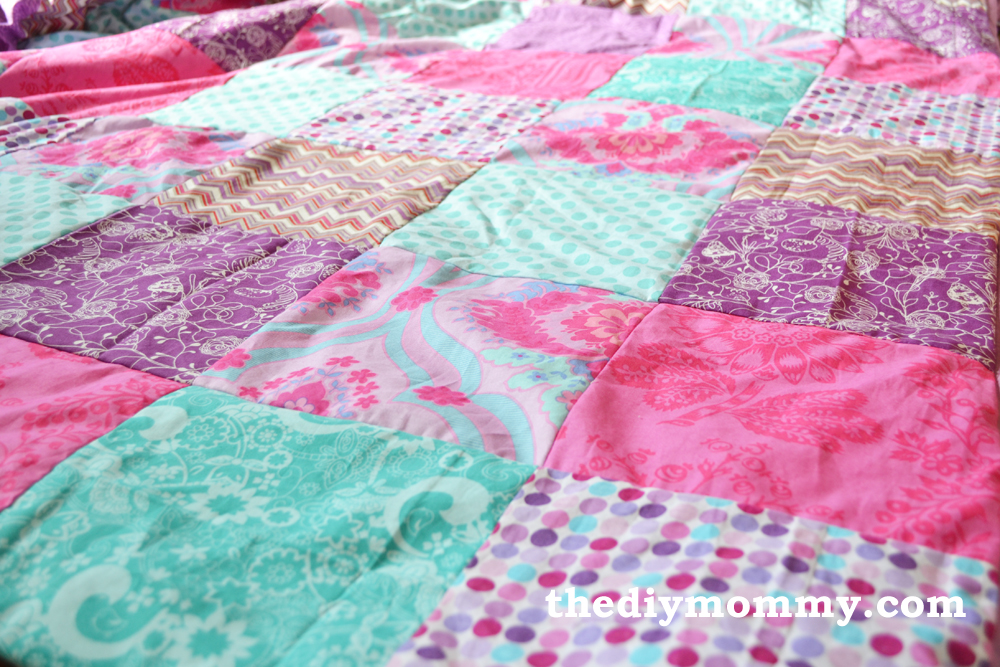
    Cut 8 squares of each of the 11 different fabrics that measure 8 ½" x 8 ½". I used a ruler, cutting mat and rotary cutter to make this go nice and fast!

    Sew a Patchwork Duvet Cover by The DIY Mommy

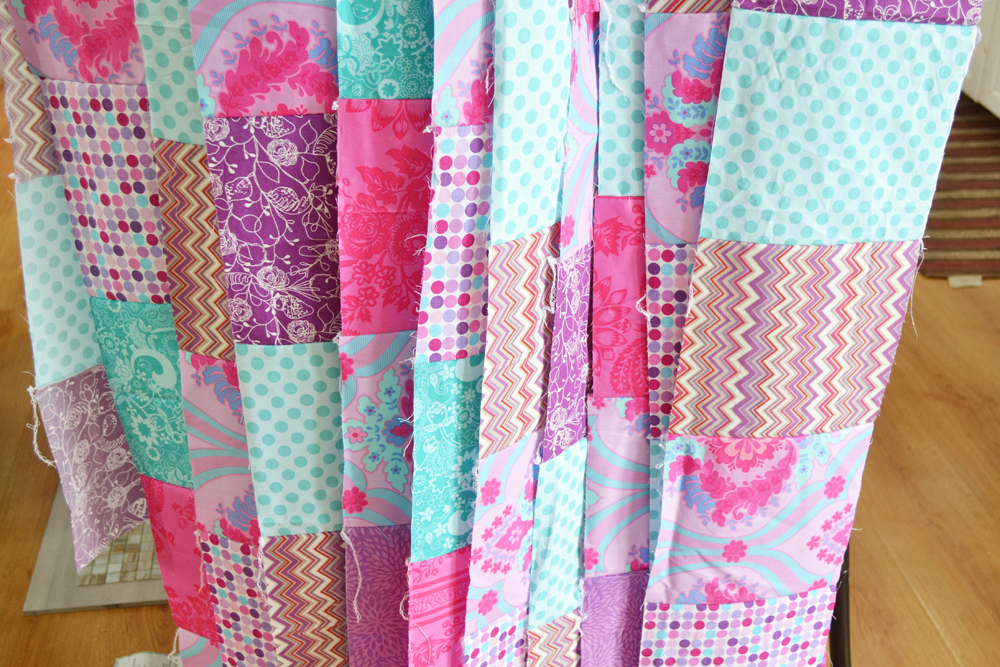
    Arrange your first strip of squares in a pattern that's pleasing to you. I laid them out on the floor and fiddled around until I came up with a pattern I liked. Then, I decided that my next row would follow the same order but I'd start on the 4th square of my 1st row (and continue the following rows the same way). Does that make sense?!

    Sew your strips together one by one. I used a serger so that the reverse side would be finished nicely, but if you don't have one I'd suggest zig-zagging the seams so that they fray less.

    Sew a Patchwork Duvet Cover by The DIY Mommy

    Now, sew your rows together. Pin them first (or do it the lazy way like I do - unpinned, very slow, and eyeballing it all the way!).

    Sew a Patchwork Duvet Cover by The DIY Mommy

    Cut off the bottom 6" of your sheet. Make sure the cut is straight (use a ruler and cutting mat). You may need to cut off some length on the longer piece like I did to match the length of the patchy front of your duvet cover. Measure to check (measure both sheet pieces and subtract 2" for your button/snap band overlap).

    Sew a Patchwork Duvet Cover by The DIY Mommy


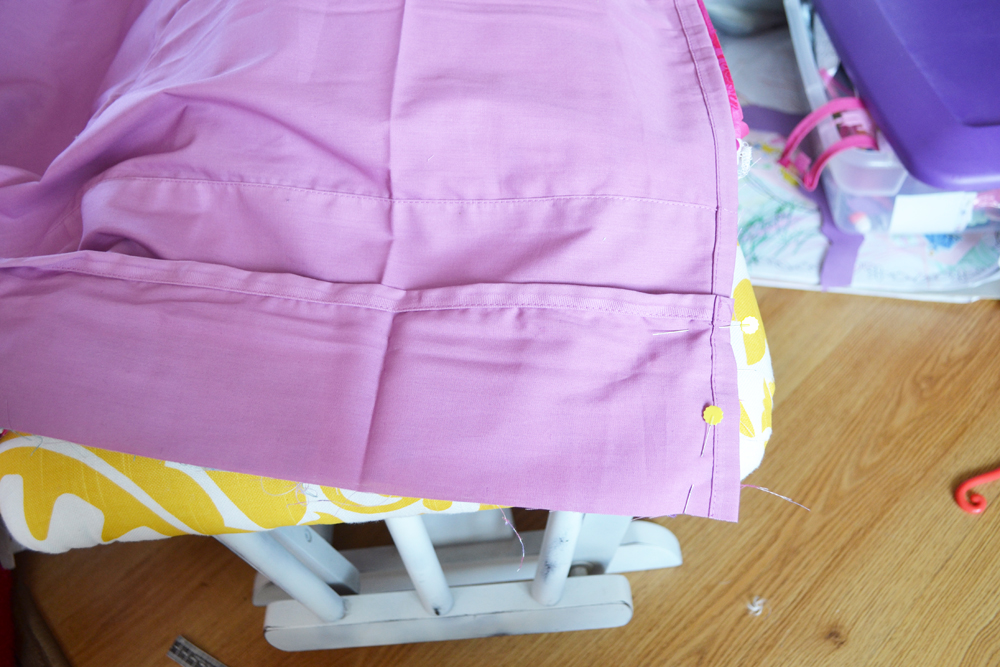
    Pin the right side of the narrow piece you cut off to the right side of the longer piece of the sheet. Overlap them by 1". The hemmed edges should be facing eachother as shown. If you do it this way, you don't have to hem anything for the button band! It's so convenient.

    Sew a Patchwork Duvet Cover by The DIY Mommy

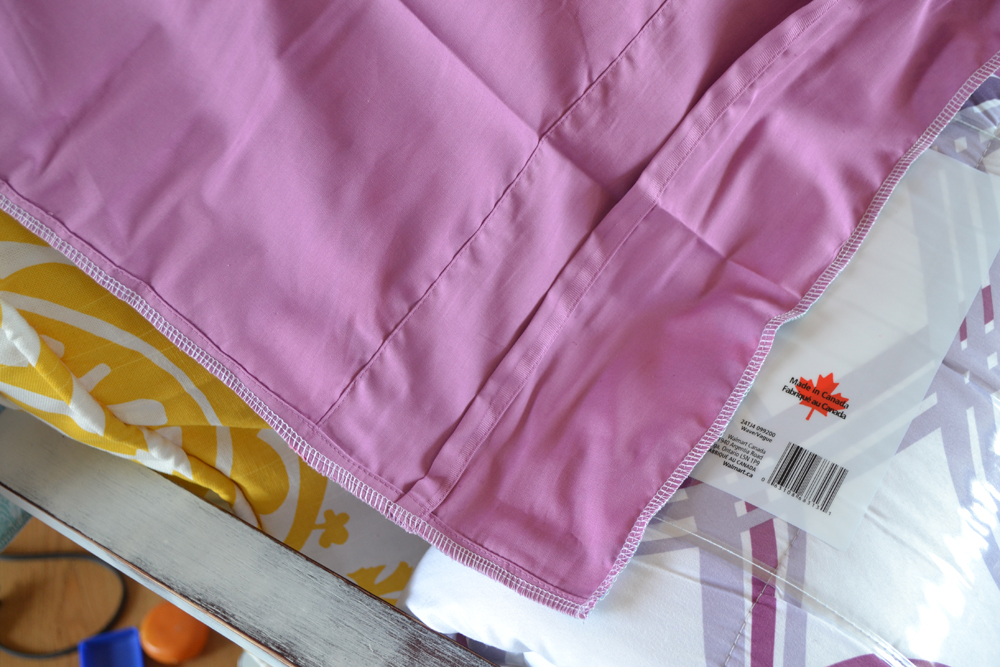
    Pin the right side of the sheet to the right side of your duvet front. Sew around the entire perimeter.

    Sew a Patchwork Duvet Cover by The DIY Mommy

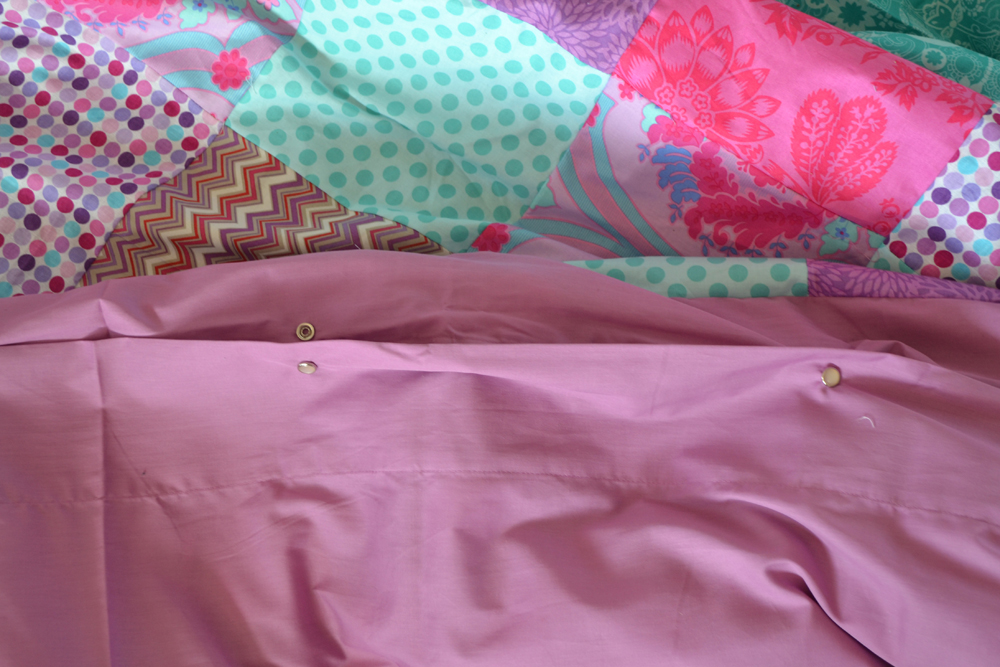
    Turn the duvet cover right side out (using the hole in the backside/sheet side). Fasten snaps about 6" apart along the opening. You can also sew on buttons and sew button holes. Whatever you prefer!

    Sew a Patchwork Duvet Cover by The DIY Mommy

    Insert your duvet into the duvet cover, snap it up and you're done!

    Little C had to make it into a fort over our chairs for its initiation.

    Sew a Patchwork Duvet Cover by The DIY Mommy

    Sew a Patchwork Duvet Cover by The DIY Mommy

    Sew a Patchwork Duvet Cover by The DIY Mommy

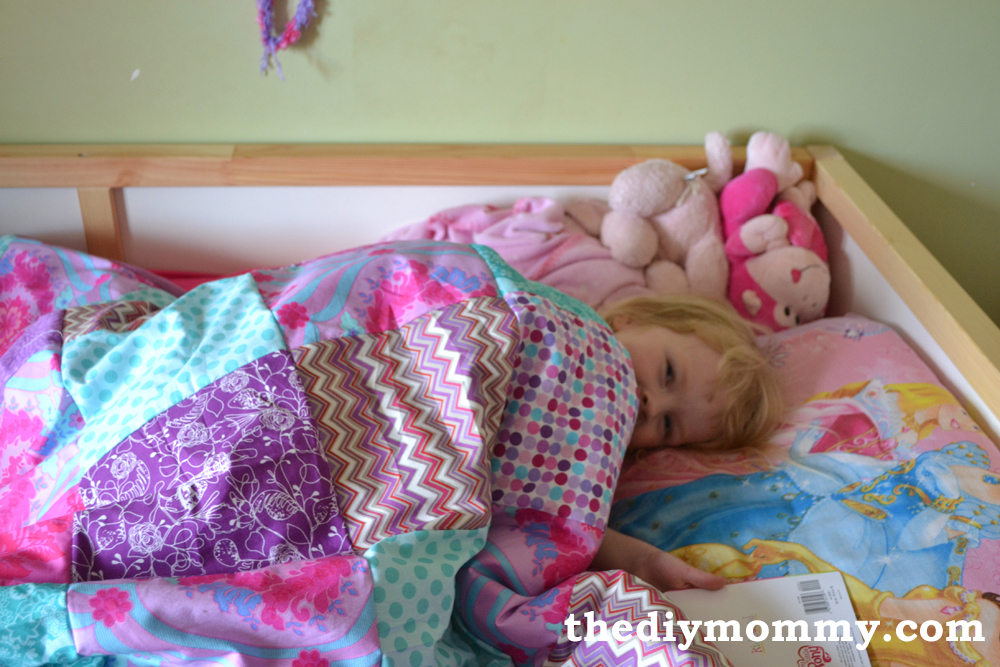
    My purple, pink and turquoise loving girl is snug as a bug in a rug... and ready to bring her fancy new duvet to our new home!

    More Inspiration

    • Introducing my NEW Canva Mood Board Templates & Mini Course!
    • We built a small bathroom wet room from scratch!
    • DIY Dollar Tree Heart Shaped Wreath
    • 10 Best IKEA Organization Products under $20

    Reader Interactions

    Comments

    1. Christy

      May 08, 2013 at 2:51 pm

      You make it look so easy! 🙂 What a great piece for your little one to have - completely personalized and made with love!

      Reply
      • Christina Dennis

        May 10, 2013 at 12:49 am

        Thanks, Christy. Little C loves her new blankie!

        Reply
    2. Amanda | naturalmommie.com

      May 08, 2013 at 2:53 pm

      It turned out beautifully. And you make it look so easy!! Actually, I think I might be able to swing this..have to get a rotary cutter thinger - that probably makes a huge difference, right?

      Reply
      • Christina Dennis

        May 10, 2013 at 12:49 am

        Thanks, Amanda. You could totally do this! Yes - a rotary cutter makes it SO much easier to cut straight lines. It's much faster than scissors!

        Reply
    3. Kerrie @ Family Food and Travel

      May 08, 2013 at 8:36 pm

      This is so beautiful! Love that it is customized and that you made it. Makes me feel sad that I can't sew. I keep telling myself I will learn.

      Reply
      • Christina Dennis

        May 10, 2013 at 12:46 am

        Thank you, Kerrie! My mom taught me to sew when I was little, but I only really picked it up again a few years ago. It just takes some practice, but I bet you'd catch on quick if you wanted to learn. 🙂

        Reply
    4. Elizabeth L

      May 09, 2013 at 12:11 pm

      Oh this is pretty, and it doesn't look too hard to do. My sister was talking about making one so I'm going to show her this tutorial!

      Reply
      • Christina Dennis

        May 10, 2013 at 12:45 am

        Thanks, Elizabeth. This really is quite easy - I think it would be a great beginner's sewing project!

        Reply
    5. Judith

      May 10, 2013 at 8:21 pm

      Gorgeous! What an awesome idea. I was looking everywhere for wide-width organic cotton fabric for the wool duvet I made my daughter - but this would have saved me the trouble! Definitely going to do this for the next one!

      Reply
      • Christina Dennis

        May 13, 2013 at 9:33 am

        Thanks, Judith. Yes - this works really well if you want to use a fabric that's not wide enough for a duvet!

        Reply
    6. Rachel Hodges

      December 15, 2013 at 5:29 pm

      I love this! What great colors you chose. Your directions make it nice and simple. One of the best ones for duvet covers I've seen yet!

      Reply
      • Christina Dennis

        December 15, 2013 at 9:48 pm

        Thanks so much, Rachel! My daughter picked the colours and I think they're so fun. Thanks so much for visiting my blog!

        Reply
    7. Lauren

      February 13, 2014 at 8:07 pm

      Love the fabric!
      You don't happen to remember the name or designer of the hot pink/turquoise tropical looking print do you? Or where you got it? I can't find it anywhere!

      Reply
      • Christina Dennis

        February 15, 2014 at 10:32 pm

        Thanks, Lauren! Unfortunately that fabric seems to be out of print now - I looked for it again later to make some matching things. 🙁 It was by Jennifer Paganelli and the line was called "Crazy Love".

        Reply
    8. Brittany

      August 10, 2014 at 7:26 pm

      Could you explain how to make the button band part better? I can't quite follow that part! 🙂

      Reply
    9. Sonya

      February 18, 2017 at 7:45 pm

      How many squares of each of the 11 different fabrics did you cut?

      I'm trying to make one for my daughter as we redo her bedroom into a Paris theme.

      Reply
      • Lindsay - The DIY Mommy

        February 20, 2017 at 1:39 pm

        Hello Sonya, Christina used "8 squares of each of the 11 different fabrics" 🙂

        Reply
    10. Visitor

      December 18, 2017 at 10:08 am

      So you used 1 sheet? Then the quilted top rests directly on the comforter. I was thinking of using 2 sheets. One is attached to the quilted top (and you run some stitches to quilt it place). The other sheet attached as stated above. Would’t This method protect the quilt underside better? I’m concerned the seams would be too stressed without it.

      Reply
      • Lindsay - The DIY Mommy

        December 19, 2017 at 8:12 am

        Christina did use one sheet. You can try your method of two sheets if you feel it would protect better. Christina hasn't had any issues at all. Let us know how your turns out 😀

        Reply
      • Mary

        March 09, 2018 at 6:49 pm

        That is what I am going to do for my dtr's queen size duvet with the patchwork top I made for her. So glad I found this though, I couldn't figure out how to put together nicely. This should work! Yeah one more UFO done!

        Reply
    11. Jean Campbell

      August 14, 2020 at 4:58 am

      You have inspired me to make a patchwork duvet cover for our kingsized duvet. I am redecorating our bedroom and it is an excellent way to use up the many bits of material i have. It will remind me of the wonderful holiday we had in Alberta and British Columbia in 2017 when we took our teenage grandson on a trip from Calgary into the Rocky Mountains in a mobile home and then flew to Vancouver. You live in a beautiful country. We have gorgeous and great mountains in theScottish highlands where our grandson is lucky enough to live but nothing prepared us for the Rocky mountain range.and the colour of Lake Abraham.

      Reply

    Trackbacks

    1. 29 Cool DIYs to Make For Your Bed - DIY Projects for Teens says:
      February 5, 2017 at 4:44 pm

      […] thediymommy […]

      Reply
    2. Awesome DIYs to Make For Your Bed - DIYCraftsGuru says:
      June 3, 2017 at 2:28 am

      […] thediymommy […]

      Reply
    3. Amazing DIYs to Make For Your Bed says:
      June 23, 2017 at 6:19 am

      […] thediymommy […]

      Reply
    4. Diese 33 DIY Bettbezüge Beat alles, was Sie kaufen können - Dekorationen says:
      August 28, 2018 at 7:08 am

      […] Thediymommy […]

      Reply
    5. Cool DIY Duvet Cover Patterns says:
      October 8, 2018 at 7:08 am

      […] The DIY Mommy […]

      Reply
    6. DIY Ideas Compilation 68 - Irga Mag says:
      June 25, 2019 at 5:50 pm

      […] thediymommy thediymommy […]

      Reply
    7. DIY Ideas Compilation 67 - Irga Mag says:
      June 30, 2019 at 8:11 am

      […] thediymommy thediymommy […]

      Reply
    8. 33 DIY Duvet Covers For Dreamy Bedroom Decor says:
      October 16, 2020 at 3:53 am

      […] thediymommy […]

      Reply
    9. 'Thrift Flipping' Is A Trend That Gives Old Clothes New Life ⋆ says:
      October 26, 2020 at 8:57 pm

      […] you’re not losing out. Be zen-like about it if you ruin it. Would you have kept it anyway? No? Make a damn patchwork duvet cover then. You can buy an old quilt at Goodwill and give it new life. Simplest thrift flip out there, and you’re not wasting […]

      Reply
    10. ‘Thrift Flipping’ Is A Trend That Gives Old Clothes New Life says:
      October 27, 2020 at 4:10 am

      […] not losing out. Be zen-like about it if you ruin it. Would you have kept it anyway? No? Make a damn patchwork duvet cover then. You can buy an old quilt at Goodwill and give it new life. Simplest thrift flip out there, and you’re not wasting […]

      Reply
    11. 29 Cool DIYs to Make For Your Bed | Ignacio Purcell Mena - DIY Do it yourself says:
      December 17, 2020 at 5:49 am

      […] thediymommy […]

      Reply
    12. Simple Bedspreads are Back, Baby! - HomeDecorCraze says:
      November 2, 2022 at 1:54 pm

      […] get your dream version of the simple bedspreads trend, you could even make a quilt yourself in your favorite pastel […]

      Reply

    What do you think? Cancel reply

    Your email address will not be published. Required fields are marked *

    This site uses Akismet to reduce spam. Learn how your comment data is processed.

    Primary Sidebar

    Welcome!

    Christina Dennis, The DIY Mommy

    I'm Christina and I'm sharing budget-friendly DIY & decor ideas to create a cozy home and life you love!

    Read more about me

    Latest Posts

    • Introducing my NEW Canva Mood Board Templates & Mini Course!
    • We built a small bathroom wet room from scratch!
    • Creative And Unique DIY Wall Art Ideas

    What's my home decor style?

    Discover the home decor style that best fits your personality and lifestyle. This two-minute quiz is going to give you the direction you need to start the big, bold room makeovers that you've always wanted to try!

    Find out now!

    Archives

    Footer

    ↑ back to top

    About

    • About The DIY Mommy
    • Privacy Policy
    • Disclosure Policy
    • Terms of Service

    Newsletter

    • Sign Up! for emails and updates

    Contact

    • Contact

    As an Amazon Associate I earn from qualifying purchases.

    Copyright © 2009 - 2023 The DIY Mommy. "The DIY Mommy" is a registered trademark.