• Skip to primary navigation
  • Skip to main content
  • Skip to primary sidebar
The DIY Mommy
  • Home Decor
  • DIY Crafts
  • Organize
  • Printables
  • Recipes
  • Life
  • Shop My Home
  • Lake House
  • About
  • Contact
    • Facebook
    • Instagram
    • Pinterest
    • Twitter
    • YouTube
menu icon
go to homepage
search icon
Homepage link
  • Home Decor
  • DIY Crafts
  • Clean & Organize
  • Recipes
  • Free Printables
  • Life
  • Our Little Lake House
  • Shop Our Home
  • About
  • Contact
    • Facebook
    • Instagram
    • Pinterest
    • Twitter
    • YouTube
  • ×

    Home » DIY Crafts

    Make DIY Dark or Coloured Wax (+ My Upcycled Side Table)

    Published: May 2, 2014 · Modified: May 12, 2014 by Christina Dennis · This post may contain affiliate links · This blog generates income via ads · 12 Comments

    So, painting things now takes about 1.3 billion times longer now that I have three kids and a newborn in the house. This little painted side table project took me about 2 weeks, and I finished ONE out of THREE. Ha!

    DIY Shabby Chic End Table with DIY Chalk Paint and DIY Dark Metallic Wax

    My technique is to sneak away for about 5 minutes at a time to work on projects as I keep one eye on the kiddos and the other on my paint brush. Can you relate?

    DIY Shabby Chic End Table with DIY Chalk Paint and DIY Dark Metallic Wax

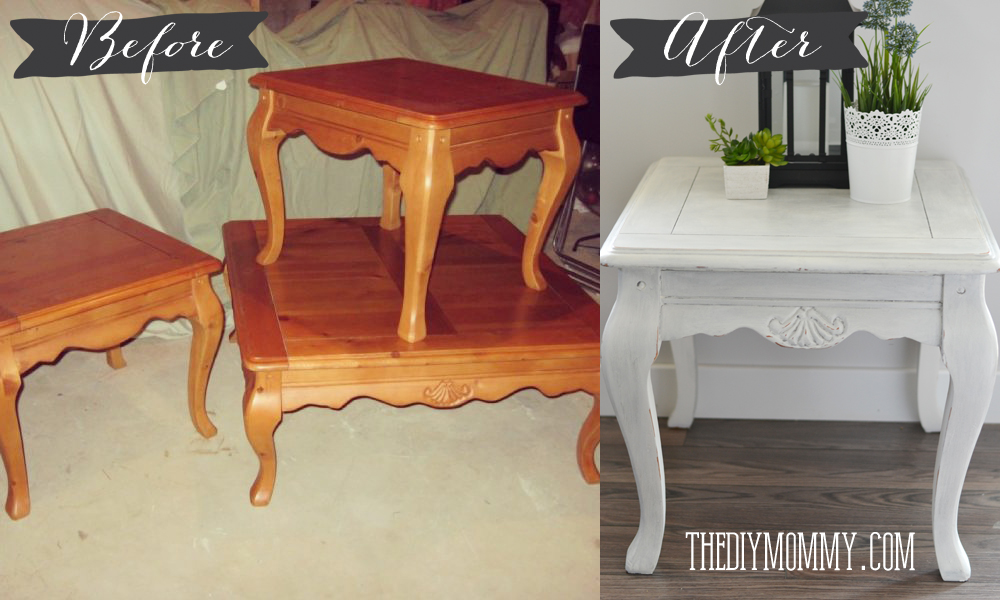
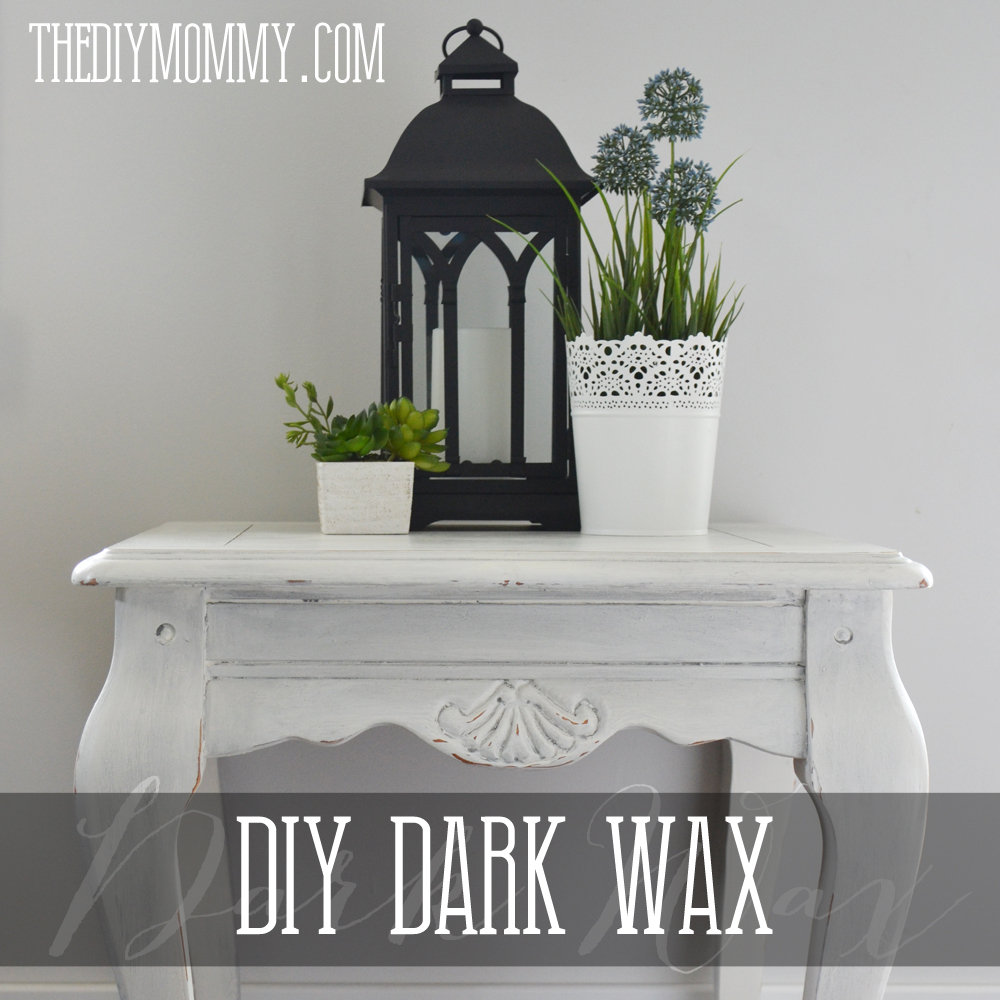
    I found a set of two side tables and a coffee table on Kijiji a little while ago that I thought would be perfect for my front room. They have a pretty, French Provincial-esque shape to them, but they were a yucky orange and laquer finish. With some DIY chalk paint (you can find my recipe here) and some DIY dark metallic silver wax, I'm slowly transforming them into some sweet shabby chic pieces!

    DIY Shabby Chic End Table with DIY Chalk Paint and DIY Dark Metallic Wax

    First, I wiped down the table with vinegar to get rid of any residue. I made a small batch of DIY chalk paint using a warm white latex paint as the base, and painted the table with a brush.

    I let the first coat dry, sanded it lightly, and then painted a second coat. After that dried, I sanded again and painted a third coat (you probably wouldn't have to do this many coats if you aren't using white).

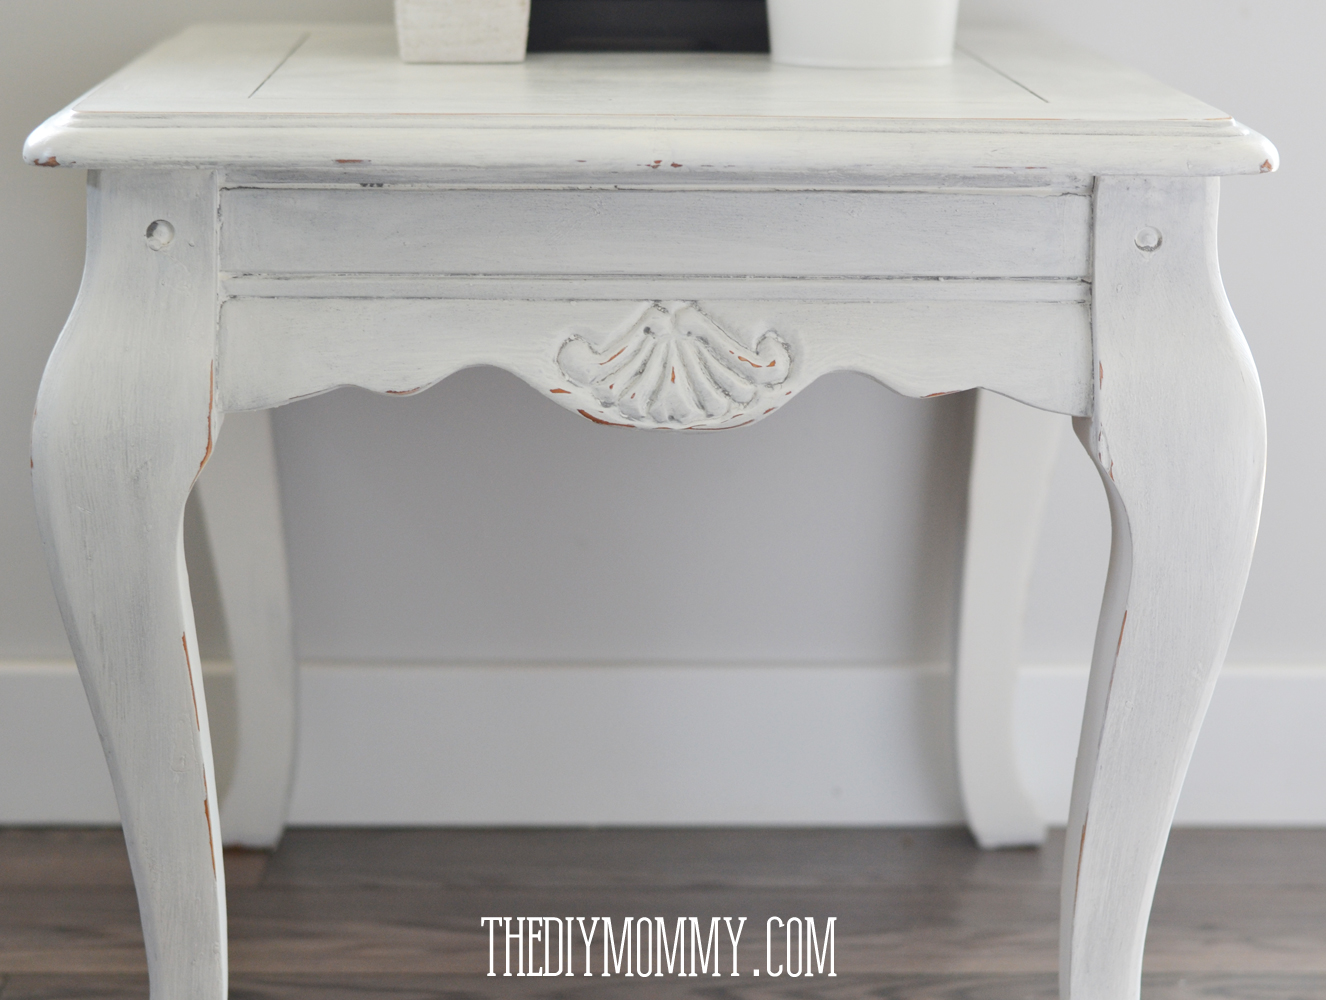
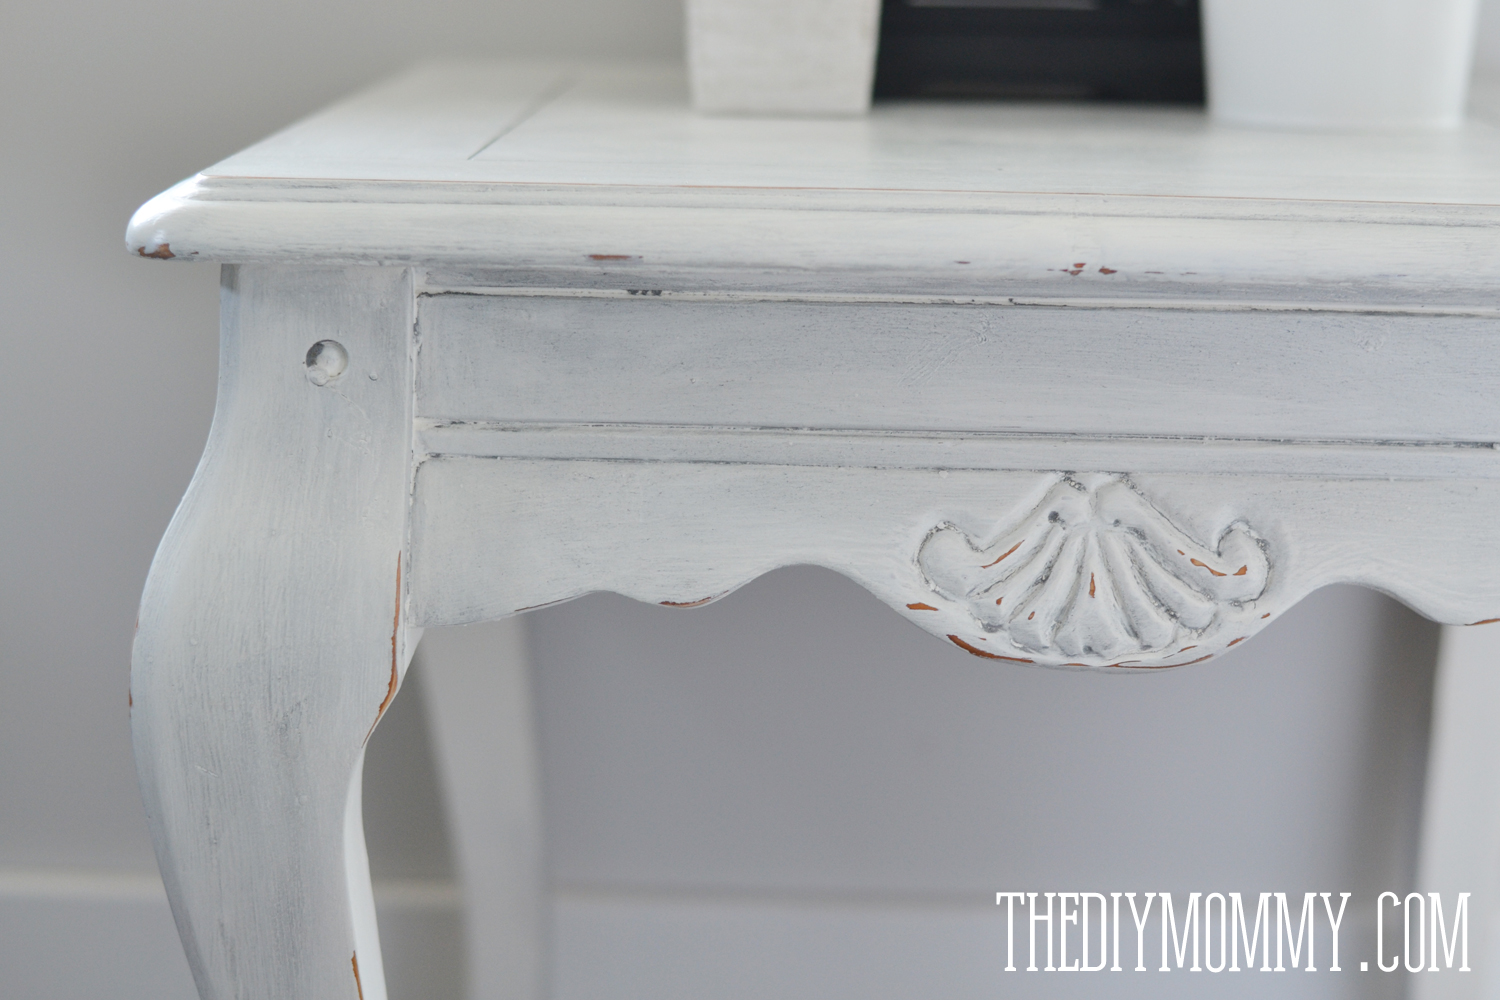
    Then, I lightly sanded the areas right down to the original wood that would naturally get some wear and tear (the corners, the high spots) to give the piece a distressed, time-worn look.

    DIY Shabby Chic End Table with DIY Chalk Paint and DIY Dark Metallic Wax

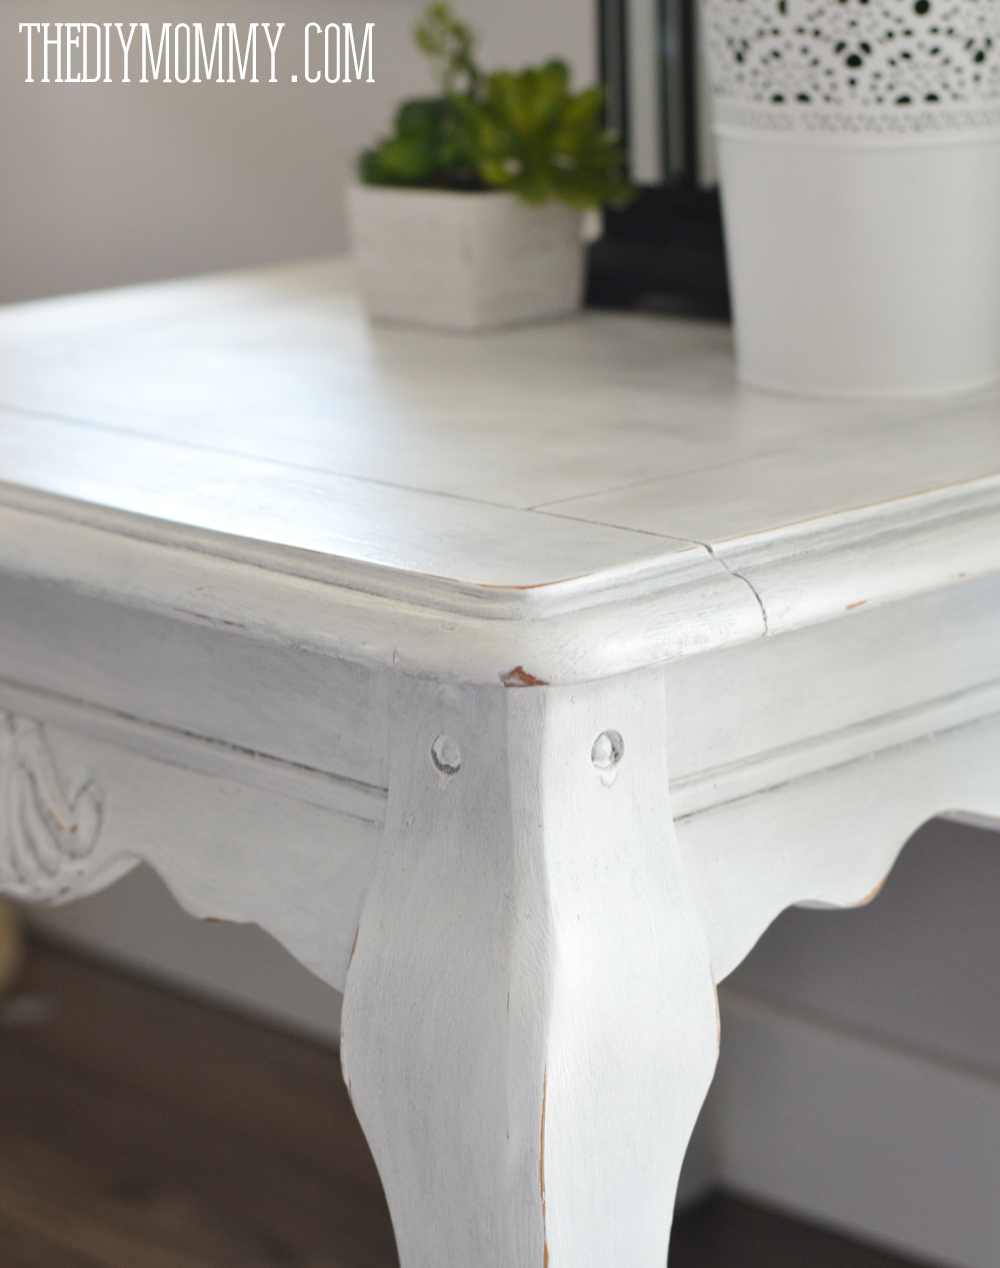
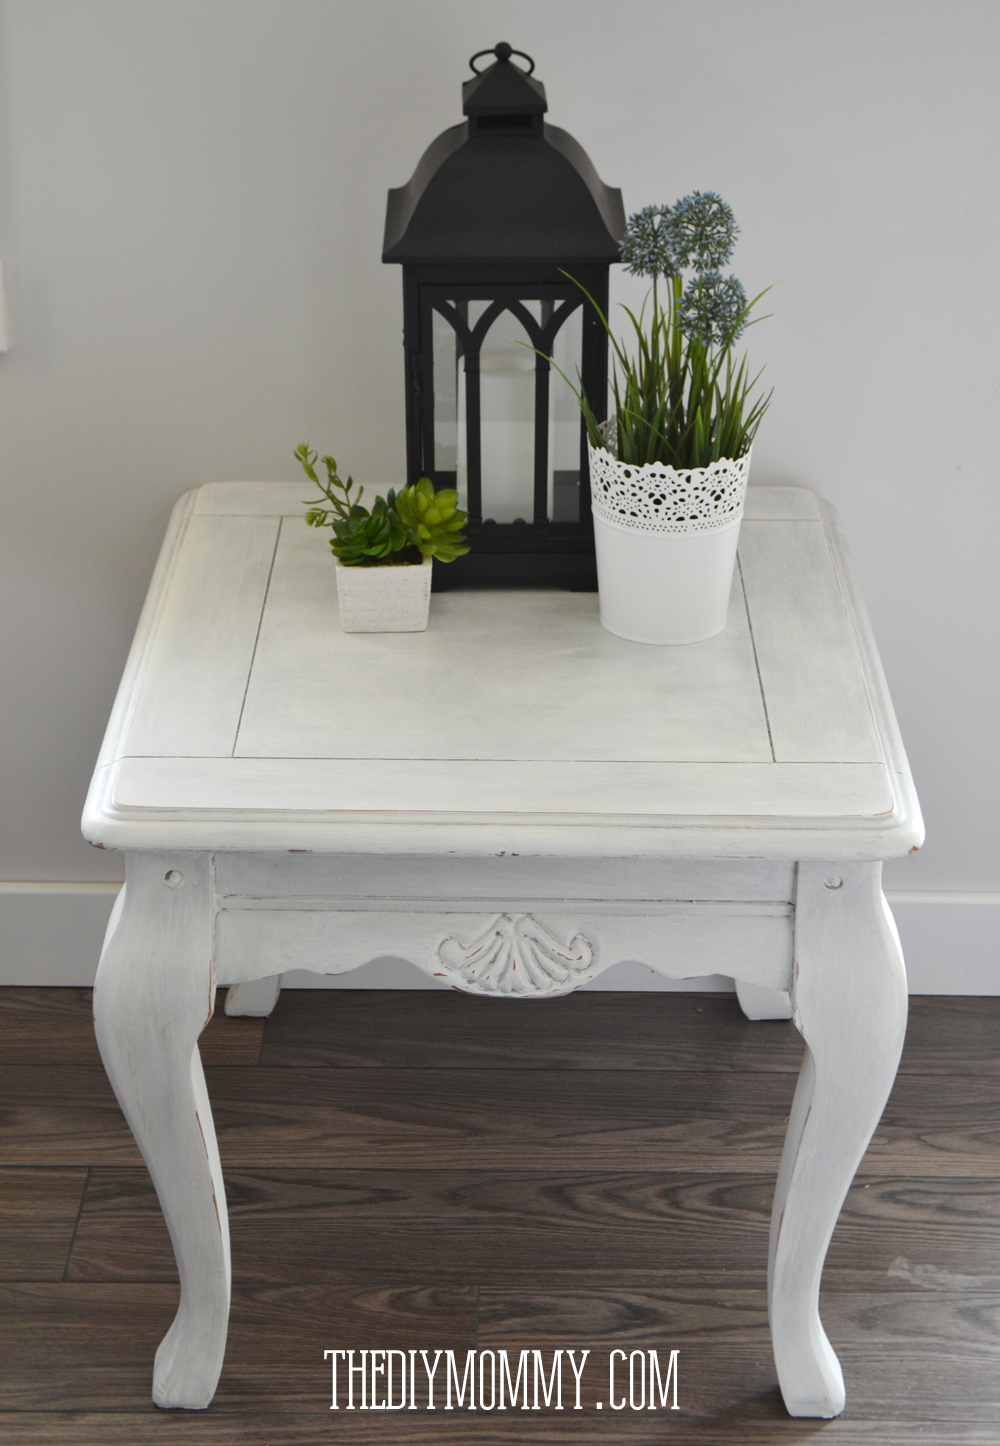
    Finally, I made a small batch of DIY dark silver metallic wax (scroll down to see how I made it!) and waxed & buffed the table (with an old t-shirt cut into pieces) one section at a time. The dark wax smushed into the cracks and crevices of the table to really highlight them and give so much dimension to the piece! The silver metallic makes the table sparkle too.

    I'm so happy with the results and I can't wait to tackle my other tables in this set!

    DIY Shabby Chic End Table with DIY Chalk Paint and DIY Dark Metallic Wax

    Here's how I made my DIY dark silver metallic wax:

    DIY Dark or Tinted Furniture Wax by The DIY Mommy

    I've seen so many gorgeous chalk-painted pieces finished with a darker wax and I love the look. So much dimension! Plus, you're really doing two steps in one (glazing and waxing). It's perfect for the time-deprived. I wondered if dark wax could be DIY'd, and then I found a great tutorial over at Salvaged Inspirations that inspired me to make my own too!

    Materials:

    • clear furniture wax (I used the Minwax brand, found at Home Depot)
    • dark acrylic or latex paint (I used a dark silver acrylic for added sparkle)

    Directions:

    Place a few tablespoons of furniture wax into a container (I've read of people melting it on the stove, but I thought this step seemed stinky and unnecessary). For every tablespoon of wax, mix in one teaspoon of paint. Mash them together and mix well with a metal spoon or wooden paint stick.

    To apply to furniture, use a piece of cheesecloth or torn up knit jersey from an old t-shirt and rub it in a circular motion onto the piece. I found working in smaller sections worked well. Smush the wax into the cracks and crevices of the furniture. Then, buff the wax with a clean cheesecloth or t-shirt in a circular motion until the wax shines and is spread evenly.

    DIY Shabby Chic End Table with DIY Chalk Paint and DIY Dark Metallic Wax

    Now I want to paint and wax everything. Don't be surprised if you see me painting my heart out during nap time on Instagram over the next while. Happy Painting!

    More Inspiration

    • DIY Dollar Tree Heart Shaped Wreath
    • How to Set Up a Cricut for the First Time (Step by Step!)
    • Inexpensive Gift Wrapping Ideas that look stunning!
    • Free Printable Christmas Coupon Book for Kids

    Reader Interactions

    Comments

    1. Sara Gibson

      May 02, 2014 at 5:23 pm

      Good for you, Christina! No matter how long it takes, you're still turning out beautiful projects!

      Reply
      • Christina Dennis

        May 05, 2014 at 10:32 pm

        Thanks, Sara! It's fun to steal away for even 5 minutes at a time to spend a little bit of time on a creative project. 🙂

        Reply
    2. Mark @ Kitchen Remodeling

      May 11, 2014 at 6:10 am

      Nice DIY! Very creative idea. Thanks for the inspiration!

      Reply

    Trackbacks

    1. A grey and cream master bedroom design with DIY pillow covers | The DIY Mommy says:
      May 26, 2014 at 9:31 am

      […] of using what I had, I carried up one of the side tables I re-painted to use as a nightstand on my side of the bed. I’m going to eventually use them for our formal […]

      Reply
    2. Upcycled Gold Dry-Brushed Table (+ How to Dry Brush) | The DIY Mommy says:
      June 19, 2014 at 9:00 am

      […] example, was part of a trio of tables I bought off of Kijiji that was crying out for a new look. The side tables were done in white chalk paint and DIY dark silver wax, and I did something a little different with the coffee table. This was a very random, […]

      Reply
    3. DIY End Tables That Look Stylish and Unique says:
      July 28, 2015 at 4:49 am

      […] The DIY Mommy upcycled piece that was freshened with some DIY made chalk paint. So, essentially you’re getting to know two different do-it-yourself techniques in one tutorial! […]

      Reply
    4. Awesome DIY End Tables - 12thBlog says:
      September 3, 2015 at 3:28 am

      […] The DIY Mommy […]

      Reply
    5. Stunning DIY End Tables says:
      October 27, 2015 at 1:32 pm

      […] The DIY Mommy […]

      Reply
    6. 35 DIY End Tables - DIYCraftsGuru says:
      June 3, 2016 at 7:39 am

      […] thediymommy […]

      Reply
    7. 38 Stylish DIY Side Table Plans with Tuitorials - Lemon Slide says:
      November 22, 2017 at 7:54 pm

      […] Build this table […]

      Reply
    8. 31 DIY End Tables – PinkDIY.com says:
      August 8, 2020 at 5:47 pm

      […] thediymommy […]

      Reply
    9. 23 Best DIY Shabby Chic Furniture Ideas and Designs For 2022 says:
      August 27, 2022 at 12:42 pm

      […] DIY Project Details: thediymommy.com […]

      Reply

    What do you think? Cancel reply

    Your email address will not be published. Required fields are marked *

    This site uses Akismet to reduce spam. Learn how your comment data is processed.

    Primary Sidebar

    Welcome!

    Christina Dennis, The DIY Mommy

    I'm Christina and I'm sharing budget-friendly DIY & decor ideas to create a cozy home and life you love!

    Read more about me

    Latest Posts

    • Introducing my NEW Canva Mood Board Templates & Mini Course!
    • We built a small bathroom wet room from scratch!
    • Creative And Unique DIY Wall Art Ideas

    What's my home decor style?

    Discover the home decor style that best fits your personality and lifestyle. This two-minute quiz is going to give you the direction you need to start the big, bold room makeovers that you've always wanted to try!

    Find out now!

    Archives

    Footer

    ↑ back to top

    About

    • About The DIY Mommy
    • Privacy Policy
    • Disclosure Policy
    • Terms of Service

    Newsletter

    • Sign Up! for emails and updates

    Contact

    • Contact

    As an Amazon Associate I earn from qualifying purchases.

    Copyright © 2009 - 2023 The DIY Mommy. "The DIY Mommy" is a registered trademark.